How to Make Homemade Granola: The Science Behind Every Ingredient

Store-bought granola has one persistent problem: the good stuff is expensive, and the cheap stuff tastes like sweetened cardboard. Making it at home costs a fraction of the price, takes about 30 minutes of active effort, and — more importantly — you control every ingredient. No mystery oils, no surprise sugar spikes, no raisins if you hate raisins.
This guide walks through the full process, from choosing your oats to storing the finished batch, with practical tips that actually make a difference.
The Core Ingredients (and Why Each One Matters)
Homemade granola is built on a short, flexible formula. Once you understand what each component does, you can swap and experiment endlessly without ruining a batch.
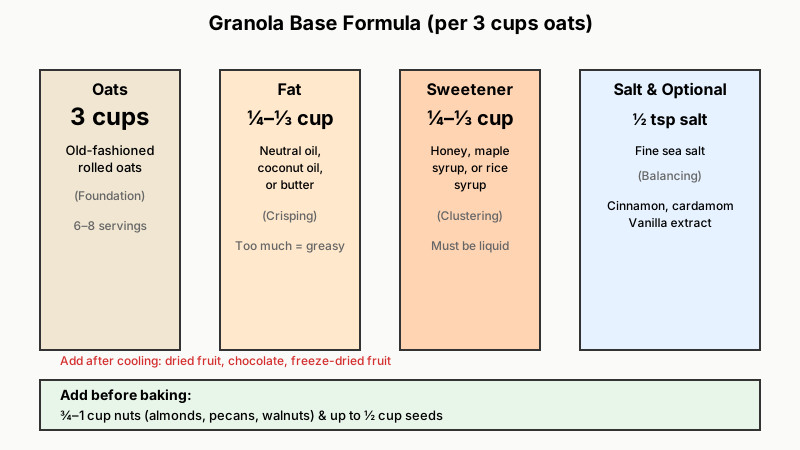
Oats: The Foundation
Use old-fashioned rolled oats, not quick oats and not steel-cut. Quick oats are too thin — they toast unevenly and often turn powdery. Steel-cut oats stay hard even after baking. Rolled oats have just the right surface area to crisp up and cluster well.
Aim for 3 cups as your base quantity. That yields roughly 6–8 servings, depending on how generously you pour.
Fat: The Crisping Agent
Fat coats the oats and nuts, conducts oven heat evenly, and creates that satisfying crunch. The most commonly used options are:
- Neutral oils (avocado, light olive, refined coconut): Blend seamlessly into the background.
- Virgin coconut oil: Adds a faint coconut note that pairs well with tropical mix-ins.
- Butter: Produces a richer, almost cookie-like flavor. Use unsalted.
Use about ¼ to ⅓ cup of fat per 3 cups of oats. Too little and the granola won’t crisp; too much and it turns greasy.
Sweetener: Flavor and Cluster Formation
Sweetener does two jobs: it flavors the oats and — when it caramelizes in the oven — it glues clusters together. Liquid sweeteners work far better than granulated sugar for clustering.
- Honey: Classic choice. Floral, amber, and slightly sticky.
- Pure maple syrup: Deeper, slightly smoky sweetness. Vegan-friendly.
- Brown rice syrup: Very sticky, creates chunky clusters, but milder in flavor.
A ratio of ¼ cup sweetener per 3 cups oats gives gentle sweetness. Increase to ⅓ cup if you prefer a more dessert-like result.
If you love applying kitchen science to baked treats, How to Bake Cookies That Stay Soft: The Science Of Chewy Batches explores similar principles of sugar and moisture that keep cookies chewy instead of crisp.
Salt: Non-Negotiable
A measured ½ teaspoon of fine sea salt per batch is one of those small details that separates genuinely good granola from bland granola. Salt amplifies the nuttiness of the oats and balances the sweetener. Don’t skip it.
Mix-ins: Nuts, Seeds, and More
Add these before baking:
- Nuts (almonds, pecans, walnuts, cashews): roughly chopped, about ¾ to 1 cup
- Seeds (pumpkin, sunflower, sesame, hemp): up to ½ cup
- Rolled coconut flakes: ½ cup (add for the last 8–10 minutes only — they burn fast)
Add these after baking once the granola is completely cool:
- Dried fruit (cranberries, apricots, cherries, chopped dates)
- Chocolate chips or cacao nibs
- Freeze-dried fruit
Heat destroys moisture-rich mix-ins and makes chocolate chips turn into a mess. Add them cold.

If you enjoy the crunch-engineering side of granola, you’ll also appreciate Homemade Croutons: The Easy Guide to Perfect Results, which applies similar toasting principles to bread instead of oats.
Step-by-Step: How to Make Homemade Granola
Here is a reliable base recipe that you can adapt from batch to batch.
Base Recipe (makes about 4 cups finished granola)
- 3 cups old-fashioned rolled oats
- ¾ cup raw nuts (almonds and pecans work well together)
- ¼ cup seeds (pumpkin or sunflower)
- ¼ cup neutral oil or melted coconut oil
- ¼ cup pure maple syrup or honey
- 1 tsp vanilla extract
- ½ tsp fine sea salt
- Optional: ½ tsp cinnamon, ¼ tsp cardamom
Step 1: Preheat Your Oven — and Use the Right Temperature
Set your oven to 325°F (163°C). This is the sweet spot. At 350°F or above, the edges of your granola can char before the center is dry. At 300°F, it takes forever. 325°F gives even, controlled toasting.
Line a large rimmed baking sheet (a half-sheet pan, roughly 18×13 inches) with parchment paper. The rimmed edges are important — they keep oats from sliding off when you stir.
Step 2: Mix the Wet Ingredients Separately
Whisk your oil, sweetener, vanilla, and salt together in a small bowl or liquid measuring cup. Whisking briefly before combining helps everything emulsify slightly and coat the dry ingredients more uniformly.
Step 3: Combine and Coat
In a large mixing bowl, combine the oats, nuts, and seeds. Pour the wet mixture over the dry ingredients and stir thoroughly until every oat is coated. Spread the mixture in an even, single layer on your prepared baking sheet. Resist the urge to pile it thick — thin layers toast evenly.
Step 4: Bake Low and Slow (With a Key Trick)
Bake for 25–35 minutes total, but stir the granola once, at the halfway point. This ensures even browning. Look for a light golden color across the pan — it will look slightly underdone when you pull it out, and that is correct.
The most important rule: Do not judge doneness by texture while it is hot. Granola crisps up as it cools. If you bake it until it feels crunchy in the oven, it will be overbaked and bitter by the time it cools.
Step 5: The Cluster Secret
If you want chunky clusters, press the granola down firmly with a spatula after you remove it from the oven. Then — and this requires patience — let it cool completely on the pan without disturbing it, at least 20 minutes. The caramelized sweetener hardens as it cools, bonding the clusters. Stirring it while warm breaks those bonds before they set.
Step 6: Add Cold Mix-ins and Store
Once fully cool, break the granola into pieces (or leave it in slabs if you want big clusters), then stir in dried fruit, chocolate chips, or whatever cold additions you prefer.
Store in an airtight container — a glass jar with a tight lid works particularly well — at room temperature. Properly dried granola stays fresh for 2–3 weeks. For longer storage, freeze it in a zip-lock bag for up to 3 months; it thaws quickly at room temperature.

Troubleshooting Common Granola Problems
Even with a solid recipe, a few things can go wrong. Here is how to fix them.
It Turned Out Soft, Not Crunchy
Two likely causes: either the granola wasn’t baked long enough to drive off moisture, or it was stored in a container that wasn’t fully airtight. If you notice it softening after a few days, spread it back on the baking sheet and toast it in a 300°F oven for 10–15 minutes to re-crisp it.
It Burned on the Edges but Is Raw in the Middle
Your oven runs hot (extremely common), or the pan was overcrowded. Try dropping to 300°F and using two pans instead of one thick layer.
There Are No Clusters
Clusters require: (a) enough sweetener to act as glue, (b) pressing the granola flat after baking, and (c) leaving it untouched until completely cool. If all three conditions were met and you still get no clusters, try adding 1 tablespoon of brown rice syrup or an egg white to the wet mixture — both are strong binders.
It Tastes Bland
Under-salted and under-spiced. Increase salt to ¾ teaspoon. Add warm spices (cinnamon, ginger, cardamom). A tablespoon of tahini, almond butter, or miso paste in the wet mixture adds a savory depth that genuinely elevates the flavor without being obvious.
Flavor Variations Worth Trying
Once you have the base down, granola becomes one of the most adaptable things in your kitchen.
Tropical Granola: Coconut oil + honey + macadamia nuts + shredded coconut (added late) + dried mango after baking.
Chocolate Hazelnut: Add 2 tablespoons of cocoa powder to the wet mix + hazelnuts + cacao nibs added after baking.
Savory Granola: Reduce sweetener to 1 tablespoon, add a teaspoon of soy sauce to the wet mix, use pumpkin seeds and almonds, add dried rosemary or smoked paprika. Excellent on yogurt with savory toppings or on soup.
High-Protein Granola: Add ¼ cup hemp seeds and ¼ cup chopped walnuts. Stir in 2 tablespoons of nut butter with the wet ingredients. Top with a drizzle of Greek yogurt when serving.
Nut-Free School-Safe: Replace all nuts with seeds — pumpkin, sunflower, and sesame. Use sunflower seed butter in the wet mix. Same texture, different flavor.

Serving Ideas Beyond Breakfast
Granola is not only for topping yogurt, though that pairing is hard to beat. Consider:
- Parfaits: Layer granola with Greek yogurt and fresh berries in a glass. Build it right before serving so the granola stays crunchy.
- Smoothie bowls: Use as a textural topping over blended frozen fruit.
- Ice cream topping: A handful of granola over vanilla ice cream with a drizzle of honey is a legitimate dessert.
- Fruit crumble topping: Press granola over sliced peaches or apples before baking. It bakes into a crisp topping in about 20 minutes at 375°F.
- Trail mix base: Mix granola with additional nuts, seeds, and dark chocolate for an on-the-go snack.
- Salad crouton substitute: Savory granola on a roasted beet or butternut squash salad adds crunch without gluten.
For more ways to round out a healthy meal built around your granola, check out 12 Homemade Salad Dressing Recipes Worth Making.
Conclusion
Making homemade granola is genuinely one of the highest-return kitchen projects you can do: low cost, quick active time, long shelf life, and the results are almost always better than anything in a box. The fundamentals are simple — rolled oats, fat, sweetener, salt, heat — but the details matter. Respect the temperature, press it flat, and let it cool completely before you touch it.
After your first successful batch, adjust from there. More clusters, less sweet, more spice, different nuts — it is your recipe now. Most people who start making their own granola stop buying it permanently within a month or two. That says something.