How to Bake Sourdough Bread from Scratch: One Living Starter, No Yeast

Making sourdough bread from scratch is one of the most satisfying things you can do in a kitchen. You don’t need a fancy mixer, a proofing chamber, or years of experience. What you need is time, flour, water, salt — and a living starter you’ve coaxed into existence yourself.
This guide walks you through every stage: building and maintaining your starter, mixing and fermenting your dough, shaping, scoring, and baking. By the end, you’ll understand why each step matters, not just what to do.

Part 1: Building Your Sourdough Starter
A sourdough starter is a fermented mixture of flour and water that captures wild yeast and lactic acid bacteria from your environment. These microorganisms leaven your bread and give it that characteristic tang. There are no shortcuts here — it takes 7 to 14 days to develop a reliable starter.
What “Ready to Bake With” Looks Like
The routine is simple even if the wait isn’t: mix equal weights of flour and water in a clean jar, then once a day discard all but a small portion and feed it fresh flour and water. Whole wheat or rye for the first few days carries more wild yeast than white flour; use unchlorinated water and keep the jar somewhere around 70–75°F (21–24°C).
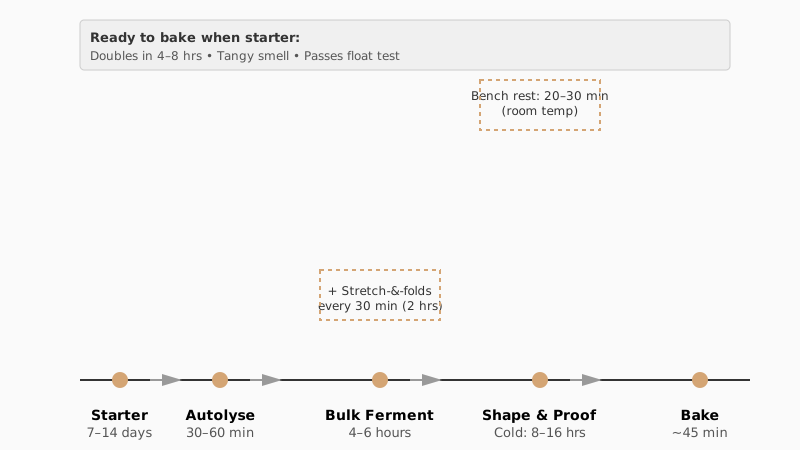
Your starter is ready for bread when three things are true at once: it reliably doubles in size within 4–8 hours of feeding, it smells pleasantly tangy rather than sharp like nail polish, and it passes the float test — a spoonful dropped into water floats instead of sinking.
Building one from scratch is a whole subject of its own. The day-by-day schedule, what to do about hooch and discoloration, refrigerator storage, and how to use the discard are all covered in How to Start a Sourdough Starter. If you already have an active starter, feed it the night before and carry on below.
Part 2: Making the Dough
This recipe produces one round loaf (boule), roughly 900g baked weight. Scale up proportionally for two loaves.
Ingredients
| Ingredient | Weight | Baker’s Percentage |
|---|---|---|
| Bread flour | 450g | 90% |
| Whole wheat flour | 50g | 10% |
| Water | 350g | 70% |
| Active sourdough starter | 100g | 20% |
| Fine sea salt | 10g | 2% |
A hydration of 70% is manageable for most beginners — the dough is workable without being a sticky mess. As your confidence grows, you can push to 75–80% for a more open crumb.
Step 1: Autolyse (30–60 minutes)
Combine the flours and 330g of the water (reserve 20g for later). Mix with your hand until no dry flour remains. Cover and rest for 30–60 minutes. This rest hydrates the flour and begins gluten development before you’ve done any kneading — the result is a smoother, more extensible dough.
Step 2: Add Starter and Salt
Add your active starter to the dough. Use the reserved 20g of water to dissolve the salt, then pour both over the dough. Work everything together by pinching and folding until fully incorporated. The dough will feel shaggy at first — keep going for 3–5 minutes until it smooths out.
Step 3: Bulk Fermentation (4–6 hours at room temperature)
This is the most important phase. The dough ferments, develops flavor, and builds structure. During the first 2 hours, perform stretch-and-folds every 30 minutes:
- Wet your hand, grab one side of the dough, stretch it up, and fold it over the opposite side.
- Rotate the bowl 90° and repeat. Do this four times per set — that’s one round.
- Aim for 4 rounds total over 2 hours, then leave the dough alone to continue fermenting.
By the end of bulk fermentation, the dough should be roughly 50–75% larger, feel airy and slightly domed on top, and jiggle gently when you shake the bowl.
Temperature matters: At 78°F (26°C), bulk fermentation typically takes 4–5 hours. In a cooler kitchen (68°F / 20°C), it can take 6–8 hours. Don’t go by the clock alone — go by how the dough looks and feels.

Part 3: Shaping and Proofing
Pre-Shape
Gently tip the dough onto an unfloured surface. Using a bench scraper, fold the edges toward the center, then flip the dough seam-side down. Use the scraper and your cupped hand to drag the dough toward you, building tension on the surface. Let it rest uncovered for 20–30 minutes (this is called the bench rest).
Final Shape
For a boule:
- Flip the dough gently so the seam faces up.
- Fold the top third down, the bottom third up, then roll toward you to create a tight log.
- Rotate 90° and repeat if needed for more tension.
- Flip seam-side down and use the scraper to drag and tighten.
Dust a banneton (proofing basket) or a bowl lined with a well-floured cloth generously with rice flour — it’s less absorbent than all-purpose and prevents sticking. Place the dough seam-side up into the banneton.
Cold Proof (8–16 hours in the refrigerator)
Cover the banneton with a shower cap or plastic bag and refrigerate overnight. The cold slow-fermentation deepens flavor and makes scoring far easier since the dough is firm. You can bake it straight from the fridge — no need to warm it first.
Part 4: Scoring and Baking
Preheat Your Oven
At least 45–60 minutes before baking, place your Dutch oven (or combo cooker) on the center rack and preheat to 500°F (260°C). Sourdough baking relies on two things: intense heat and steam. A Dutch oven provides both — the lid traps moisture released by the dough, allowing maximum oven spring before the crust sets.
Scoring
Turn the cold dough out onto a piece of parchment paper. Using a lame (a curved razor blade tool) or a very sharp knife, score the surface with one confident slash at a 30–45° angle. This controls where the bread expands and gives you that dramatic ear. You can also do a decorative pattern — a square, a leaf, or a cross — once you’re comfortable.
Score quickly and decisively. A hesitant drag tears the dough rather than cutting it.
Baking
- Carefully lift the parchment with the dough into the hot Dutch oven. Put the lid on.
- Bake covered at 500°F for 20 minutes. This is the steaming phase — the loaf springs up dramatically.
- Remove the lid, reduce heat to 450°F (230°C), and bake for another 20–25 minutes. The crust deepens to a dark mahogany. Don’t pull it early — a pale crust means an underbaked interior.
- Internal temperature should reach 205–210°F (96–99°C). A probe thermometer removes all guesswork.
- Cool on a wire rack for at least 1 hour before cutting. The interior is still finishing its set via steam escaping through the crumb. Cutting too early gives you gummy bread.

Common Problems and How to Fix Them
Dense crumb with large gummy pockets: Dough was underfermented, or you cut the loaf too soon after baking. Extend bulk fermentation next time and wait the full cool-down period.
Flat loaf that spread sideways: Either the starter wasn’t active enough, or you over-fermented during bulk (the gluten network broke down). Use the float test rigorously and watch the dough’s dome — once it starts to flatten and look slack, it’s gone too far.
Pale, thick crust: Oven wasn’t hot enough, or the Dutch oven wasn’t preheated long enough. Give it a full hour of preheat and don’t rush.
Overly sour flavor: Long, warm bulk fermentation and a more mature (acidic) starter both increase acidity. For milder flavor, keep bulk fermentation on the shorter side and use a young, recently-fed starter.
Dough sticks to the banneton: Use rice flour for dusting — it doesn’t absorb into the surface the way all-purpose does. A dedicated banneton that never gets washed (just tapped out and air-dried) builds a natural non-stick coating over time.
Flour, Water, and Equipment Notes
Flour: Bread flour (higher protein, typically 12–14%) gives better gluten development and a chewier crumb than all-purpose. King Arthur Bread Flour and Central Milling’s Organic Artisan Baker’s Craft are widely available and consistently reliable. Whole wheat or rye additions boost flavor and fermentation activity.
Water: Hard tap water with high chloramine content can inhibit fermentation. If your starter struggles to become active, switch to filtered water.
Dutch oven: A 5-quart (4.7-liter) enameled cast-iron Dutch oven (Lodge, Le Creuset, Staub) is the gold standard. The heavy lid seals in steam far better than a baking stone with a steam pan. If you don’t own one, a deep oven-safe pot with a tight lid works — just avoid plastic handles.
Lame: A curved lame produces a proper ear. A sharp serrated knife is the next-best alternative if you don’t want to invest in one.
Conclusion
Sourdough bread is less about following a recipe to the letter and more about reading your dough. Temperature, humidity, your starter’s age, even your flour’s protein content will shift timings. The first loaf might be dense or a little flat. That’s expected, not failure.
Keep a simple baking journal — note your room temperature, how long bulk fermentation ran, how the dough felt at each stage. After three or four bakes, patterns emerge, and adjustments become intuitive.
The fundamentals don’t change: an active starter, a properly fermented dough, a very hot Dutch oven, and patience after it comes out of the oven. Get those right, and the rest follows.