Ferment Vegetables at Home with Just Salt and Water

Fermenting vegetables at home sounds like it requires specialist equipment or years of training. It doesn’t. All you really need is salt, water, vegetables, and a clean jar. The lacto-fermentation process — the same one behind sauerkraut, kimchi, and half-sour pickles — has been feeding people reliably for thousands of years, long before refrigerators existed.
This guide walks through the whole process: choosing salt and vegetables, making a brine, troubleshooting problems, and knowing when a batch is actually ready to eat.
Why Salt and Water Work
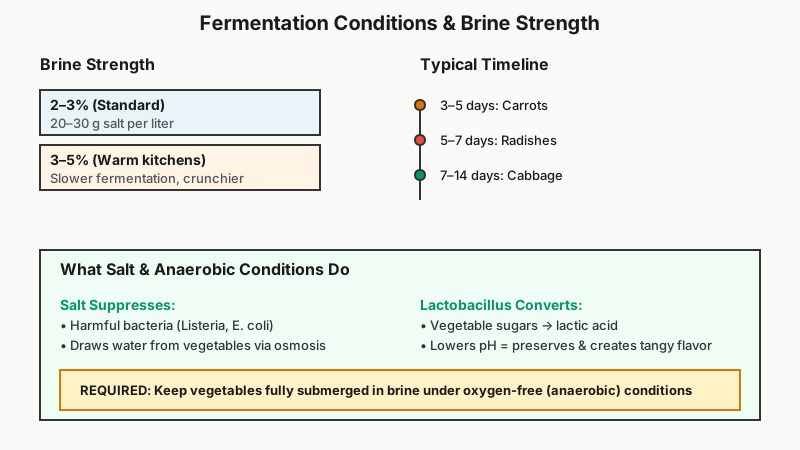
Lacto-fermentation is driven by naturally occurring bacteria called Lactobacillus that live on the surface of most raw vegetables. These bacteria thrive in a salty, anaerobic (oxygen-free) environment. Salt does two things simultaneously:
- Suppresses harmful bacteria like Listeria and E. coli, which can’t tolerate high salinity
- Draws water out of the vegetables through osmosis, creating the liquid brine that submerges the ferment
The Lactobacillus bacteria convert the natural sugars in the vegetables into lactic acid. That acid lowers the pH of the brine, which preserves the vegetables and produces the tangy, complex flavor characteristic of fermented foods.
No vinegar. No heat processing. Just beneficial bacteria doing what they’ve always done.

Choosing Your Ingredients
Salt
Salt choice matters more than most beginner guides admit. You want non-iodized salt — iodine inhibits bacterial activity and can slow or stall fermentation. Kosher salt and sea salt are both good choices. Pickling salt (pure sodium chloride with no additives) is ideal but not strictly necessary.
Avoid table salt with anti-caking agents like silicon dioxide; these can cloud your brine without actually harming the ferment, but they’re worth avoiding for cleaner results.
Brine concentration: A general-purpose brine is 2–3% salt by weight. That means:
- 20–30 grams of salt per 1 liter of water
- Or roughly 1–1.5 teaspoons of fine sea salt per cup of water
Slightly higher concentrations (3–5%) work well for warmer kitchens or vegetables you want to stay crunchier for longer. Lower concentrations ferment faster but carry slightly more risk of off-flavors.
Water
Chlorinated tap water can inhibit fermentation because chlorine targets bacteria — including the beneficial ones you’re relying on. Use filtered water if your tap water is heavily chlorinated, or leave tap water in an open container for 30 minutes to let the chlorine off-gas before using it.
Vegetables
Practically any raw vegetable ferments well. Good starting points:
- Cabbage (makes sauerkraut or the base for kimchi)
- Carrots (hold their crunch beautifully, ferment in 3–5 days)
- Cucumbers (best when small and unwaxed; waxed supermarket cucumbers won’t ferment properly)
- Radishes (fast, bold flavor, vivid color)
- Green beans (called dilly beans when made with dill and garlic)
- Beets (earthy, sweet brine that’s excellent on its own)
Use fresh, firm vegetables. Soft or overripe produce tends to turn mushy. Organic is preferable because conventional vegetables sometimes carry pesticide residue that can slow bacterial activity, though this is rarely a decisive factor.
If you’d rather cook your vegetables than ferment them, How to Roast Vegetables in the Oven: 7 Rules for Perfect Results offers a completely different way to bring out their flavor.
Equipment You Actually Need
You don’t need a ceramic crock or an airlock lid to start. A wide-mouth glass mason jar works perfectly. Here’s what matters:
- Glass jar (wide-mouth quart or half-gallon jars are easiest to pack)
- Something to keep vegetables submerged — a small zip-lock bag filled with brine, a clean smooth stone, a smaller jar that fits inside, or purpose-made glass weights
- A loose lid or cloth cover — fermentation produces CO₂ gas, so you need to let it escape. A loosely screwed lid, a cloth secured with a rubber band, or a purpose-made airlock all work.
Do not seal the jar airtight without an airlock. Pressure builds and jars can crack or pop lids unexpectedly.

Step-by-Step: Basic Brine Ferment
This method works for whole or sliced vegetables — carrots, cucumbers, green beans, radishes, and similar firm produce.
Step 1: Make your brine Dissolve salt in water at room temperature. For a quart jar, mix 1 tablespoon of non-iodized salt into 2 cups of filtered water. Stir until fully dissolved. You can make more brine as needed — the ratio is what matters.
Step 2: Prepare the vegetables Wash vegetables thoroughly. Trim ends — for cucumbers, remove the blossom end (the end opposite the stem), as it contains enzymes that can cause softening. Cut into your preferred shape: spears, coins, sticks, or leave small cucumbers whole.
Step 3: Add flavorings (optional but recommended) Garlic, fresh dill, peppercorns, mustard seeds, bay leaves, chili flakes, and fresh ginger all work well. Add them directly to the jar. These aren’t just for flavor — tannin-containing additions like grape leaves, oak leaves, or a small piece of horseradish root help vegetables stay crunchy by inhibiting the pectin-softening enzymes.
Step 4: Pack the jar Pack vegetables in tightly — this naturally helps keep them below the brine line. Pour brine over the top, leaving about an inch of headspace.
Step 5: Weigh down the vegetables Every piece of vegetable must stay submerged. Any part exposed to air can mold. Use your chosen weight to keep everything under the brine.
Step 6: Cover and wait Cover loosely. Set the jar at room temperature, away from direct sunlight. Place a small plate or tray under the jar — brine sometimes bubbles over as fermentation gets active.
Step 7: Taste and monitor Start tasting after 2 days. Carrots and radishes are usually ready in 3–5 days at room temperature (68–72°F / 20–22°C). Cucumbers take 3–7 days. Cabbage for sauerkraut typically needs 1–4 weeks depending on temperature and your taste preference.
When you’re happy with the flavor and tanginess, screw the lid on properly and move it to the refrigerator. Cold temperatures slow fermentation dramatically, effectively pausing it at your preferred point.
Troubleshooting Common Problems
White film on top
A thin, slightly wrinkled white layer on the brine surface is usually kahm yeast — a harmless, wild yeast that appears when exposure to air is significant. Skim it off, make sure your vegetables are submerged, and the ferment is fine to eat. It tastes a bit yeasty but isn’t dangerous.
If the film is thick, fuzzy, and colored (green, black, pink), that’s actual mold. Toss the batch and start fresh, paying closer attention to keeping vegetables submerged.
Too salty
Brines do concentrate slightly as fermentation progresses. If the result is too salty for your palate, rinse the vegetables lightly before eating, or start with a lower-salinity brine next time.
Vegetables turned mushy
Most common causes: vegetables were past their prime, brine concentration was too low, or the jar sat in a warm spot too long before refrigerating. Adding tannins (grape leaves, oak leaves) to the next batch helps significantly.
No bubbling activity after 48 hours
This usually means the kitchen is cool (below 65°F / 18°C). Move the jar somewhere warmer. Activity can take 3–4 days to become visible in a cold room.

Flavor, Safety, and Knowing When It’s Done
A properly fermented vegetable has a clean, tangy, sour smell — like a good deli pickle. Trust your nose. If it smells rotten, sulfurous, or genuinely foul (rather than sharply sour), discard it.
The pH of a successful lacto-ferment drops to around 3.5–4.0, which is acidic enough to prevent pathogen growth. This is why lacto-fermentation has such a strong safety record historically. That said, following basic hygiene — clean jars, clean hands, keeping vegetables submerged — matters enormously.
You don’t need to sterilize jars the way canning requires. A thorough wash with hot soapy water is sufficient. Unlike heat-processed canning, lacto-fermentation is a living process, and the beneficial bacteria you want are already present.
How Long Do Fermented Vegetables Last?
Once moved to the refrigerator, fermented vegetables keep well for 3 to 6 months. Flavor continues to develop slowly even in cold storage. Many people find that a 2-week-old refrigerated sauerkraut tastes better than one eaten immediately after fermentation.
Building on the Basics
Once you’ve done a straightforward brine ferment, variations open up quickly:
- Sauerkraut: Shred cabbage finely, toss with 2% of its weight in salt, massage until it releases liquid, pack into a jar, and use the cabbage’s own juice as the brine. No added water needed.
- Fermented salsa: Chop tomatoes, onion, garlic, chili, and cilantro; add 2% salt by weight; pack and ferment 2–3 days. The result is brighter and more complex than fresh salsa.
- Hot sauce: Blend fermented chilis with a small amount of their brine. Lacto-fermented hot sauces have more depth than vinegar-based ones.
- Beet kvass: Fill a jar with cubed raw beets and a 2% brine; after 3–5 days the brine becomes a dark, earthy, mildly sour drink with a cult following among home fermenters.
Once you’ve got fermentation down, you might also explore How to Dehydrate Fruits and Vegetables at Home as another way to preserve your harvest for the long term.
Conclusion
Salt, water, vegetables, and time — that’s the whole recipe. The science behind lacto-fermentation is well understood and the safety record is long. Starting with a jar of brine-fermented carrots or cucumbers is genuinely low-risk, low-cost, and produces something you’ll actually want to eat.
The main thing beginners get wrong is overcomplicating it. Pack vegetables tightly, keep them submerged, use non-iodized salt, and taste often. Within a week, you’ll have a jar of tangy, probiotic-rich vegetables made entirely by your own hand — and a clear sense of why this technique never needed improving.