Hands-Off Risotto: Less Stirring, Better Results

Risotto has a reputation as a dish that punishes inattention — the kind of recipe that chains you to the stove for 25 minutes of compulsive stirring. That reputation isn’t entirely wrong, but it isn’t entirely right either. The real goal of all that stirring is to coax starch out of the rice and build a creamy, lightly bound sauce. There are at least three ways to get there without turning into a kitchen statue.
Why Constant Stirring Became the Rule
Traditional risotto technique calls for adding warm stock one ladle at a time and stirring almost continuously. The motion does two things: it keeps the grains moving so they don’t stick and scorch, and it chips away at the outer surface of each grain, releasing amylopectin — the branched starch that gives risotto its characteristic silkiness. The problem is that both goals can be achieved through other means once you understand what you’re actually after.
Rice variety matters a great deal here. Arborio, Carnaroli, and Vialone Nano all have high amylopectin content, which is why they work for risotto. Carnaroli in particular has a firmer center that holds up better during longer, less-attended cooking — it’s the variety most professional cooks reach for when they want more margin for error.

The Batch-Liquid Method: Add More, Stir Less
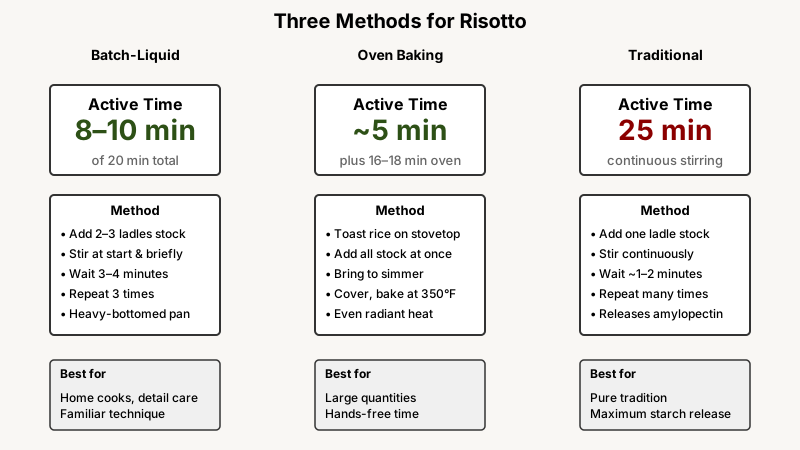
The most practical shift for home cooks is simply adding more stock at once. Instead of a single ladle (~75 ml) every minute or two, add two or three ladles and stir only at the beginning of each addition and once or twice while it absorbs. The rice still releases its starch — the liquid contact does most of the work — you just don’t need to babysit each individual addition.
Here’s how to structure it:
- Toast the rice in fat (butter or olive oil) for 90 seconds until the edges turn translucent. This step is non-negotiable; it seals the grain slightly and prevents mushiness.
- Deglaze with wine and stir until absorbed — this part you do attend.
- Add stock in larger pours: roughly one third of the total liquid at a time. Give it a good stir, then walk away for 3–4 minutes. Come back, stir for 20–30 seconds, check absorption, and repeat.
- Finish with the usual mantecatura — pulling the pan off the heat and vigorously beating in cold butter and Parmesan until the risotto flows like lava.
Total active stirring time: maybe 8–10 minutes across a 20-minute cook. The texture is genuinely difficult to distinguish from the stir-every-30-seconds version, especially once mantecatura does its work.
What to watch for
The main risk of this approach is a hot spot on the bottom of the pan scorching the rice. Use a heavy-bottomed pan — enameled cast iron or a thick stainless saucier — and keep the heat at a steady medium rather than medium-high. If you see the liquid boiling vigorously at the edges while the center sits still, turn it down.
The Oven Method
Baking risotto was treated as heresy for a long time, and then restaurant cooks started doing it for volume service and noticed the results were quite good. The logic is sound: an oven provides even, radiant heat from all sides, which eliminates hot spots and means there’s nothing to scorch.
The basic approach:
- Sauté your aromatics and toast the rice on the stovetop as normal.
- Deglaze with wine and let it absorb.
- Add all your stock at once — typically a ratio of about 3 parts warm stock to 1 part rice by weight, though this varies by grain size and how much liquid your add-ins release.
- Bring to a simmer on the stovetop, then cover tightly (foil plus a lid if your pot has any gaps) and transfer to an oven set to around 180°C / 350°F.
- Bake for 16–18 minutes. Check at 15; the rice should be just barely al dente with a small amount of loose liquid remaining.
- Pull from the oven and finish with mantecatura on the stovetop over low heat for 60–90 seconds.
The result is slightly different in texture from the stirred version — a little less saucy, a touch more uniform — but it’s excellent, and you get 15 minutes completely free. This technique works particularly well for risotto you’re making in large quantities (feeding six or more), where stovetop stirring becomes genuinely impractical.

Since you’ll already have the oven going, How to Roast Vegetables in the Oven: 7 Rules for Perfect Results is a handy companion technique for rounding out the meal.
Stock temperature matters more in the oven
Always add hot stock, not cold. Cold stock dropped into hot rice stops the cooking and can make the grain exterior gluey before the center has cooked. Keep your stock at a bare simmer in a separate pot throughout.
The Instant Pot / Pressure Cooker Method
Pressure cookers work on a different principle: elevated pressure raises the boiling point of water, cooking the rice faster and under conditions that push liquid into the grain rather than relying on gradual absorption. The starch release happens, but the mechanism is less mechanical friction and more steam pressure.
The trade-offs are real:
- Speed: 6–7 minutes at high pressure (plus time to come to pressure and release) gets you to done.
- Texture: Very good — tender and creamy — but the grains have a slightly softer, more uniform bite than the best stovetop version. The difference is noticeable to an experienced palate, less so to most diners.
- Mantecatura is still essential: Without the vigorous butter-and-cheese finish, pressure-cooker risotto can taste flat. Don’t skip it.
A workable ratio: 1 cup Arborio to about 2.5 cups stock, with sautéed aromatics and wine done on the sauté setting before sealing. High pressure for 6 minutes, quick release, then finish on sauté with butter and Parmesan stirred vigorously for 2 minutes.
One genuine caveat: Carnaroli holds up better under pressure than Arborio, which can go mushy if you’re off by even a minute. If you have access to Carnaroli, use it here.
Mantecatura: The Step That Saves All Methods
Whatever approach you use, the finish matters more than the method. Mantecatura — beating cold butter (and optionally grated Parmigiano-Reggiano) into just-cooked risotto off the heat — is the single step that most home cooks skip or rush, and it explains why restaurant risotto often tastes silkier than the home version.
The fat molecules from cold butter emulsify into the starchy cooking liquid as you beat and shake the pan, forming a loose, flowing sauce that coats each grain. Warm or room-temperature butter breaks this emulsion. The cheese adds body. Done right, the risotto should spread slowly across a plate when you tilt it — Italian cooks call this all’onda, meaning “like a wave.”
Give it at least 60–90 seconds of real agitation, then let it rest, covered, for 2 minutes before plating. Those two minutes of rest matter: the starch slightly firms up and the flavors integrate.

Which Method for Which Situation
- Weeknight dinner for two: Batch-liquid stovetop. Fastest, most satisfying, easiest cleanup.
- Dinner party for eight: Oven method. Frees you to manage other dishes while the risotto bakes.
- Fastest possible weeknight: Pressure cooker with Carnaroli. Accept a slight texture trade-off.
- First time making risotto: Batch-liquid stovetop — it keeps you engaged enough to learn what the rice looks and sounds like at each stage, which pays off later.
If you need more low-effort dinner ideas beyond risotto, 15 Easy Weeknight Dinner Recipes Ready in 30 Min offers plenty of options that fit into a busy weeknight.
Frequently Asked Questions
Does stirring actually make risotto creamier, or is it a myth?
Stirring does mechanically release starch from the grain surface, contributing to creaminess — but the effect is smaller than tradition suggests. Mantecatura (the butter finish) contributes far more to the final texture. Recipes that skip mantecatura but stir constantly still produce a thinner result than ones that stir moderately but finish properly.
Can I reheat leftover risotto without ruining it?
Yes. Add a splash of warm stock or water, then stir gently over medium-low heat until loose again. Microwaving works in a pinch with the same splash of liquid and a damp paper towel over the bowl. It won’t fully recover the all’onda texture, but it’s much better than eating cold, gluey leftovers.
Does the type of stock matter?
More than most recipes acknowledge. A bland or salty commercial stock produces a bland or salty risotto; the stock is roughly half the dish by volume. Homemade or low-sodium store-bought stock, simmered briefly with a Parmesan rind, upgrades the result noticeably. Match the stock to the risotto: chicken for most applications, seafood for seafood risotto, vegetable for delicate spring versions.
Why does my risotto turn out gluey?
Usually one of three causes: overcooking past al dente, using cold stock (which shocks the grain and causes uneven starch release), or too much vigorous stirring with Arborio at high heat — Arborio releases starch aggressively and can over-thicken. Switch to Carnaroli if gluey texture is a recurring problem.
Is there any point in adding the wine?
The wine’s acidity brightens the overall flavor and its alcohol carries aromatic compounds from the soffritto forward into the rice. It’s not strictly necessary, and many cooks skip it without disaster — but the depth is genuinely different with it. Use a wine you’d drink, not “cooking wine”: anything neutral and dry works, from Pinot Grigio to Vermentino.