How to Grill Vegetables Properly: Why Prep Makes Or Breaks It

Grilling vegetables sounds straightforward — toss them on the grate, wait, eat. But if you’ve pulled off a batch of charred mush or pale, steamed pieces that slid through the grate, you know there’s more to it. Done right, grilling transforms vegetables in a way that roasting or sautéing simply can’t match: direct flame and high heat create those bitter-sweet charred edges, concentrating sugars and adding smoke in the same stroke.
This guide covers everything that actually matters — prep, heat management, timing, and a few overlooked details that make the difference between forgettable and genuinely good grilled vegetables.
Start With the Right Prep
How you prep vegetables before they hit the grill shapes everything that follows.
Cut for Contact, Not Convenience
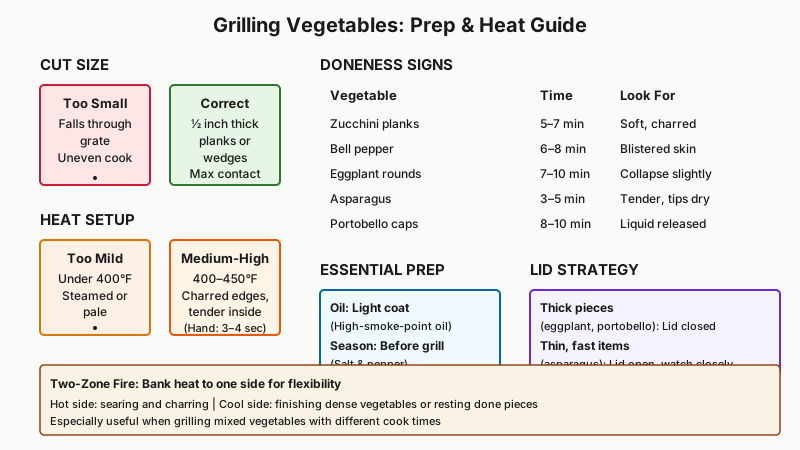
The goal is maximum surface area touching the grate. Thin, small, or oddly shaped pieces fall through or cook unevenly. Here’s how to approach common vegetables:
- Zucchini and summer squash: Slice lengthwise into planks about ½ inch thick. Rounds tend to slip through grates and cook unevenly.
- Bell peppers: Quarter them and remove the seeds. Flat pieces lie flush against the grate — no rolling, no hot spots.
- Eggplant: Cut crosswise into ½-inch rounds. Salting them 20–30 minutes before grilling draws out excess moisture, which means better browning and less bitterness. Pat dry afterward.
- Corn: Keep it in the husk for steamed-style corn, or strip the husk entirely and grill directly for full char.
- Asparagus: Leave spears whole if they’re medium to thick. Very thin spears cook so fast they’re hard to control — save those for the pan.
- Portobello mushrooms: Grill caps whole, gill-side up first so they don’t flood with liquid.
- Onions: Cut into thick rings or halves through the root so layers hold together.
- Cherry tomatoes: Thread on skewers or use a grill basket — they’ll split and fall otherwise.
Oil: Not Optional, But Don’t Overdo It
Coating vegetables lightly in oil serves two purposes: it helps conduct heat more evenly and prevents sticking. Brush or toss with a neutral, high-smoke-point oil — refined avocado oil, grapeseed, or plain canola all work. Extra-virgin olive oil is fine for shorter cook times on medium heat, but it will smoke aggressively on a screaming-hot grill.
Avoid over-oiling. Vegetables sitting in oil take longer to char and are more likely to flare up over direct flame. A thin, even coat is the target.
Season Before, Not After
Salt and pepper go on before grilling, not at the table. Salt draws a little moisture to the surface, which evaporates quickly on a hot grate and helps develop a better crust. Season generously — the grill is not a delicate environment.

Heat Management: The Part Most People Skip
Temperature control is where grilling separates from just burning things.
If you’d rather work with an oven than an open flame, How to Roast Vegetables in the Oven: 7 Rules for Perfect Results walks through the equivalent heat and timing rules for indoor cooking.
Two-Zone Setup for Mixed Loads
If you’re grilling a variety of vegetables — some dense (carrots, onions), some tender (asparagus, cherry tomatoes) — a two-zone fire is your best tool. On a charcoal grill, bank the coals to one side, leaving the other side without direct heat. On a gas grill, turn burners on one side to high and leave the other side on low or off.
This gives you a hot side for searing and charring and a cooler side for holding vegetables that are done before others, or for finishing dense pieces that need more time without burning.
Temperature Targets
Most vegetables grill best at medium-high heat — roughly 400–450°F (200–230°C) at the grate surface. This is hot enough to char quickly but not so violent that the outside scorches before the inside softens.
A rough test without a thermometer: hold your hand about 5 inches above the grate. At medium-high, you’ll be pulling it away in about 3–4 seconds.
Grill Lid: Open or Closed?
For most vegetables, keep the lid closed. Closing the lid creates an oven-like environment — the ambient heat cooks the top of vegetables at the same time the grate sears the bottom. This matters especially for thick pieces like eggplant rounds or portobello caps.
For thin, fast-cooking items like asparagus or scallions, open-lid grilling with close attention works fine. They’re done in minutes and don’t need the extra heat.
Timing Guide: When Vegetables Are Actually Done
This is where instinct matters more than a stopwatch. The timings below assume medium-high direct heat as a baseline:
| Vegetable | Approximate Time | Signs of Doneness |
|---|---|---|
| Asparagus (thick) | 4–6 min | Tender when pierced, slight char on ridges |
| Bell peppers (quartered) | 6–8 min | Blistered skin, soft flesh |
| Zucchini/squash planks | 5–7 min | Clear grill marks, yields to pressure |
| Eggplant rounds | 8–10 min | Collapsed texture, golden-brown edges |
| Corn (husked) | 10–12 min, turning often | Kernels char in spots, no raw crunch |
| Portobello caps | 8–10 min | Moisture beads on top, cap edges curl |
| Onion halves | 10–14 min | Deep char outside, translucent inside |
| Cherry tomatoes | 4–6 min | Skins split, juices start running |
Flip once if possible, rather than repeatedly. Constant flipping interrupts crust formation. You’ll know it’s time to flip when the vegetable releases easily from the grate — if it sticks, it’s not ready.

The Skewer and Basket Question
Skewers solve the small-piece problem. Use flat metal skewers rather than round ones — they prevent the vegetables from spinning when you turn them. If you use wooden skewers, soak them for at least 30 minutes before grilling to reduce charring.
Grill baskets are worth owning if you frequently grill small or delicate items like mushroom slices, shaved fennel, or cut green beans. They take longer to develop char than direct grate contact, but they keep everything contained. Line the basket with a single layer — piling vegetables in a basket steams the bottom layer instead of grilling it.
Finishing and Serving: Where the Flavor Gets Built
Grilling is mostly about texture and char, but the finishing stage is where flavor becomes layered.
Rest Briefly
Let grilled vegetables sit for 2–3 minutes before serving. This isn’t as critical as with meat, but it lets residual heat finish any barely-underdone pieces and gives the exterior a moment to firm up rather than going soggy on a plate.
Acids and Aromatics
A squeeze of lemon or a splash of good vinegar — sherry vinegar, red wine vinegar — brightens grilled vegetables considerably. Add it immediately after pulling them from the grill, while they’re still hot. The acid absorbs into the warm flesh instead of sitting on the surface.
Fresh herbs, grated hard cheeses (Pecorino Romano, aged Parmesan), and toasted nuts added after grilling round out the flavor without competing with the smoke and char.
Sauces and Rubs
Sauces with sugar — barbecue sauce, honey-based marinades — should go on in the last 1–2 minutes of grilling only. Added earlier, they carbonize into a bitter crust.
Dry rubs (cumin, smoked paprika, garlic powder, dried herbs) can be applied before grilling and work well on denser vegetables like eggplant and portobello mushrooms.
Common Mistakes and How to Avoid Them
Crowding the grate: Too many vegetables at once drops the grate temperature and causes steaming instead of searing. Grill in batches if needed.
Skipping the preheat: A cold or lukewarm grate causes sticking and uneven cooking. Preheat for at least 10–15 minutes before the first piece goes on.
Marinating too long: Vegetables marinated for more than 30 minutes — especially in acidic marinades — start to break down. They’ll turn mushy on the grill. A quick 15–20 minute marinade or a post-grill dressing is usually better.
All vegetables at the same time: Different vegetables cook at different rates. Add longer-cooking items first and faster items later so everything finishes together. Plan your sequence before you start.
Ignoring grate maintenance: A clean, well-oiled grate releases vegetables cleanly. Scrub the grate with a brush before use and rub it with a lightly oiled paper towel using long-handled tongs.

A Few Vegetables Worth Extra Attention
Corn: Grilled corn without the husk gets real char and sweetness — one of the best outcomes you can produce on a grill. Brush with butter or compound butter in the last 2 minutes. Rotating every 2–3 minutes keeps the kernels from burning unevenly.
Eggplant: Commits fully only when cooked through. Undercooked eggplant has an unpleasant spongy texture. Press with a spatula mid-cook to speed the process and ensure even contact.
Radicchio: Underrated on the grill. Quarter it through the root, brush with olive oil, and grill 3–4 minutes per side. The bitterness mellows with heat, and it pairs well with a balsamic drizzle.
Whole garlic heads: Slice the top off to expose the cloves, drizzle with oil, wrap in foil, and place on indirect heat for 30–40 minutes. Not exactly fast, but the result — soft, caramelized roasted garlic — is worth planning for.
For a comparison of how the same caramelized edges can be achieved without a grill, check out Roasting Vegetables for Perfect Caramelized Edges.
Putting It Together
Grilling vegetables well comes down to a handful of consistent decisions: cut for flat contact, coat lightly in oil with a high smoke point, preheat and manage heat in zones, flip once and only when the vegetable releases, and finish with acid while hot. None of it is complicated, but most of it is deliberate.
The more you grill vegetables, the more you’ll develop a feel for what a properly charred zucchini plank sounds like when you press it, or when a portobello has released enough moisture to be worth flipping. That instinct builds quickly. Start with a single vegetable rather than a mixed platter, get comfortable with timing, then expand from there.