How to Dehydrate Fruits and Vegetables at Home

Dehydrating food at home is one of the most practical preservation skills you can pick up. Strip the water out of a peach or a zucchini and you’ve turned something that rots in a week into a shelf-stable snack that lasts months — sometimes years. The process is old, simple, and requires far less special equipment than most people assume.
This guide walks through everything from choosing produce to storing the finished product, with specific temperatures, times, and techniques that actually work.

Why Dehydration Works (and Why It Matters)
Dehydrating removes enough moisture that bacteria, yeast, and mold can’t multiply. Most fruits need to reach a water activity level below 0.60 and most vegetables below 0.70 to be shelf stable. You don’t need to measure water activity at home — following established time and temperature guidelines gets you there reliably.
Beyond safety, there are real practical reasons to dehydrate:
- Shelf life: Properly dehydrated fruit stored in airtight containers away from light lasts 6–12 months at room temperature. Dried vegetables can last 1–2 years under the same conditions.
- Flavor concentration: Water removal intensifies sugars and aromatics. A dehydrated strawberry tastes sharper and sweeter than a fresh one.
- Reduced weight and volume: Hikers and campers have known this for decades — dried produce packs down dramatically compared to fresh.
- No waste: Produce approaching its prime is the best candidate for the dehydrator, not the compost bin.
Methods: Dehydrator vs. Oven vs. Sun-Drying
You have three realistic options at home, each with trade-offs.
Electric Food Dehydrator
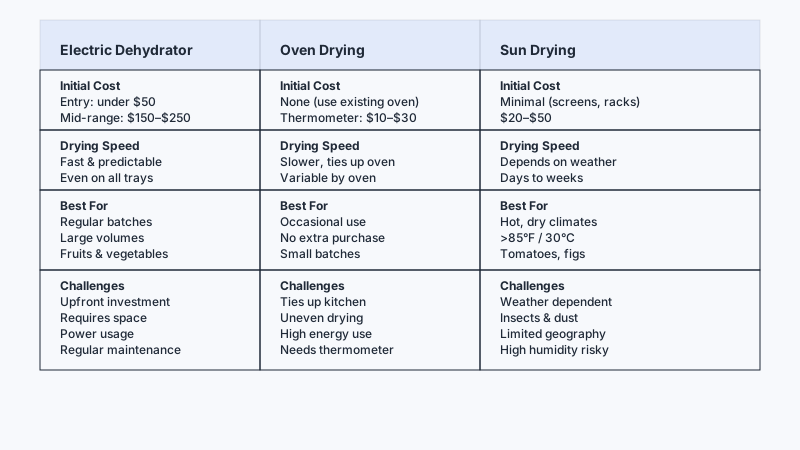
A dedicated dehydrator is the most reliable method. It circulates warm air at a precisely controlled temperature, which means even drying without the risk of accidentally cooking the outside while leaving moisture in the center. Entry-level stackable-tray models from brands like Nesco or Presto cost under $50. A mid-range unit with a thermostat, timer, and horizontal airflow (the kind where a fan sits at the back, like Excalibur’s tray models) runs $150–$250 but dries food more evenly across all trays simultaneously.
If you plan to dehydrate regularly or in large batches, the investment pays off quickly compared to buying dried produce at retail prices.
Oven Drying
Any conventional oven can dehydrate food if it can hold a low temperature — ideally 140–170°F (60–77°C). The main challenge: many ovens don’t go below 170°F, and some run hotter than their dial suggests. Use an oven thermometer to verify. Prop the oven door open a couple of inches with a wooden spoon to let moisture escape; this matters more than most recipes acknowledge. Convection mode, if your oven has it, speeds the process meaningfully by improving air circulation.
Oven drying uses more energy than a dehydrator and ties up your oven for hours, but requires no additional equipment.
Sun Drying
Traditional sun drying works in climates with consistently high temperatures (above 85°F / 30°C), low humidity, and a run of dry sunny days. It’s genuinely impractical in most of the United States and northern Europe but works well in arid regions. The risks — insects, dust, unpredictable weather — mean you need screens and some patience. Tomatoes and figs are the classic candidates for outdoor sun drying.

Preparing Produce for the Dehydrator
Preparation is where most beginners cut corners and pay for it with uneven results or poor shelf life. These steps matter.
Choose the Right Produce
Start with ripe, blemish-free produce. Overripe fruit will work but produces a stickier, darker result. Underripe fruit lacks the sugar development that makes dried snacks worth eating. Avoid bruised sections — they carry mold spores that can spread.
If you have leftover fresh produce that isn’t quite ready for the dehydrator yet, How to Store Cut Vegetables and Keep Them Fresh explains how to keep it in good shape until you’re ready to slice.
If you’d rather grow your own supply than rely on store trips, Best Vegetables to Grow Indoors: No Greenhouse or South Window Needed shows you how to keep a steady harvest coming even without a greenhouse or sunny window.
Wash and Dry Thoroughly
Rinse everything under cold water. Dry the surface before slicing; excess surface water dilutes the product and extends drying time.
Slice Evenly
Uniform thickness is the single most important preparation step. Thin slices dry faster and more evenly; thick or uneven slices create a situation where some pieces finish hours before others. For most fruits and vegetables, aim for ¼-inch (6mm) slices. A mandoline makes this consistent and fast.
Pre-treatment: When and Why
Some produce needs pre-treatment to prevent oxidation (browning) or to soften the skin so moisture can escape.
Ascorbic acid dip — Dissolve ½ teaspoon of ascorbic acid (or 1 tablespoon of lemon juice as a weaker substitute) in 2 cups of water. Dip apple, pear, banana, and peach slices for 1–2 minutes before arranging on trays. This preserves color and adds a slight tartness.
Blanching — Most vegetables benefit from blanching before dehydrating. It halts enzymatic activity that degrades color, flavor, and nutrition during drying and storage. Blanch green beans, carrots, corn, broccoli, and potatoes in boiling water for 2–4 minutes (times vary by vegetable), then transfer immediately to ice water to stop cooking. Pat dry before loading trays.
Sulfuring or sulfite dip — Commercial dried fruit often uses sulfur dioxide to preserve color. Home cooks can use a sodium bisulfite or potassium metabisulfite dip instead. This is optional; many people skip it and simply accept darker color, which doesn’t affect safety.
Checking (scoring skins) — Whole small fruits like grapes, blueberries, or cranberries have waxy skins that trap moisture. Dip them briefly in boiling water (30–60 seconds) to crack the skins, then ice bath, before drying. Without this step, they can take twice as long to dry — or never dry through completely.
Temperature and Time Reference Guide
Temperature accuracy matters. Too low and you risk bacterial growth before the product dries; too high and you case-harden the exterior, trapping interior moisture and shortening shelf life.
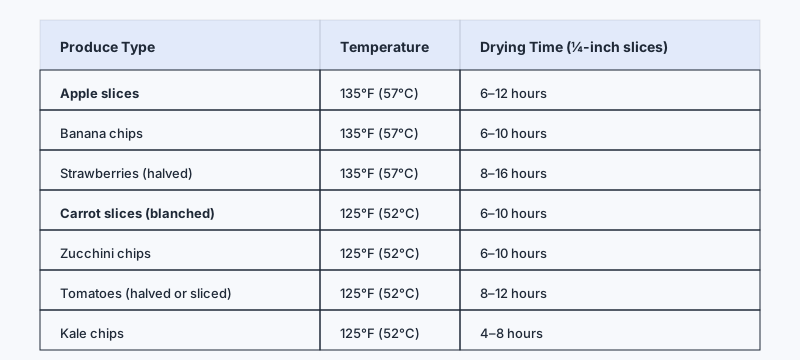
The USDA recommends the following starting temperatures for a dehydrator:
- Fruits: 135°F (57°C)
- Vegetables: 125°F (52°C)
- Herbs: 95–115°F (35–46°C)
- Meat jerky: 160°F (71°C) — outside the scope of this article but worth noting
Approximate drying times (dehydrator at correct temperature, ¼-inch slices):
| Produce | Time Range |
|---|---|
| Apple slices | 6–12 hours |
| Banana chips | 6–10 hours |
| Strawberries (halved) | 8–16 hours |
| Tomatoes (halved or sliced) | 8–12 hours |
| Zucchini chips | 6–10 hours |
| Carrot slices (blanched) | 6–10 hours |
| Kale chips | 4–8 hours |
| Mango slices | 6–12 hours |
| Grapes (checked) | 24–36 hours |
These ranges are wide because humidity, slice thickness, and specific dehydrator airflow all vary. Treat them as starting points and test for doneness manually.
How to Test for Doneness
Fruits should be leathery and pliable with no wet or sticky center. Cut a piece in half — there should be no visible moisture inside. Some fruits like apples will feel crisp when cool.
Vegetables should be brittle and hard, snapping cleanly when bent. Any flexibility usually means more time is needed.
Allow pieces to cool to room temperature before testing — food feels drier when warm than it actually is.
Conditioning and Storage
Conditioning
After drying, let food cool completely and then loosely pack it into glass jars for 7–10 days. Shake the jars daily. If you see condensation on the inside of the jar, the food needs more time in the dehydrator. This conditioning step equalizes residual moisture between pieces and catches any problem batches before they go into long-term storage.
Storage Conditions
Oxygen, light, heat, and moisture are your enemies. Store dehydrated produce in:
- Airtight containers: Glass mason jars work well for countertop or pantry storage. Vacuum-sealed bags or mylar bags with oxygen absorbers extend shelf life significantly for long-term stockpiling.
- Cool, dark locations: A pantry shelf away from the stove is fine for most household use. Avoid storing above refrigerators or near windows.
- Refrigerator or freezer: For the longest possible shelf life, especially with fruit, storing in the refrigerator (6–12 months) or freezer (up to 2 years) prevents any residual oil from going rancid and guards against humidity fluctuations.
Label everything with the date and contents. Dried food all starts to look similar after a few months.

For another shelf-stable preservation method worth exploring, check out Ferment Vegetables at Home with Just Salt and Water.
Best Produce for Beginners
If you’re just starting out, choose produce that’s forgiving and produces a rewarding result quickly:
- Zucchini chips — Slice thin, season with salt, dry at 125°F. Ready in 6–8 hours and genuinely crispy. A good intro to vegetable dehydrating.
- Apple slices — Dip in lemon water, dust with cinnamon, dry at 135°F. Widely liked and a good confidence builder.
- Strawberries — Halve or quarter, no pre-treatment needed. Intensely flavored result.
- Tomatoes — Halve cherry tomatoes or slice beefsteaks. Concentrated, sweet, versatile in cooking.
- Kale chips — Fast, light, and easy. Season before drying and the result is better than most store-bought versions.
Avoid starting with grapes, whole blueberries, or high-sugar tropical fruits with thick skins — they require more technique and patience.
Common Problems and How to Fix Them
Food is sticky after cooling: Not fully dry. Return to the dehydrator for 2–4 more hours and re-test.
Pieces dried unevenly: Slices were different thicknesses, or trays weren’t rotated (in a stacked dehydrator). Rotate trays every 2–3 hours and aim for consistent knife work.
Color is very dark: Oxidation from skipping the ascorbic acid pre-treatment, or temperature was too high. Taste is usually fine; appearance is the only cost.
Case hardening (hard outside, moist inside): Temperature was too high initially. Lower by 10–15°F and dry longer.
Mold develops during storage: Food wasn’t fully dry before storage, or container wasn’t airtight. Discard affected batches — this is the one outcome that’s genuinely unsafe.
Conclusion
Dehydrating at home is less complicated than it looks from the outside. Once you get the preparation steps right — even slicing, proper pre-treatment, correct temperature — the dehydrator does the rest. Start with a batch of apple chips or zucchini slices, get a feel for what “done” looks and feels like, and build from there.
The payoff is real: less food waste, better snacks, and a pantry that’s more resilient than one that depends entirely on fresh produce. The process scales up or down easily, works with whatever is in season, and once you own a dehydrator, the per-use cost is close to nothing.