Root Cellar Storage: How to Preserve Fresh Vegetables

Why Root Cellaring Still Makes Sense
Before mechanical refrigeration existed, root cellars kept families fed through winter. The technique fell out of fashion once electric fridges became standard, but it never stopped working — and right now a lot of gardeners and small-scale homesteaders are coming back to it. The reasons are practical: a properly managed root cellar or cool storage space can keep carrots, potatoes, beets, cabbages, and dozens of other vegetables in good eating condition for months, with no electricity, no canning, and no freezer burn.
This guide covers exactly how to do that — from understanding the conditions different vegetables need, to setting up storage if you don’t have an actual cellar, to avoiding the common mistakes that cause rot and wasted harvests.

The Two Variables That Control Everything: Temperature and Humidity
Root cellaring is largely a matter of matching vegetables to the right temperature and relative humidity. Get those two things right and storage times measured in weeks stretch into months. Get them wrong and you’ll open your cellar in January to a shelf of mush.
Temperature Ranges
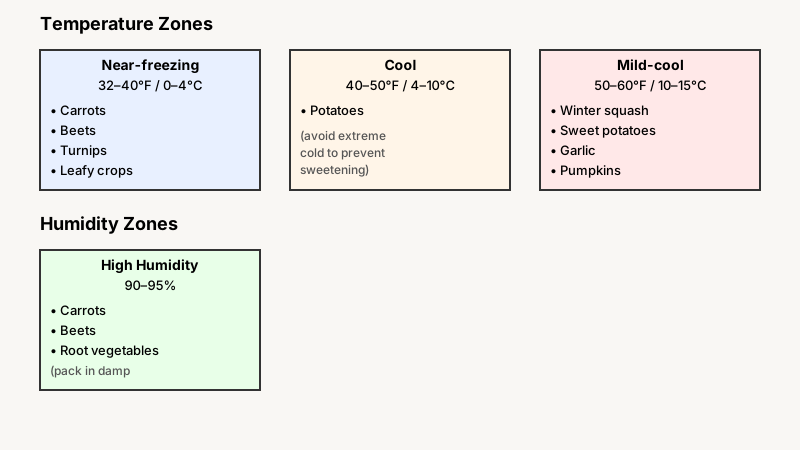
Most root-cellar crops fall into one of three broad temperature preferences:
- Near-freezing (32–40°F / 0–4°C): Carrots, beets, parsnips, turnips, rutabagas, celeriac, and most leafy crops do best here. These vegetables tolerate cold and can even survive light freezes as long as they’re not frozen solid repeatedly.
- Cool (40–50°F / 4–10°C): Potatoes are the main occupant of this zone. They need cold, but actually sweeten and develop an off texture if kept too close to freezing for extended periods — a process called cold-induced sweetening.
- Mild-cool (50–60°F / 10–15°C): Winter squash, pumpkins, sweet potatoes, and garlic want a slightly warmer environment. A traditional root cellar that drops to 35°F is actually too cold for squash; it causes chilling injury that shows up as rotting flesh weeks after storage begins.
Humidity Requirements
Humidity matters just as much as temperature, and different crops want opposite extremes:
- High humidity (90–95%): Root vegetables — carrots, beets, turnips, celeriac — need moisture in the air or they shrivel. Packing them in damp (not wet) sand, sawdust, or peat moss is the classic solution. Without packing material, a high-humidity environment achieved with a pan of water or moist gravel on the floor works well.
- Moderate humidity (60–70%): Potatoes, cabbages, and kohlrabi. Potatoes stored in very humid air tend to rot faster because surface moisture encourages bacterial soft rot.
- Low humidity (50–60%): Garlic, onions, and dried beans. These crops were cured specifically to reduce internal moisture, and putting them somewhere humid reverses that work.
The practical challenge: achieving two different humidity zones in one space. The simplest fix is to designate a section of your storage area for high-humidity crops (packed in moist medium) and hang onions and garlic in mesh bags in a drier corner, or store them in a separate cool pantry shelf entirely.
Setting Up Your Storage Space
Not everyone has a walk-in root cellar dug into a hillside. Here’s how to work with what you have.
For the vegetables you’ll eat sooner rather than store long-term, Best Food Storage Containers for a Tidy Fridge can help you organize your fridge to complement whatever root cellar system you build.
Traditional Root Cellar
If your home has an unheated basement with an earthen or concrete floor and at least one exterior wall, you already have a root cellar candidate. The north or northeast corner is coldest because it gets the least solar gain. Insulate interior walls and the ceiling above to keep cold air from migrating into the heated part of the house, and use a small vent with a sliding cover on the exterior wall to regulate temperature — open it on cold nights, close it during warm spells.
A thermometer/hygrometer combo (under $20 at most hardware stores) should live in the space permanently. Check it every day or two in the first few weeks to understand how your particular space behaves.
Basement Closet or Utility Room Corner
Insulate three sides of a corner space on an exterior basement wall with rigid foam board, build a simple plywood partition with a door, and add the vent. This creates a room within a room that tracks outdoor temperatures much more closely than your heated basement does. It won’t get as cold as a fully underground cellar, but for much of the year it will hold 40–50°F, which is genuinely useful.
Unheated Garage or Outbuilding
This works well in climates where temperatures don’t drop below 25°F for extended periods. Line wooden crates or large coolers with insulating material (old blankets, straw) to buffer temperature swings. The risk is freezing: check stored vegetables during cold snaps and move them temporarily inside if temperatures are forecast to stay below 28°F for more than a couple of days.
In-Ground Storage Pits
For gardeners with no basement at all, burying a garbage can or wooden box in the ground — with a lid covered in a thick layer of straw mulch and a piece of plywood — creates a surprisingly effective storage pit. Line it with hardware cloth or metal mesh to deter rodents. Temperatures at 24 inches deep stay relatively stable, usually tracking within 10–15 degrees of mean annual air temperature for the region.

Preparing Vegetables for Storage
How you handle vegetables before they go into storage determines how well they last.
Harvest Timing
Harvest root vegetables after the first light frosts but before the ground freezes. Frost actually improves the flavor of parsnips and carrots by converting some starches to sugars. For potatoes, wait until the foliage has died back fully — the skins are better cured and tougher at that point.
Curing
Some vegetables need a curing period before storage to harden their skins or heal surface wounds:
- Potatoes: Cure at 50–60°F with high humidity for 10–14 days. This allows small cuts and bruises from harvest to form a protective layer called wound periderm.
- Sweet potatoes: Cure at a warmer 80–85°F for 4–7 days, then store at 55–60°F. Sweet potatoes are tropical plants and will develop pitting and internal decay if stored below 50°F.
- Winter squash and pumpkins: Cure at 80–85°F for 10–14 days to harden the skin.
- Onions and garlic: Spread in a single layer in a warm, dry, well-ventilated space for 2–4 weeks until the outer skins are papery and the necks are fully dry.
Skipping curing — going straight from field to cold storage — is one of the most common reasons vegetables don’t keep well.
Cleaning and Sorting
Brush off loose soil but don’t wash vegetables before storage — water on the surface speeds decay. Cut off any tops (carrot greens, beet greens) leaving about an inch of stem. Inspect every single vegetable before it goes in: one soft potato really does start a chain reaction. Store only sound, unblemished specimens and use anything with cuts or soft spots in the kitchen within a few days.
Packing Methods by Vegetable Type
Carrots, Beets, Turnips, Celeriac
Pack in layers in wooden crates or plastic bins, burying each layer in barely damp sand, peat moss, or wood shavings. The medium should feel like a wrung-out sponge — damp to the touch but not dripping. Check moisture levels monthly; the medium dries out over time and so do the vegetables if you ignore it.
Potatoes
Store in slatted wooden crates, burlap sacks, or ventilated cardboard boxes. Keep them in complete darkness — exposure to light causes greening and the buildup of solanine, a mildly toxic compound. Don’t store potatoes near apples: apples emit ethylene gas that causes potatoes to sprout prematurely.
Cabbages and Kohlrabi
Cabbage smells. That’s worth knowing upfront. Traditional advice is to store whole heads individually in newspaper or hang them by the stem, allowing air circulation. If your storage space connects to your living space, you’ll notice. Many people end up keeping cabbage in an outbuilding or very well-ventilated porch rather than in a basement cellar simply for that reason.
Winter Squash and Pumpkins
Arrange in a single layer on shelves so they don’t touch each other — contact points tend to rot first. Check every week or two. Acorn squash is the shortest keeper of the bunch (8–10 weeks); hubbard and butternut stored properly can easily go 4–6 months.
Onions and Garlic
Braid or hang in mesh bags in a cool, dry, dark location. Good air circulation is the key requirement. They do not need to be near freezing — a cool pantry, a dry shed, or the higher, drier shelves of a cellar all work fine as long as temps stay below about 65°F.
If you’re curious about other pantry staples that behave differently in storage, How to Store Fresh Ginger: Why It Shrivels On The Counter explains why that particular root resists the cold, humid conditions ideal for the vegetables covered here.
Monitoring and Troubleshooting
Root cellaring is not a set-it-and-forget-it operation. Check your stored vegetables at least once a month — more often at the start of storage and again when outdoor temperatures swing in late winter.
Remove anything going bad immediately. Soft rot bacteria and mold spread quickly in cool, enclosed spaces.
Watch for sprouting. Potatoes and onions begin to sprout as days lengthen in late winter. Once sprouted, quality declines quickly. This is normal — it’s just the natural signal that winter storage is ending. Use sprouting vegetables first.
Temperature spikes. A warm spell in October or November can temporarily raise cellar temperatures. If you see condensation forming on stored produce, the temperature has risen and humidity spiked. Increase ventilation and check for early soft spots.
Pest monitoring. Mice are drawn to root cellars. Hardware cloth lining on storage bins and regular checks help. Mouse damage is usually easy to see — gnawed produce should be trimmed and used or discarded.

Expected Storage Times at a Glance
| Vegetable | Temperature | Humidity | Expected Duration |
|---|---|---|---|
| Carrots | 32–35°F | 90–95% | 4–6 months |
| Beets | 32–35°F | 90–95% | 3–5 months |
| Potatoes | 38–40°F | 85–90% | 4–6 months |
| Turnips/Rutabagas | 32–35°F | 90–95% | 4–6 months |
| Parsnips | 32–35°F | 90–95% | 4–6 months |
| Celeriac | 32–35°F | 90–95% | 3–4 months |
| Winter Squash | 50–55°F | 50–70% | 2–6 months (varies by variety) |
| Onions | 32–40°F | 60–70% | 4–6 months |
| Garlic | 32–40°F | 60–70% | 6–8 months |
| Cabbage | 32–35°F | 80–90% | 3–4 months |
| Sweet Potatoes | 55–60°F | 85–90% | 4–6 months |
Putting It Together: A Practical Approach
Root cellaring rewards attention to detail more than it rewards expensive equipment. The difference between vegetables that keep until March and ones that rot by December usually comes down to three things: harvesting at the right stage, curing properly before storage, and matching temperature and humidity to what each crop actually needs.
Start simple. A single bin of sand-packed carrots and a crate of potatoes in a cool corner will teach you more about your particular storage conditions than anything you can read — including this. Once you know how cold your space gets, how stable it stays, and where the moisture problems are, you can expand confidently.
The most useful piece of equipment you can buy is a $15–20 digital thermometer/hygrometer. Everything else — the crates, the sand, the mesh bags — you likely already have or can build for almost nothing.