How to Clean Grout Between Tiles: Matching Grime Level To Method

Grout is one of those surfaces that seems fine until it isn’t. One day the lines between your tiles look crisp and neutral; the next they’re grey, brown, or streaked with mold — and no amount of wiping seems to help. The good news is that cleaning grout is almost always a DIY job, even when it looks hopeless. You just need the right method for the level of grime you’re dealing with.
This guide walks through seven approaches, from gentle everyday fixes to aggressive deep-cleaning for chronically neglected grout, so you can pick the one that fits your situation.
Why Grout Gets So Dirty (and Why It Stays That Way)
Cement-based grout is porous. It absorbs water, soap residue, body oils, cleaning product buildup, and airborne grease — especially in kitchens. That porosity is also why surface wiping rarely works: the dirt isn’t sitting on grout, it’s absorbed into it.
Mold and mildew are a separate problem, driven by moisture trapped in bathroom grout that never fully dries between uses. Even epoxy grout, which is far less porous than cement grout, can accumulate surface grime in textured joints.
Three factors determine how hard the job will be:
- How long the grime has been there. Fresh stains respond to mild acids and basic scrubbing. Stains that have sat for months or years need more aggressive chemistry or mechanical action.
- The type of grout. Unsanded, sanded, and epoxy grouts each have different tolerances for cleaning agents.
- What’s surrounding the grout. Natural stone tiles (marble, travertine, slate) can be damaged by acids. Ceramic and porcelain are far more forgiving.

Assess the Grout Before You Start
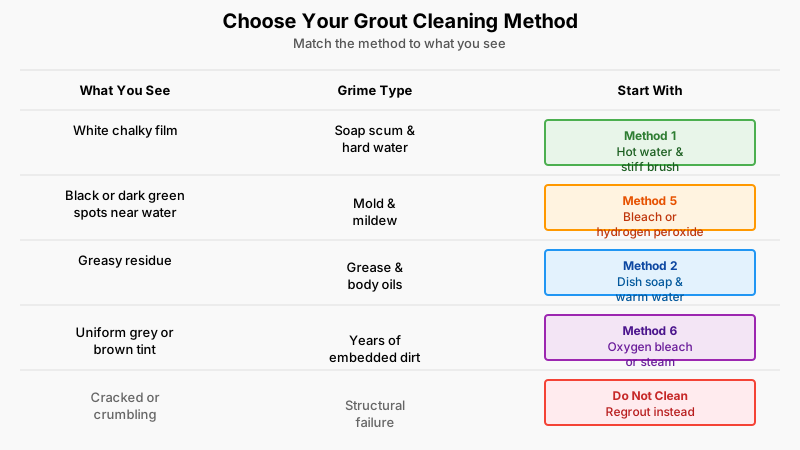
Not all discolored grout responds to the same treatment, and starting from the wrong assumption wastes an afternoon. Before reaching for a product, identify what you’re actually looking at:
- Soap scum and hard water deposits — a white, chalky, or faintly yellow film sitting on or just inside the grout surface. The easiest category to remove.
- Mold and mildew — black or dark green spots concentrated where water lingers: the shower pan, the tub edge, the lower few inches of a wall. Mold grows into grout, not just on it.
- Deeply embedded dirt — a uniform grey or brown tint across every line, worst in traffic areas. This is years of buildup that has oxidized into the grout itself.
- Cracked or crumbling grout — no cleaning method helps here, and scrubbing makes it worse.
A ten-second test tells you which situation you’re in: press a fingernail firmly into a grout line. If it flakes or crumbles, stop — the section on regrouting further down is the relevant one, not the methods below.
What You’ll Need
The right tools matter more than most people expect. An old toothbrush works in a pinch, but it wastes time and tires your hand on anything larger than a small backsplash.
Essential:
- A stiff-bristled grout brush — narrow enough to sit down inside the joint
- A spray bottle
- A bucket of warm water
- Microfiber cloths or old towels
- Rubber gloves and eye protection
Worth having if you clean grout regularly:
- An electric spin scrubber with a narrow attachment
- A handheld steam cleaner with a detail nozzle
- A flat-head grout brush for wide joints
Skip wire brushes entirely. They scratch glazed tile and chip the edges of the grout line, which leaves more surface for dirt to cling to next time.
The 7 Methods, Ranked from Gentlest to Strongest
Method 1: Hot Water and a Stiff Brush
Always start here. Hot water alone loosens a surprising amount of buildup, especially soap scum, and it’s completely safe for every tile and grout type.
Use a dedicated grout brush — these have stiff, narrow bristles designed to reach into the joint without scratching tile edges. An old toothbrush works in a pinch but tires your hand quickly on large areas. Scrub in circular motions, not just along the grout line.
If this solves the problem, great. If the grout still looks dingy after drying, move to Method 2.
Method 2: Dish Soap and Warm Water
A few drops of dish soap in warm water creates light surfactant action that cuts through grease and body oil. Apply with a brush, scrub, and rinse thoroughly. The “thoroughly” part matters — soap residue left in grout attracts new dirt faster than if you’d left the grout alone.
This is a good weekly maintenance method for kitchen backsplash grout, where cooking oils accumulate.
Method 3: Baking Soda Paste with White Vinegar
This is probably the most searched DIY approach, and it does work — with caveats.
How to do it: Make a thick paste with baking soda and a small amount of water. Apply it along the grout lines. Then spray or drizzle white vinegar over the paste. The fizzing reaction helps lift debris from porous grout.
Scrub with a grout brush while the reaction is active, then rinse with clean water.
Important caveats:
- Do NOT use vinegar on natural stone tiles or near marble surrounds. Acetic acid etches calcium-based stone permanently.
- The fizzing looks impressive but the real work is done by the mechanical scrubbing and the mild abrasive action of baking soda. Don’t expect the chemistry alone to do the job.
- After the reaction, baking soda residue can leave a white film if not rinsed completely.
Method 4: Hydrogen Peroxide
Hydrogen peroxide (the standard 3% solution from a pharmacy) is an effective bleaching and disinfecting agent that’s gentler than chlorine bleach. It’s particularly effective against mold and mildew in bathroom grout.
Apply it directly to grout lines, let it sit for 10–15 minutes, then scrub and rinse. For stubborn spots, mix it into a paste with baking soda for combined abrasive and oxidizing action.
Hydrogen peroxide is safe for most tile types, including glazed ceramic, porcelain, and most natural stones (unlike vinegar). It does lighten colored grout over time with repeated use, so test an inconspicuous area first.
Method 5: Oxygen Bleach (Sodium Percarbonate)
Oxygen bleach — sold as powders like OxiClean or store-brand equivalents — releases hydrogen peroxide when mixed with water. It’s stronger than straight 3% peroxide but still considerably safer than chlorine bleach for grout, colored tiles, and surrounding surfaces.
Mix according to package directions, apply to grout, and let it dwell for 15–30 minutes. The longer dwell time is part of the mechanism: oxygen bleach needs time to penetrate porous grout and break down embedded stains. Scrub, then rinse.
This is often the sweet spot for bathrooms with persistent mold staining — effective enough to make a visible difference, without the fume and bleaching risks of chlorine.

Method 6: Chlorine Bleach (Use Carefully)
For genuinely severe mold — black mold deeply embedded in grout, or grout that has been neglected for years — chlorine bleach is sometimes the only practical option.
Apply neat (undiluted) bleach or a thick bleach gel directly to the grout using an old toothbrush or a pointed applicator. Let it sit for 10 minutes. Scrub and rinse thoroughly.
Rules to follow:
- Ventilate the room fully. Open windows, run the exhaust fan.
- Wear rubber gloves and avoid contact with eyes.
- Never mix bleach with vinegar, ammonia, or any other cleaner. The resulting chlorine gas or chloramines are toxic.
- Bleach will strip color from colored grout. If your grout is anything other than white or near-white, test a hidden section first.
- Bleach can degrade the grout sealer, so reseal after using it.
- Do not use on natural stone tile surrounds.
Method 7: Steam Cleaning
A handheld steam cleaner delivers high-temperature steam (typically 100°C / 212°F or above) directly into grout joints, killing mold and bacteria and loosening deeply embedded grime without any chemicals at all.
This is an excellent option for households wanting to avoid chemical cleaners, and it works surprisingly well on grout that hasn’t responded to scrubbing. The steam penetrates the pores of the grout and forces debris out.
Use a small nozzle or brush attachment and work slowly — rapid passes don’t allow enough dwell time. Wipe away the loosened residue as you go.
Steam cleaners range widely in price and quality. For grout work, you need a model that can sustain pressure for several minutes without the reservoir running dry every few seconds. Handheld models in the mid-price range handle most bathroom and kitchen jobs adequately. (Note: some retailers offer these on affiliate programs — prices vary; check current listings.)
One caution: Repeated steam cleaning can gradually weaken the grout sealer, so reseal the grout annually if you steam clean regularly.
Choosing the Right Method for Your Tile Type
Not every method is safe on every surface. Here’s a quick reference:
| Tile/Grout Type | Safe Methods | Avoid |
|---|---|---|
| Ceramic / Porcelain | All methods | — |
| Natural Stone (marble, travertine) | Hot water, dish soap, hydrogen peroxide, steam | Vinegar, chlorine bleach |
| Colored Grout | Hot water, dish soap, oxygen bleach, steam | Undiluted chlorine bleach, repeated hydrogen peroxide |
| Epoxy Grout | Hot water, dish soap, steam | Abrasive scrubbers |
The Deep-Clean Procedure, Step by Step
Choosing the method is half the job; the sequence is the other half. This is the full process for restoring an average bathroom or kitchen backsplash in one session.
1. Clear and dry the area. Remove toiletries, mats, and anything stored in the shower surround. If the tile was used recently, give it an hour — cleaning agents penetrate dry grout far better than wet.
2. Brush or vacuum away loose debris. Hair, dust, and dried soap flakes get pushed deeper the moment you add moisture.
3. Work in sections of one to two square feet. Treating a whole bathroom at once guarantees the cleaner dries before you get to it.
4. Let it dwell. This is the step people skip, and it’s where the chemistry actually happens. Five minutes for the gentle options, up to thirty for oxygen bleach.
5. Scrub along the line, not across it. Short, firm strokes following the joint direction. Scrubbing crossways sprays grime onto the tile and does less work per stroke.
6. Rinse thoroughly. Warm water and a damp cloth, or a handheld showerhead. Residue left in the joint attracts new dirt faster than if you had never cleaned it.
7. Dry the surface. A microfiber cloth or squeegee. Letting tile air-dry in a humid bathroom redeposits the minerals you just removed.
8. Repeat stubborn sections rather than escalating. Two careful passes with a moderate cleaner beat one aggressive pass that strips the sealer or etches stone.
After Cleaning: Sealing Grout to Prevent Future Staining
Cleaning grout only solves half the problem. Because cement-based grout is porous, it will get dirty again quickly unless you seal it.
Grout sealer penetrates the surface and creates a hydrophobic barrier that slows moisture and stain absorption. It doesn’t make grout bulletproof — sealed grout still needs regular cleaning — but it dramatically reduces how fast grime accumulates.
How to seal grout:
- Make sure the grout is completely clean and fully dry. Sealing over dirty grout locks the stains in.
- Apply a penetrating grout sealer using a small brush, roller applicator, or squeeze bottle. Work it into the joint.
- Wipe away any sealer that lands on tile faces before it dries.
- Allow to cure for the time specified on the product (typically 24–72 hours before exposure to water).
- Reapply every 1–2 years, or whenever water stops beading on the grout surface.

When Cleaning Isn’t Enough: Regrouting and Caulk
Some grout genuinely cannot be restored. If it is cracked, crumbling, missing in sections, stained black all the way through rather than just on the surface, or pulling away from the tile and letting water behind it, no method on this page will fix it.
That grout needs to come out. A grout saw or an oscillating multi-tool removes the old material without damaging tile edges. Regrout with pre-mixed or powder grout matched to the original color, let it cure for the time on the package, and seal it before it ever has a chance to get dirty — sealing new grout is far easier than rescuing old grout.
The caulk in corners and along the tub-to-wall joint deserves separate attention. It is not grout, it deteriorates faster, and it is the usual culprit when water gets behind tile. Replace it every few years rather than trying to clean it.
Maintenance That Actually Works
A few habits will keep grout from becoming a major project again:
- Dry your shower walls after use. A quick squeegee pass removes the standing moisture that feeds mold. It takes 30 seconds.
- Run the exhaust fan for at least 15 minutes after a shower. Most mold problems in bathrooms trace back to inadequate ventilation.
- Wipe kitchen backsplash grout weekly. Cooking grease is sticky and collects dust; weekly dish-soap wiping prevents cumulative buildup.
- Spot-treat early. A small mold spot treated immediately with hydrogen peroxide takes two minutes. Left for six months, the same spot might need bleach and a reseal.
- Check your sealer annually. Drip a few drops of water on the grout. If it beads up, the sealer is working. If it absorbs within a few seconds, it’s time to reseal.
The same little-and-often philosophy applies to other overlooked household spots, as shown in How to Clean a Ceiling Fan: 7 Simple Steps for Spotless Blades.
Conclusion
There’s no single “best” method for cleaning grout — the right approach depends on how dirty the grout is, what type of tile surrounds it, and whether you’re dealing with general grime or mold. Starting gentle and escalating only as needed protects both the grout and the tile, and avoids unnecessary exposure to strong chemicals.
For most bathrooms and kitchens, a combination of oxygen bleach for deep cleaning, steam for regular maintenance, and proper sealing afterward will keep grout looking clean with far less effort than people expect. The squeegee habit alone eliminates most shower mold before it starts.