Garbage Disposal Deep Clean Using Only Natural Ingredients

Why Bother Cleaning Something That Cleans Itself?
The logic sounds reasonable: water runs through it every time you use it, so how dirty can a garbage disposal actually get? Quite dirty, it turns out. A disposal’s rubber splash guard, grinding chamber, and drain walls accumulate a slick biofilm of food fat, starch, and bacteria over time. That film is the source of the sulfuric, fishy, or just generically foul smell most people eventually notice — and a bottle of industrial drain cleaner poured down there will dissolve very little of it while exposing your pipes, hands, and lungs to harsh chemicals.
Natural cleaning methods work because they target the actual problem: breaking up fat and food residue with mild acidity, mechanical scrubbing, and odor-neutralizing compounds that are already in most kitchens. Below is a method-by-method breakdown so you can choose what works for your situation.
If your disposal is just one stop on a broader kitchen refresh, How to Deep Clean Kitchen Appliances Step by Step walks through the rest of the appliances worth tackling.
The Core Cleaning Arsenal
Before picking a method, know what each ingredient does:
- Baking soda (sodium bicarbonate): A mild abrasive that helps lift residue. It also deodorizes by reacting with acidic odor compounds.
- White vinegar: Acetic acid at roughly 5% concentration — enough to break down light mineral deposits and cut through light grease, and it disrupts the surface chemistry of biofilm.
- Coarse salt: Abrasive particles that physically scour the grinding chamber walls when combined with ice.
- Ice cubes: The cold firms up grease clinging to the blades and chamber walls, making it easier for the abrasion cycle to remove it. Ice does not sharpen the impellers — that is a persistent myth. The impellers are not knives; they are blunt, hardened metal flippers.
- Citrus peels: The citrus oil (d-limonene) in lemon, orange, or grapefruit peel cuts light grease and leaves a pleasant scent. Treat them as a finishing step, not a primary cleaner — the oil content alone is not sufficient to tackle heavy buildup.
- Dish soap: Even a small amount of grease-cutting liquid soap significantly boosts cleaning power at the final flush stage.
The same pantry staples do double duty elsewhere in the kitchen, as shown in How to Deep Clean Your Oven Naturally Without Chemicals.
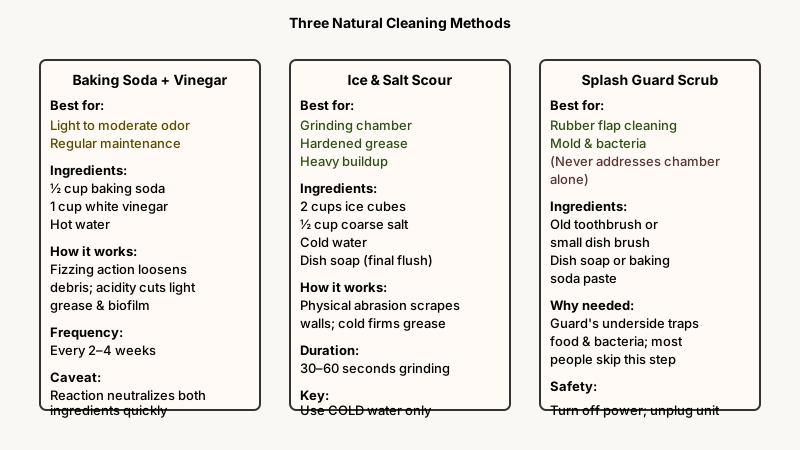
Method 1 — Baking Soda + Vinegar Foam Flush
This is the most popular natural method and works well for regular maintenance cleaning every two to four weeks.
What you need: ½ cup baking soda, 1 cup white vinegar, hot water.
- Turn off the disposal and confirm it is not running.
- Pour the baking soda directly down the drain opening, trying to coat the walls.
- Follow with the white vinegar. It will fizz vigorously — that fizzing action helps loosen debris from crevices.
- Let it sit for 10–15 minutes.
- Flush with the hottest tap water available for 30–60 seconds while running the disposal.
Honest caveat: The baking soda–vinegar reaction produces carbon dioxide foam, which looks dramatic and does help agitate surface grime. However, the neutralization reaction also means neither ingredient is present in full strength for long. This method is effective for light-to-moderate odor and residue, not for heavy grease buildup.
Method 2 — Ice and Salt Scour
For the grinding chamber specifically, physical abrasion outperforms chemistry. Grease that has hardened onto the impellers and chamber walls responds well to this approach.
What you need: 2 cups of ice cubes, ½ cup of coarse salt (kosher or rock salt).
- Dump the ice cubes into the disposal.
- Pour the salt on top.
- Run cold water at a moderate flow.
- Turn the disposal on and let it grind until all the ice is processed — usually 30–60 seconds.
- Follow with a dish-soap flush: a small squirt of dish soap with hot water running for another 30 seconds.
The cold water and ice firm up any fat and grease inside the chamber. The salt acts as a scouring agent against the chamber walls. Use cold — not hot — water during this step; hot water can liquefy the fats you are trying to scrape off.
Method 3 — Splash Guard Scrub (the Step Most People Skip)
The black rubber splash guard — the flap over the drain opening — is the dirtiest part of most disposals and is almost never cleaned. Bacteria, mold, and decomposing food hide on its underside. No amount of flushing will address it unless you physically clean it.
What you need: An old toothbrush or a small dish brush, dish soap or a paste of baking soda and a few drops of dish soap.
- Turn off the power at the wall switch and, ideally, unplug the unit under the sink or flip its circuit breaker before inserting your hand.
- Peel back the rubber flaps with your non-dominant hand.
- Scrub the underside aggressively with the brush and your cleaning paste.
- Rinse thoroughly.
Do this monthly, or whenever you notice residue buildup. The smell improvement from cleaning the splash guard alone is often greater than any flush method, because you are physically removing the biofilm source.
Method 4 — Citrus Peel Deodorize
This is purely a finishing and maintenance step — treat it as the final 30 seconds of a cleaning session, not a standalone deep clean.
- After cleaning with one of the methods above, drop 3–4 pieces of lemon, lime, or orange peel (roughly 2-inch sections) into the disposal.
- Run cold water and turn the disposal on until the peels are fully ground.
- The citrus oils coat the chamber with a fresh scent and contribute a small amount of additional grease-cutting action.
One note: do not use large quantities of citrus peel or whole fruit. Large volumes of citrus pulp can leave starchy residue that contributes to the very problem you are trying to solve.
A Practical Cleaning Schedule
The frequency that prevents buildup from getting severe in the first place:
- Weekly: Quick flush — dish soap and hot water for 30 seconds while the disposal runs.
- Every two to four weeks: Baking soda + vinegar foam flush (Method 1), followed by a citrus finish.
- Monthly: Full ice-and-salt scour (Method 2) plus splash guard scrub (Method 3).
- When odors persist despite cleaning: Check the drain further down for partial clogs, which trap decomposing food in the pipe rather than in the disposal itself.
What Not to Put Down There
Cleaning the disposal is easier when you limit what goes in. The following cause the most rapid buildup and are worth avoiding:
- Cooking fats and oils — even small daily amounts solidify in the chamber and pipe.
- Starchy foods in bulk — potato peels and pasta swell with water and form a paste that coats everything.
- Coffee grounds — they seem fine, but accumulate over time like a fine sediment.
- Fibrous vegetables — artichoke leaves, celery strings, and corn husks wrap around the impellers.
- Eggshells — the membrane can wrap around the shaft; the shell itself is abrasive but the volume needed to be effective is more than most people generate.
Frequently Asked Questions
Does vinegar damage the rubber parts of a disposal?
Occasional use — once or twice a month, at household vinegar concentration (5% acetic acid) — does not meaningfully degrade rubber gaskets or seals. Continuous or daily soaking could wear rubber over time, but that is not how cleaning treatments work in practice.
How often should I deep-clean my garbage disposal?
For most households, a thorough clean once a month (ice scour plus splash guard scrub) and a lighter flush every one to two weeks is sufficient. High-use kitchens may need to double that frequency.
Will baking soda and vinegar actually unclog a disposal?
Not reliably. For a genuine clog, the foam will not generate enough pressure or chemical action to move a blockage. Try plunging, or use the reset button on the bottom of the unit if the disposal has seized. Persistent clogs warrant a plumber.
Is it safe to clean a disposal with bleach?
Bleach can disinfect, but it is corrosive to metal disposal components over time, and it reacts dangerously with ammonia (found in some other cleaners). For routine cleaning, the natural methods above are safer and comparably effective at reducing bacteria — bleach is overkill for odor and grease.
Can I just use dish soap and hot water instead of all this?
For maintenance, yes — dish soap and hot water daily or weekly is genuinely underrated and often sufficient for a disposal that gets light use and where you have good habits about what goes in. The more involved methods are for resetting a disposal that has developed a smell or visible buildup.