How to Deep Clean Your Oven Naturally Without Chemicals

A blackened oven interior is one of those domestic problems that feels bigger than it is. Grease bakes on, smoke happens, and at some point the oven smells like last month’s roast every time you preheat. The good news: you don’t need a can of caustic foam to fix it. Baking soda, white vinegar, and a little patience will do the same job — without fumes that send you out of the kitchen, or residue you’d rather not have near food.
This guide covers every surface inside your oven (racks, glass door, walls, and the heating element area), explains why natural methods work, and gives you a realistic timeline so the process doesn’t eat your whole Saturday.

Why Natural Cleaning Methods Actually Work
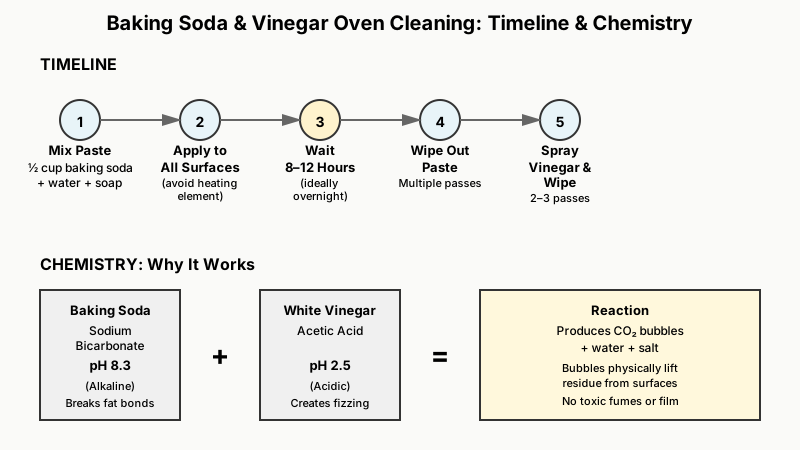
Oven grime is mostly polymerized fat — grease and food drippings that have been repeatedly heated until they bond into a tough, carbonized layer. Alkaline substances break those bonds. Baking soda (sodium bicarbonate) has a pH of around 8.3, which is enough to loosen baked-on fat when it has time to sit. White vinegar (acetic acid, pH around 2.5) reacts with baking soda to produce carbon dioxide bubbles that physically lift residue. Neither substance is toxic, and neither leaves a chemical film.
Compared to commercial oven cleaners that rely on sodium hydroxide (lye) — corrosive enough to cause skin burns — the baking soda method is far gentler, though it does require more dwell time. Plan for a paste that sits at least 8–12 hours, ideally overnight.
This same baking-soda-and-vinegar chemistry is also the secret behind How to Unclog a Drain Naturally: Baking Soda Beats Harsh Chemicals, another spot where natural ingredients outperform harsh commercial products.
What You’ll Need Before You Start
Gather everything before you open the oven. You’ll need:
- Baking soda — roughly half a cup for an average oven interior
- White distilled vinegar — a spray bottle filled is ideal
- Dish soap — a few drops added to the baking soda paste boosts grease-cutting
- Warm water
- Rubber gloves — even natural cleaners can dry out skin with prolonged contact
- A silicone or plastic spatula — for scraping without scratching
- Microfiber cloths or old rags (multiple)
- A small bowl for mixing paste
- A heavy-duty bin bag for soaking racks
That’s it. No specialist products required.
Step-by-Step: Cleaning the Oven Interior
1. Remove Everything and Do a Dry Wipe
Pull out the oven racks completely — they get their own treatment below. If your oven has a temperature probe or any removable parts, take those out too. Use a dry cloth or paper towel to brush away any loose crumbs or ash from the bottom. Trying to apply paste over dry debris is just moving the mess around.
2. Mix and Apply the Baking Soda Paste
In a small bowl, combine:
- ½ cup baking soda
- A few tablespoons of water
- 3–4 drops of dish soap
Stir until you get a thick, spreadable paste — similar in consistency to toothpaste. Add water gradually; you want it to cling to surfaces, not run off.
Using gloved hands or a pastry brush, coat every interior surface: walls, the ceiling of the oven, and the floor. Avoid the heating element itself (the bare coil at the bottom, if visible) and any gas ports. The paste won’t damage them, but wet baking soda inside electrical elements can cause problems when you next switch on the oven.
For really thick, carbonized buildup, apply a heavier layer and press it in slightly with a spatula. The paste will turn brown as it absorbs grease — that’s normal, and a useful signal of where the worst spots are.
3. Leave It Overnight (Minimum 8 Hours)
Close the oven door and walk away. The longer the paste sits, the more it softens the baked-on carbon. Eight hours is the minimum; 12 works better for ovens that haven’t been cleaned in over a year.
Do not turn the oven on during this time.
4. Wipe Out the Paste
Using a damp microfiber cloth, wipe out as much of the paste as you can. A plastic spatula is useful here for corners and the lip at the front of the oven floor. Don’t rush this step — multiple passes with a rinsed cloth give better results than one heavy swipe.
5. Spray with Vinegar and Wipe Again
Fill a spray bottle with undiluted white vinegar and mist the entire interior. The vinegar reacts with any remaining baking soda — you’ll see mild fizzing. This reaction helps lift residue from textured surfaces that a cloth can’t reach cleanly. Wipe down again with a fresh damp cloth.
Repeat the vinegar spray and wipe cycle until the interior looks clean and no white residue remains. Two or three passes is usually enough.

Cleaning the Oven Racks
Oven racks need different treatment because of their shape — paste doesn’t adhere well to metal bars, and they need soaking.
The bin-bag method works well for most people:
- Place racks inside a large, heavy-duty bin bag.
- Pour in ½ cup of baking soda and ½ cup of white vinegar.
- Add enough warm water to mostly submerge the racks (do this in a bathtub or outdoors).
- Seal the bag and leave for 4–6 hours, turning occasionally.
- Remove the racks, scrub with an old sponge or nylon brush, and rinse thoroughly.
Bathtub soak alternative: Line your bathtub with old towels (to protect the surface), lay the racks flat, fill with hot water, and add a generous squirt of dish soap plus ½ cup of baking soda. Let soak for 2–4 hours, then scrub and rinse.
For stubborn burnt-on residue that soaking doesn’t shift, a paste of baking soda and dish soap applied directly to the affected bar, left for 30 minutes, then scrubbed with a ball of scrunched aluminium foil (used gently) will usually break it loose without scratching.
Tackling the Oven Door Glass
The glass panel is often the most visually impactful part — a streaky, brown door makes the whole oven look filthy even when the interior is clean. And it has a particular challenge: the grime is often between the glass panes, not just on the inside surface.
Outer and Inner Glass Surfaces
Make a slightly wetter baking soda paste (add a bit more water than for the interior). Apply it to the inner glass surface, spread it evenly, and leave for 30 minutes. Wipe off with a damp cloth, then spray with vinegar and buff dry with a clean microfiber cloth. For streak-free results, a final wipe with a cloth barely dampened with plain water does the job.
Between the Glass Panes
On many oven models, the door can be partially disassembled to clean between the panes. The method varies by brand — usually there are screws or clips at the top of the door interior — so check your oven’s manual or look up the specific model online before attempting this. Once accessed, wipe the inner glass surfaces with a damp cloth and mild dish soap, then dry thoroughly before reassembly. This step makes a surprisingly dramatic difference to how the oven looks in use.
The Oven Seal and Exterior
The rubber gasket around the door collects grease splatter and deserves attention. Wipe it down with a cloth dampened with warm water and a drop of dish soap — do not use vinegar on rubber seals, as acid can cause them to degrade over time. Be gentle; tears in the seal affect the oven’s ability to hold temperature.
For the exterior (control panel, knobs, and door surface), a cloth wrung out in warm soapy water is usually enough. Remove knobs if they pull off — the recesses behind them collect an impressive amount of residue.

How Often Should You Do This?
The answer depends on how you cook. If you roast meats or bake things that bubble over, a full deep clean every 3–4 months is realistic. For lighter use, twice a year is sufficient.
Between deep cleans, a quick wipe-out after anything spills — while the oven is still warm (not hot) and the residue is still soft — saves significant scrubbing time later. A damp cloth on a warm oven floor takes 30 seconds and prevents weeks of baked-on buildup.
If your oven has a self-cleaning function, that’s a separate decision. Self-cleaning cycles work by heating to around 480°C (900°F) to incinerate residue — effective, but hard on oven components and the heating element over time. Natural cleaning is gentler on the oven’s mechanics and doesn’t require you to vacate the kitchen for hours because of smoke.
If your oven cleaning session has you motivated to tackle the rest of the kitchen, How to Deep Clean Kitchen Appliances Step by Step walks you through the stove, fridge, and dishwasher too.
If you’re on a natural cleaning streak, our guide to Deep Clean Your Bathroom Without Harsh Chemicals is a great next step for tackling another grimy corner of the house.
Frequently Asked Questions
Does baking soda damage oven surfaces?
No. Baking soda is a mild abrasive and alkaline cleaner that’s safe for the enamelled steel interior of most domestic ovens. It won’t scratch or corrode. The only surfaces to avoid are bare heating elements and rubber seals (where prolonged contact with any moisture is best avoided).
Can I use this method on a gas oven?
Yes, with one adjustment: avoid getting paste or liquid near the gas ports (the small holes in the burner assembly). Otherwise the process is identical. Remove the burner grates and soak those separately using the same baking soda and dish soap method.
What if the stains still won’t come off after one clean?
For truly severe buildup — an oven that hasn’t been cleaned in years — one overnight paste application may not be enough. Repeat the process: apply a fresh paste, leave again overnight, and wipe out again. Two rounds of this will shift most carbonized residue without resorting to harsh chemicals.
Is it safe to cook in the oven immediately after cleaning?
Yes, provided you’ve wiped out all the baking soda residue and rinsed the interior thoroughly. Any remaining baking soda will release a very mild soapy smell at first heat. A brief 10-minute preheat at around 180°C (350°F) with the kitchen ventilated will burn off any trace and clear it completely before you cook food.
Does white vinegar leave a smell in the oven?
Briefly, yes — vinegar has a sharp smell when applied. It dissipates quickly and completely once the surface is dry. It leaves no lasting odour once the oven has been preheated.
Wrapping Up
Deep cleaning an oven without chemicals is genuinely straightforward once you know the sequence: paste overnight, wipe out, vinegar spray, wipe again, racks soaked separately. The results are comparable to commercial products, and you’re not filling your kitchen with sodium hydroxide fumes or leaving residue near food.
The real trick is timing — do the paste application the evening before, and the bulk of the work is done by the next morning. Break it into stages (racks one day, interior the next if needed), and it stops feeling like a project.
Sources
- https://www.epa.gov/saferchoice/learn-about-safer-choice-label
- https://www.goodhousekeeping.com/home/cleaning/tips/a24062/how-to-clean-oven/
- https://www.epa.gov/system/files/documents/2022-10/235_Green%20cleaning%20brochure.pdf — US EPA, Green Cleaning: Non-toxic cleaning recipes for your home
- https://pubmed.ncbi.nlm.nih.gov/28443378/ — Toxicity from exposure to oven cleaners, UK National Poisons Information Service 2009–2015