How to Deep Clean a Microwave: The Steam Trick For Baked-On Grime

A grimy microwave is one of those kitchen problems that sneaks up on you. One day it’s a light splatter, and before long there’s a crust of old tomato sauce baked onto the ceiling and a smell that greets you every time you open the door. The good news: you don’t need special chemicals or an hour of scrubbing. With the right technique, a thorough microwave clean takes about 15 minutes and leaves the interior looking close to new.
This guide covers seven practical methods — from the classic steam trick to heavy-duty stain removal — so you can pick what works for what’s actually in your microwave right now.
Why Deep Cleaning Actually Matters
Beyond aesthetics, there are real reasons to stay on top of microwave hygiene. Food residue absorbs microwave energy, which means old splatter heats up every time you run the appliance. Over time, this can scorch built-up grease, create persistent odors, and in extreme cases, cause uneven heating that affects food safety. The FDA’s food safety guidance is to wash food-contact surfaces often — a microwave interior is one of them — to prevent cross-contamination between old residue and fresh food.
Surface bacteria are also a factor. Food-safety research has repeatedly found that kitchen appliance interiors — including microwaves — can harbor pathogens like Listeria monocytogenes when they are not cleaned regularly. Regular cleaning is simply part of safe kitchen practice.
If your oven is overdue for the same treatment, How to Deep Clean Your Oven Naturally Without Chemicals walks through a chemical-free approach that works just as well on baked-on grease.
What You’ll Need Before You Start
Most of these methods use things already in your kitchen:
- White distilled vinegar
- Fresh lemons or bottled lemon juice
- Baking soda
- Dish soap (plain, not heavily scented)
- A microwave-safe bowl or measuring cup
- Wooden toothpick or wooden skewer (for steam methods — see below)
- Clean microfiber cloths or paper towels
- A soft sponge
Avoid steel wool, abrasive scrub pads, or any cleaner that contains bleach — these scratch the interior coating or leave residue that’s unsafe to heat.
A note on wooden skewers: When you heat plain water in a microwave, it can superheat and erupt suddenly when disturbed — a phenomenon called bumping. Dropping a wooden toothpick or skewer into the bowl gives the water a nucleation point so it boils normally. Don’t skip this step.
7 Methods for Deep Cleaning a Microwave
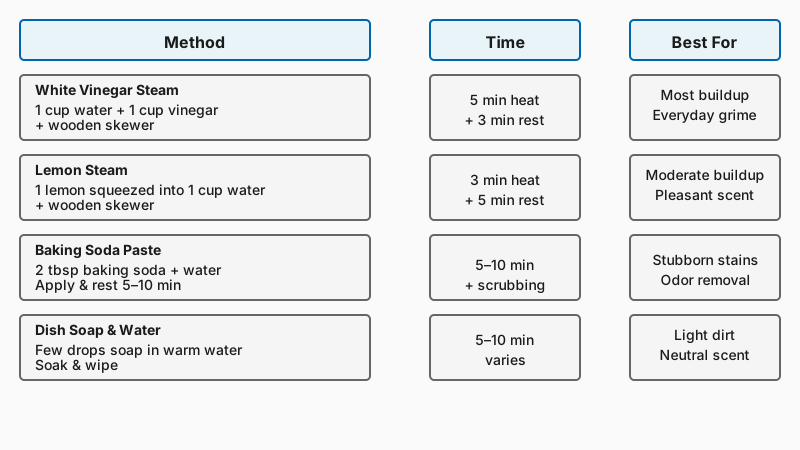
1. The White Vinegar Steam Method
This is the workhorse approach — fast, cheap, and genuinely effective on most everyday buildup.
- Fill a microwave-safe bowl with 1 cup of water and 1 cup of white vinegar.
- Add a wooden toothpick or skewer.
- Microwave on high for 5 minutes, then let it sit — door closed — for another 3 minutes. The steam loosens stuck-on food.
- Remove the bowl carefully (it will be hot). Wipe down all interior surfaces with a damp cloth, starting from the ceiling and working down.
- Remove the turntable plate and wash it in the sink with dish soap.
The acetic acid in vinegar cuts through grease and also neutralizes odors rather than just masking them.
2. The Lemon Steam Method
If you dislike the vinegar smell, lemon works on the same principle and leaves a genuinely pleasant scent.
- Slice a lemon in half and squeeze both halves into a bowl of water (about 1 cup). Drop the squeezed halves in too.
- Add a wooden skewer.
- Microwave on high for 3 minutes, then rest for 5 minutes with the door closed.
- Wipe the interior clean.
Lemon juice’s citric acid is slightly less aggressive than acetic acid, so this method works better on moderate — not severe — buildup.
3. Dish Soap and Warm Water
For a microwave that’s only mildly dirty, there’s nothing wrong with the basics. Add a squirt of dish soap to a bowl of warm water, soak a sponge, and wipe every surface. Rinse with a damp cloth. Simple, and it smells neutral.
This is also the right follow-up step after any of the steam methods — a final wipe with soapy water removes the loosened residue more completely than plain water alone.
4. Baking Soda Paste for Stubborn Stains
For baked-on spots that survived the steam treatment, a baking soda paste is your next tool.
- Mix 2 tablespoons of baking soda with enough water to form a thick paste.
- Apply it directly to the stained area.
- Let it sit for 5–10 minutes.
- Scrub gently with a soft sponge and wipe clean.
Baking soda is a mild abrasive that lifts stains without scratching. It also absorbs odors, which makes it useful if your microwave has taken on the smell of last week’s fish.
5. The Dish Soap Steam Method
A variation worth knowing: fill a microwave-safe bowl with water and a few drops of dish soap, then heat it on high for 2–3 minutes. The steam is less acidic than the vinegar method but still loosens light grease effectively. Good option if you’re out of vinegar and lemons.

6. Cleaning the Exterior and Vents
Deep cleaning only counts if you don’t ignore what’s outside the cavity.
- Control panel: Spray a small amount of all-purpose cleaner onto a cloth — never directly onto the panel — and wipe gently. Liquid seeping into buttons causes electrical problems.
- Door and seal: The rubber door gasket collects grease and food particles. Wipe it with a damp cloth and, for stubborn spots, a little baking soda paste.
- Vents: Use a dry brush (an old toothbrush works) to clear dust from external vents. Clogged vents reduce airflow and can cause the appliance to overheat.
- Top and sides: Wipe with a damp cloth and a general-purpose kitchen cleaner.
For stainless steel exteriors, wipe with the grain using a microfiber cloth. A tiny amount of mineral oil on the cloth after cleaning prevents fingerprints and gives a cleaner finish.
7. Deodorizing a Smelly Microwave
Sometimes the microwave isn’t visually dirty but still smells. A few targeted options:
- Baking soda bowl: Leave an open bowl of baking soda inside the microwave overnight (door closed). It absorbs ambient odors.
- Coffee grounds: Same idea — dry coffee grounds in a small bowl absorb strong smells effectively.
- Vanilla extract: Put a few drops of vanilla extract in a bowl of water and microwave it for 30 seconds. It doesn’t eliminate odors the way baking soda does, but it temporarily replaces them with something pleasant, which can be enough after the interior is already clean.
If a smell persists after deep cleaning, check the charcoal filter (on over-the-range models). Most manufacturers recommend replacing it every six months to a year depending on use — check your model’s manual.
How to Keep It Clean Between Deep Cleans
A deep clean every 1–2 months is reasonable for regular household use, but a few small habits cut down on how much work that involves:
- Use a microwave-safe cover. A vented silicone cover costs a few dollars and stops 90% of splatter before it reaches the walls.
- Wipe after every visible splatter. If you see it happen, a 30-second wipe while the surface is still warm is far easier than removing baked-on residue a week later.
- Loosely cover sauces and soups. Placing a paper towel over soup or chili before heating drastically reduces splatter without the need for a dedicated cover.
- Leave the door ajar after steamy foods. Letting moisture dissipate prevents mold growth, particularly around the door seal.

Once your microwave is sparkling, you might want to tackle the rest of your kitchen with How to Deep Clean Kitchen Appliances Step by Step.
Troubleshooting Specific Problems
Burnt smell that won’t go away: After cleaning, place a bowl of water with a tablespoon of baking soda inside and run for 3 minutes. Follow with the overnight baking soda bowl trick. Repeat if necessary. If the smell is coming from the microwave running with nothing inside (a burnt electronic smell), that’s a mechanical issue — not a cleaning problem.
Yellow staining on the ceiling or walls: This is usually oxidized grease. Apply baking soda paste, let it sit for 10–15 minutes, and scrub gently. For severe yellowing, a paste made from oxygen-based cleaner powder and water can help — test a small area first.
Cracked or flaking interior coating: This is beyond cleaning. The coating on microwave interiors (typically a painted enamel or polymer) can chip if scratched over time. Small chips near the walls are usually safe but worth monitoring; large flaking areas, especially on the interior ceiling near the magnetron, should be assessed by a repair technician. The FDA cautions against using a microwave with damaged interior coatings that could allow arcing.
Conclusion
Deep cleaning a microwave is straightforward once you have a method that matches the level of grime you’re dealing with. For most buildup, the vinegar or lemon steam method handles the job in under 15 minutes. Stubborn stains respond well to baking soda paste. And a quick wipe-down habit after each splatter means deep cleaning sessions stay genuinely manageable — not the hour-long ordeal most people dread.
The tools are already in your kitchen. Pick a method, set a bowl of water to steam, and cross this one off your list.