How to Organize a Home Craft Space: Build a Workflow Not a Shelf

If your craft supplies have quietly colonized half the house — a basket of yarn on the couch, fabric bolts behind the door, stamps mixed in with the junk drawer — this guide is for you. Getting a dedicated craft space in order is less about buying the perfect storage system and more about building a workflow that keeps things findable when inspiration actually strikes.
These tips work whether you have a spare room, a closet conversion, a single IKEA cart, or just one corner of a shared living space.
1. Start With a Honest Audit Before You Buy Anything
The single most common mistake crafters make is shopping for storage before they know what they own. You end up with bins that are the wrong size, or three label makers but nothing to actually put in the drawers.
Spend an hour pulling everything craft-related into one place. Yes, everything — the dried-out paint tubes, the three pairs of scissors, the fabric you bought in 2019 and have never touched. Then sort by category:
- Paper crafts (cardstock, stamps, dies, inks)
- Textiles (fabric, yarn, thread, needles)
- Drawing and painting (brushes, paints, markers)
- Mixed media / general tools (glue guns, cutting mats, rulers)
- Works in progress
As you sort, cull aggressively. Dried markers, cracked paint, fabric you genuinely don’t like anymore — donate or toss. A craft space stays organized when there’s less stuff competing for room.

2. Map the Space Before Committing to Furniture
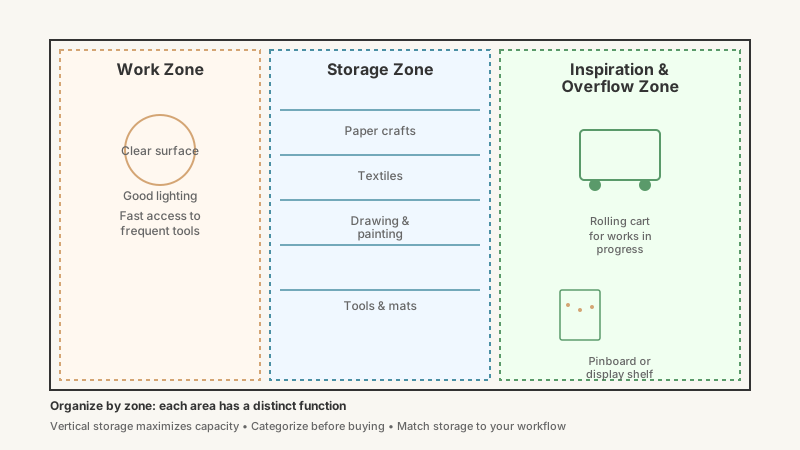
Once you know what you have, measure your actual space and sketch a rough layout — even on a napkin. Think about three zones:
Work zone: Where you actually make things. This area needs clear surface space, good lighting (ideally daylight-balanced), and fast access to the tools you use most.
Storage zone: Where supplies live when not in use. Vertical storage wins here — shelving from floor to ceiling dramatically increases capacity in a small room without eating floor space.
Inspiration or overflow zone: A pinboard, a small display shelf for finished projects, or a cart for works in progress. Not strictly necessary, but it keeps half-done projects from cluttering your work surface.
If you’re working with a closet, remove the doors and add deep shelves at varying heights. A 24-inch-deep reach-in closet can hold a surprising amount when shelved properly.
3. Choose Storage That Matches How You Actually Work
Storage categories that look great in photos don’t always match how people actually craft. Before choosing bins, ask yourself:
- Do I work on one project at a time, or several?
- Do I need to see my supplies to feel motivated, or does visual clutter distract me?
- Do I work in bursts, pulling lots of things out at once?
Open storage (pegboards, open shelving, clear acrylic drawers) works best for people who need to see everything at once. Pegboards are particularly effective for tools — a hook or clip for each item means you always know where it goes back.
Closed storage (lidded bins, cabinet doors, drawer units) suits people who find visible clutter distracting, or who need to keep supplies away from kids or pets.
Hybrid systems — open shelving for frequently used items, closed bins for seasonal or specialty supplies — work for most people.
One genuinely useful tool: a rolling cart with shallow drawers (the IKEA RÅSKOG and Alex carts are popular for good reason — they’re deep enough for most craft supplies but not so massive they dominate a small space). A rolling cart also lets you move your supplies to wherever you’re working, which matters if your craft space doubles as a dining room.
If you want another example of storage built around real usage patterns rather than aesthetics, How to Organize a Pantry: 9 Practical Steps That Last walks through the same zone-first thinking applied to a kitchen.
4. Tackle Tools Separately From Supplies
Tools and supplies have different needs. Supplies get used up; tools (scissors, craft knives, cutting mats, bone folders) stay indefinitely and need dedicated homes so they’re never hunting.
For cutting tools: Magnetic knife strips — originally for kitchen knives — hold scissors, rotary cutters, and craft knives safely and visibly. Mount one at eye level near your cutting area.
For small tools and bits: Shallow divided trays (think tackle boxes or the type sold for bead storage) keep things like eyelets, brads, tiny buttons, or embellishments sorted without getting jumbled.
For rulers and mats: Vertical is best. A tall, narrow container (a clean trash can, a PVC pipe section, a purpose-built holder) keeps rulers upright and easy to grab.
Label everything that goes into a closed container. The label is the contract you make with future-you — it removes the decision of where something goes back.

5. Solve the Fabric and Paper Problem
Two materials give crafters the most organizational grief: fabric and paper. Both accumulate fast, take up a lot of space, and get damaged if stored poorly.
Fabric
- Fold fabric pieces around cardboard comic book boards or sturdy cardboard rectangles cut to the same size. Stack or file vertically in a bin so you can flip through and see each piece — the same principle as records in a crate.
- Small scraps live in a clear bin by size (palm-sized, fat quarter, half-yard). When the bin is full, it’s time to use scraps or let some go.
- Store fabric away from direct sunlight to prevent fading. A closed cabinet works well for any fabric you want to preserve.
Paper
- Stand paper upright in file boxes or magazine holders rather than stacking in horizontal piles. Stacking leads to paper avalanches and makes the pieces at the bottom effectively inaccessible.
- Sort by color family rather than paper type — it’s usually easier to find what you need when browsing by color.
- Keep a scrap paper bin nearby. Anything under 4x4 inches goes there; anything too small to use gets recycled immediately.
6. Build a System for Works in Progress
Unfinished projects are the main reason craft spaces descend into chaos. A half-assembled card, a quilt block pinned to batting, a half-painted canvas — all of them need a place to live while you’re not actively working on them.
A few approaches that work:
- Project bins or bags: Each active project gets its own labeled bin or zip bag containing everything needed to finish it. When you want to work on it, grab the bag. When you’re done for the day, everything goes back in.
- A dedicated WIP shelf: One shelf, clearly designated, for things that are in progress. When the shelf is full, finish something before starting something new.
- A project binder: For paper-based crafts, a binder with plastic sleeves holds inspiration clippings, notes, sketches, and small samples together without taking up physical bin space.
The specific system matters less than the rule: works in progress live in one place, not scattered across the whole room.
7. Light It Properly — It Changes Everything
Poor lighting is underestimated as a craft space problem. It causes eye strain, makes color matching harder (especially for fabric and paint), and makes the space feel cramped even when it isn’t.
If you can’t add overhead lighting, a daylight-spectrum desk lamp (5000–6500K color temperature) is one of the highest-value upgrades you can make. It renders colors accurately, which matters if you’re trying to match thread to fabric or paint to a reference. A clip-on version works if you have no desk space to spare.
For overhead lighting in a dedicated room, LED shop lights mounted to the ceiling are inexpensive, bright, and easy to install without an electrician.
The same lighting and layout principles apply beyond crafting, as shown in 12 Tips for Organizing a Home Office That Actually Works.
8. Label, Then Maintain the System
Labeling gets mentioned in every organizing guide, but the maintenance part rarely does. A well-labeled system fails the moment you start piling things on top of the “miscellaneous” bin because you’re in a hurry.
Build a reset habit: spend five minutes at the end of each craft session returning tools and supplies to their labeled spots. Five minutes of reset prevents three hours of re-organizing later.
If a particular spot consistently attracts wrong items, the system is probably off — the bin is in the wrong place, or the category doesn’t match how you think. Adjust the system rather than fighting yourself.

9. Make the Most of Small or Shared Spaces
Not everyone has a dedicated craft room. If you’re working with a corner, a cart, or a shared table:
- A craft armoire or secretary desk can hold an entire setup that closes away when not in use — a genuine option if the space doubles as a living room.
- Over-door organizers with clear pockets work for flat items: stencils, foam sheets, envelopes, ribbon spools.
- Under-table storage on rolling carts or with hanging fabric bins keeps supplies accessible without taking surface space.
- Vertical wall space often goes unused — a few floating shelves or a pegboard panel can dramatically increase capacity without touching the floor plan.
The core principle in small spaces: everything must have a home, and that home must be efficient. One item sitting out is clutter; a clear surface with intentional storage is a functional workspace.
Putting It All Together
A well-organized craft space doesn’t need to be large, expensive, or Pinterest-perfect. It needs to be honest about what you own, logical about where things live, and realistic about how you actually work.
Start with the audit. Define your zones. Choose storage that fits your workflow, not someone else’s aesthetic. Label things, then build the five-minute reset habit. Adjust when things aren’t working.
Done right, an organized craft space removes the friction between you and making things — which is the whole point.