How to Set Up a Recycling System at Home (Step-by-Step)

Setting up a recycling system at home sounds straightforward until you actually try it. Bins multiply, rules vary by city, and half the items you assume are recyclable aren’t. This guide cuts through the confusion with a practical, room-by-room approach that works regardless of where you live.
Why Most Home Recycling Attempts Fail
The biggest obstacle isn’t laziness — it’s friction. When recycling requires extra steps, extra trips, or mental effort at the moment you’re holding an empty yogurt container, people default to the trash. A good home system removes that friction entirely.
The second killer is contamination. Greasy pizza boxes, food-smeared cans, and plastic bags stuffed into recycling bins are the reason entire loads get rejected at sorting facilities. Getting this right matters as much as sorting in the first place.

Step 1 — Know Your Local Rules Before You Buy a Single Bin
Recycling rules are hyperlocal. A municipality in Germany may accept plastic films curbside; one in rural Australia might not. Before spending money on containers, find out:
- What materials your curbside program accepts. Most council or municipal websites publish an A-to-Z list. Search for “[your city] recycling guidelines” or call your waste hauler.
- Which items require drop-off instead of curbside pickup. Electronics, batteries, hazardous materials, and glass often have separate streams.
- What day and format collection happens. Some areas want everything loose in one bin (single-stream); others require separated containers.
This research takes 15 minutes and saves months of sorting things incorrectly.
The “Wish-Cycling” Trap
Wish-cycling is the habit of tossing questionable items into the recycling bin hoping they’ll be handled. They usually aren’t — they contaminate the load. If you’re unsure about an item, check your local list. If it’s not on it, don’t bin it.
Step 2 — Design a System That Matches Your Space
There’s no universal setup. A studio apartment needs a different solution than a four-bedroom house with a garage. Here’s how to think about it:
If clutter is part of what’s making your recycling flow feel chaotic, How to Declutter Your Home Step by Step (That Actually Works) can help you clear the physical space you need for bins in the first place.
The Kitchen (Your Central Hub)
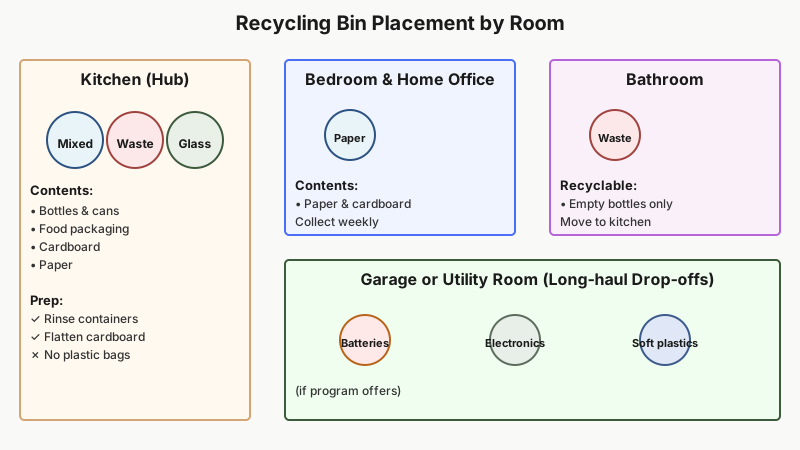
The kitchen generates the highest volume of recyclables — food packaging, cans, bottles, cardboard. This is where your main sorting station should live.
A practical kitchen setup:
- One bin for mixed recyclables (paper, cardboard, cans, plastic bottles) — sized to match your collection schedule. If pickup is weekly, go larger.
- A separate small container for glass if your program collects it separately.
- A lidded bin for general waste right next to it, so the choice is immediate.
Under-sink pull-out frames hold two or three bins side by side and keep the visual clutter off the floor. IKEA’s HÅLLBAR range and similar products from simplehuman are popular options — note that links to these are for reference only.
The Rest of the House
Don’t run recyclables from every room to the kitchen every day. Instead:
- Bedroom/home office: A small paper-only bin. Collect it weekly.
- Bathroom: Most bathroom waste (cotton pads, blister packs, toothpaste tubes) is non-recyclable. A single general waste bin is usually enough. Keep a small dedicated spot for empty shampoo bottles and cardboard packaging to consolidate.
- Garage or utility room: This is where your long-haul collection lives — a bin for batteries, a box for old electronics, a bag for soft plastics if your area has a drop-off scheme.

Step 3 — Prep Your Materials Correctly
This is where recycling actually gets done. Most programs require:
Rinse, don’t sterilize. A quick rinse of cans, jars, and bottles removes food residue. You don’t need to run them through the dishwasher — just enough that the container isn’t actively greasy or sticky.
Flatten cardboard. Boxes that aren’t broken down take up bin space and can jam sorting machinery. Flatten them and store them flat until collection day.
Remove non-recyclable parts where possible. Peel the plastic window out of envelope windows. Take lids off glass jars if your program requires separation. Strip tape from cardboard if there’s a thick layer — small bits of tape are generally fine.
Never bag recyclables in plastic bags unless your program specifically says to. A plastic bag full of recyclables looks like a bag of trash to sorting machinery and to workers — it goes straight to landfill.
What Almost Never Belongs in Curbside Bins
These items cause problems nearly everywhere:
- Greasy food containers (pizza boxes with heavy grease, takeaway foil)
- Soft plastics (cling film, bread bags, bubble wrap) — unless you have a dedicated drop-off
- Coffee cups (most are lined with plastic and need specialist facilities)
- Broken glass
- Hoses, wires, and long stringy materials that tangle machinery
- Nappies and medical waste
Step 4 — Label Everything Clearly
Labeling transforms a system from something you have to remember into something you can follow on autopilot. You can:
- Print your council’s accepted-items list and tape it inside a cabinet door above your bins.
- Use colored bins or colored lids that match a legend (green = glass, blue = mixed recycling).
- Write categories directly on the bin with a label maker or masking tape.
This also matters enormously if other people share the space. A system only one person understands is a system that will be ignored by everyone else.
The same principles of clear categories and consistent labels apply beyond recycling, as shown in How to Create a Simple Document Filing System That Works.
Step 5 — Handle the Awkward Categories
Some materials don’t fit neatly into a bin. Here’s how to handle the most common ones:
Soft Plastics
Supermarkets in many countries (the UK’s REDcycle equivalent, Lidl and Tesco schemes, and similar programs in the US and Australia) accept soft plastics like bread bags, produce bags, and bubble wrap at in-store drop-off points. Check which retailers near you participate.
Batteries
All household batteries — AA, AAA, 9V, button cells — should go to a dedicated collection point, not general waste. Many supermarkets, hardware stores, and electronics retailers have free collection bins near the entrance.
Electronics (E-Waste)
Old phones, cables, laptops, and small appliances contain materials that are both hazardous and valuable. Manufacturers, retailers, and dedicated e-waste facilities often offer take-back. In the EU, retailers selling electronics are legally required to accept returns of old items.
Textiles
Clothing and fabric don’t belong in curbside recycling. Donate wearable items; for worn-out textiles, look for in-store take-back (H&M, Zara, and similar brands run ongoing schemes) or municipal textile banks.

Step 6 — Build the Habit, Not Just the System
A well-designed system still requires consistent behavior. A few things that make it stick:
Tie it to an existing routine. If you cook dinner every evening, do a quick rinse of the day’s recyclables at the same time. If Sunday is cleaning day, that’s when you break down cardboard.
Schedule a monthly audit. Once a month, look at what’s piling up outside the system — items you’re unsure about, things accumulating in a drawer. Spend 20 minutes researching and routing them correctly.
Reduce first. Recycling is valuable, but reducing packaging in the first place is more so. Buying in bulk, choosing products with minimal packaging, and avoiding single-use items means less sorting overall.
Get the whole household on board. A shared system needs shared understanding. A five-minute walk-through with family members or housemates is worth more than the best-designed bin setup.
How to Tell If Your System Is Actually Working
A functioning system has a few signs:
- Your general waste bin fills more slowly than before.
- You rarely have recyclables sitting on the counter because there’s no obvious place for them.
- Collection day doesn’t require a frantic pre-sort.
- Other household members use the bins correctly without prompting.
If any of these feel off, the system needs tweaking, not more willpower. Adjust bin placement, bin size, or labeling before assuming the problem is motivation.
Conclusion
A home recycling system that actually works isn’t about buying matching bins or memorizing dozens of rules. It’s about removing the decision-making from the moment you’re holding packaging and replacing it with clear, obvious paths for each type of waste. Start with your local guidelines, design for your actual space, prep materials correctly, and handle the tricky categories through the right drop-off routes. Once the infrastructure is in place, maintaining it takes almost no effort at all.