How to Cook Quinoa Properly: Why Your Pot Turns Gluey

Quinoa has a reputation for being healthy, but it also has a reputation for turning out gluey, bitter, or waterlogged — and that reputation is earned. Most recipes give you the ratio and the timer, then leave you to wonder why your pot looks like beige porridge. This guide closes that gap.
What Quinoa Actually Is (and Why It Cooks the Way It Does)
Quinoa isn’t technically a grain — it’s the seed of Chenopodium quinoa, a flowering plant native to the Andes. That distinction matters in the kitchen because quinoa seeds are coated in saponins, natural bitter compounds the plant produces to deter insects and birds. If you cook without rinsing, those saponins dissolve into the water and infuse every bite with a soapy, astringent edge.
The other key fact: quinoa seeds are tiny and absorbent. They swell to roughly four times their dry volume when cooked. That’s why the wrong water ratio or a loose-fitting lid can derail the whole pot.
Three main types appear in most grocery stores:
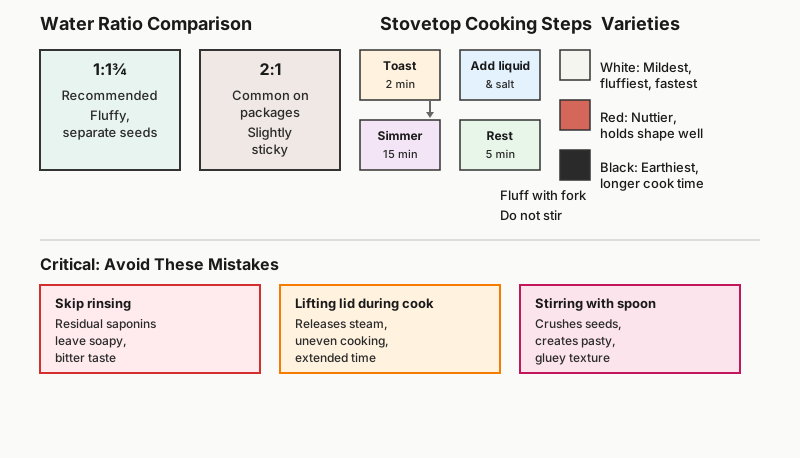
- White quinoa — the mildest, fluffiest, fastest to cook
- Red quinoa — nuttier, chewier, holds its shape better in salads
- Black quinoa — earthiest flavor, slightly longer cook time, dramatic color
Tricolor blends are a mix of all three and will cook to the texture of the slowest component, so give them a few extra minutes.

The Rinsing Step Most People Skip
Rinse your quinoa. Every time. Even if the bag says pre-washed.
Pre-washed quinoa has been through a commercial process that removes most saponins, but not necessarily all of them — and flavor is sensitive enough that residual bitterness is noticeable. Put the quinoa in a fine-mesh strainer (the holes in a standard colander are too large; the seeds will escape) and run cold water over it for 30 to 60 seconds while rubbing the seeds gently with your fingers. The water will run cloudy at first, then clear. That’s your signal to stop.
After rinsing, let the strainer sit over the sink for a minute so excess water drains off. Cooking waterlogged quinoa throws off your liquid ratio before you even start.
The Correct Water-to-Quinoa Ratio
The standard ratio is 1 cup dry quinoa to 1¾ cups liquid. You’ll see 2:1 ratios on many packages, and they work — but they often produce slightly sticky results. The 1:1¾ ratio is tighter and yields fluffier, more separate seeds.
A few nuances:
- Using broth instead of water boosts flavor significantly. Vegetable or chicken broth both work. Low-sodium versions give you more control over seasoning.
- At high altitudes, water boils at a lower temperature, which means quinoa needs slightly more liquid and a longer simmer — add an extra 2 tablespoons of water and extend the cook time by 3 to 4 minutes.
- Toasting before cooking slightly reduces the liquid the quinoa absorbs, so don’t add extra liquid if you toast.
Step-by-Step: How to Cook Quinoa on the Stovetop
This method works for any variety of quinoa and produces consistent results.
Step 1 — Toast (Optional but Recommended)
Before adding liquid, heat a dry saucepan over medium heat. Add the rinsed, drained quinoa and stir continuously for 2 minutes until the seeds smell nutty and begin to crackle faintly. Toasting drives off surface moisture and adds depth of flavor that plain boiled quinoa lacks.
Step 2 — Add Liquid and Salt
Pour in your measured liquid (1¾ cups per cup of quinoa). Add a generous pinch of salt — roughly ¼ teaspoon per cup of dry quinoa. Bring to a boil over medium-high heat.
Step 3 — Reduce and Cover
The moment the pot reaches a full boil, reduce the heat to low and cover with a tight-fitting lid. This is where most problems originate: a lid that lets steam escape means the quinoa won’t cook evenly and the liquid won’t be fully absorbed.
Step 4 — Simmer Without Peeking
Cook for 15 minutes without lifting the lid. Resist the urge to check. Every time you lift the lid, you release steam and drop the internal temperature, extending cook time unpredictably.
Step 5 — Rest Off the Heat
After 15 minutes, remove the pot from the heat — still covered — and let it rest for 5 minutes. This resting period allows residual steam to finish cooking the seeds and lets moisture redistribute. Skip it and the quinoa at the bottom of the pot will be overcooked while the top stays underdone.
Step 6 — Fluff with a Fork
Remove the lid and fluff gently with a fork, starting from the edges and working toward the center. Don’t stir with a spoon — you’ll crush the seeds and get a pasty texture. If there’s any liquid pooled at the bottom, tilt the pot, let it run to one side, and give it another 30 seconds uncovered over low heat.
Step 7 — Taste and Adjust
Taste before serving. If the quinoa still has a faint chalky bite, it needs another minute or two covered on low. If it’s slightly bland, a drizzle of olive oil, a squeeze of lemon, or a pinch of flaky salt makes an immediate difference.

Alternative Cooking Methods
If you’re troubleshooting grain textures across the board, our guide How to Cook Brown Rice Without It Getting Mushy tackles a similar sticky-pot problem with a different staple.
If you enjoy mastering grain ratios like this, our companion guide How to Cook Couscous Properly: Fix The Water Ratio Mistake tackles the same water-ratio pitfalls for another finicky grain.
Rice Cooker
A rice cooker handles quinoa well. Use the same 1:1¾ ratio, set it to the white rice setting, and let it run its full cycle. The keep-warm function holds quinoa nicely without overcooking it for up to an hour.
Instant Pot or Pressure Cooker
Combine 1 cup quinoa with 1 cup liquid (reduce liquid slightly for pressure cooking because no steam escapes). Cook on high pressure for 1 minute, then allow a natural pressure release for 10 minutes before venting manually. The result is exceptionally fluffy — some cooks prefer this method for meal prep because it’s hands-off.
Oven Method
For large batches (4+ cups dry), the oven works surprisingly well. Combine quinoa and liquid in a covered baking dish and bake at 375°F (190°C) for 25 to 30 minutes. Even heat from all sides means consistent texture throughout the entire batch.
Common Mistakes and How to Fix Them
Mushy quinoa: You used too much water or didn’t drain after rinsing. Spread the cooked quinoa on a baking sheet and put it in a 300°F (150°C) oven for 5 to 10 minutes — it dries out and firms up well enough to use in salads.
Bitter quinoa: You skipped the rinse. There’s no real fix once it’s cooked. Next time, rinse for a full minute.
Crunchy quinoa: Not enough liquid, or the lid wasn’t tight. Add 2 tablespoons of water, cover, and steam on low for 3 more minutes.
Bland quinoa: Salt went in too late, or you used plain water. For future batches, switch to broth and season the water before it boils.
For another everyday staple that trips people up with timing and starch, check out How to Cook Pasta Al Dente: The Exact Method.
What to Do with Properly Cooked Quinoa
Perfectly cooked quinoa is versatile in a way that overcooked quinoa simply isn’t — the seeds stay separate and have enough texture to work in a range of dishes.
- Grain bowls: Use it as the base with roasted vegetables, a soft-boiled egg, and a tahini dressing
- Cold salads: Red or black quinoa holds up particularly well; toss with cucumber, feta, lemon, and herbs while still warm so it absorbs the dressing as it cools
- Stuffed peppers or squash: Mix cooked quinoa with sautéed aromatics, cheese, and spices for a hearty filling
- Breakfast porridge: Cook in milk rather than water, sweeten with honey, and top with fruit — it’s a higher-protein alternative to oatmeal
- Crispy quinoa: Spread cooked quinoa thinly on a parchment-lined baking sheet and roast at 400°F (200°C) for 20 minutes until golden. Scatter it over soups, salads, or yogurt as a crunchy topping

Storage and Meal Prep
Cooked quinoa keeps in an airtight container in the refrigerator for up to 5 days. It also freezes well — spread it flat on a sheet pan first so it freezes in loose grains rather than a solid block, then transfer to a freezer bag. Frozen quinoa reheats in under 2 minutes in a microwave with a splash of water to restore moisture.
For meal prep, cook a double or triple batch on a Sunday. It keeps its texture through the week and works equally well cold (salads, bowls) or reheated (stir-fries, soups).
Conclusion
Getting quinoa right comes down to a few non-negotiable habits: always rinse, use slightly less liquid than most packages suggest, keep the lid on, and let it rest before you touch it. Once those steps are automatic, the seed that earned its reputation as a nutritional powerhouse actually earns its place on the plate for flavor and texture too. Start with white quinoa if you’re new to it — it’s the most forgiving — and experiment with red and black varieties once the basic method feels reliable.