How to Cook Perfect Rice Every Time: Why It Turns Mushy Or Crunchy

Getting rice right sounds simple — it’s just water and grain, after all. But anyone who has pulled a pot of mushy, gummy, or crunchy-in-the-middle rice off the stove knows the reality is more complicated. The good news: once you understand why rice behaves the way it does, cooking perfect rice every time stops being luck and starts being method.
This guide covers the core techniques, the science behind them, and the adjustments that actually matter — so you can cook any variety of rice confidently, whether you’re using a pot, a rice cooker, or an oven.
Why Rice Goes Wrong (And How to Fix It)
Most rice failures come down to three variables: water ratio, heat control, and resting time. Get those three right and you’ve solved 90% of the problem.
The Water Ratio Problem
The standard “2 cups water per 1 cup rice” rule is misleading because it doesn’t account for:
- Rice variety — long-grain white rice, short-grain sushi rice, and brown rice all absorb different amounts of water
- Pot size — a wider pan loses more steam than a narrow one
- Altitude — water boils at a lower temperature above 3,500 feet, which affects absorption
- Whether you rinse — rinsed rice absorbs slightly differently than dry rice straight from the bag
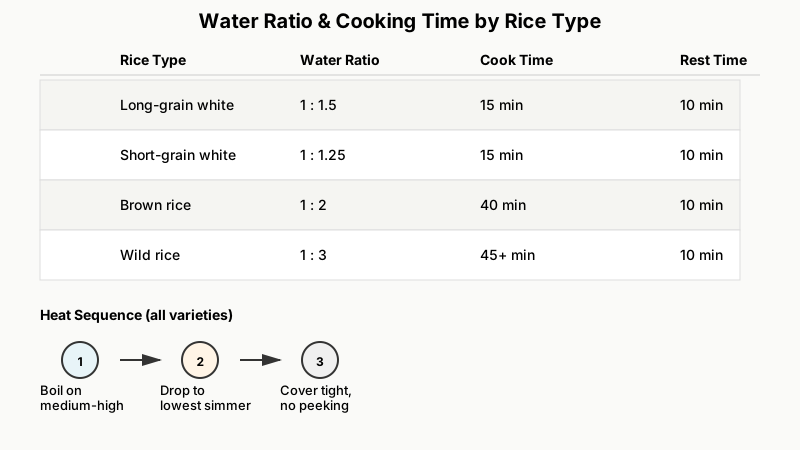
A better starting point by variety:
| Rice Type | Water Ratio (cup rice : cups water) |
|---|---|
| Long-grain white (e.g., basmati, jasmine) | 1 : 1.5 |
| Short-grain white (sushi, arborio) | 1 : 1.25 |
| Brown rice (any grain length) | 1 : 2 |
| Wild rice | 1 : 3 |
These are absorption-method ratios, which give you more control than the pasta-boil method. Adjust by a tablespoon at a time if results are consistently too wet or too dry.
Heat Control
Bringing rice to a full boil and keeping it there scorches the bottom and blows off too much steam. The correct sequence is:
- Bring to a boil over medium-high heat
- As soon as it boils, drop to the lowest possible simmer
- Cover with a tight-fitting lid and don’t lift it
Lifting the lid during cooking releases steam — that steam is water the rice was supposed to absorb. Every peek costs you.
Resting Time
This step gets skipped most often. After the water is fully absorbed (typically 15–18 minutes for white rice), take the pot off the heat and let it sit, covered, for 10 minutes. This allows the starches to set and the grains to firm up. Without the rest, even correctly cooked rice can feel wet and sticky.

If you always end up with extra, check out Best Ways to Use Leftover Rice: 12 Practical Ideas for ways to put that resting rice to good use the next day.
The Absorption Method: Step-by-Step
This is the most reliable everyday technique for white and brown rice.
What You Need
- A heavy-bottomed saucepan (2-quart for up to 2 cups dry rice)
- A tight-fitting lid
- A fine-mesh strainer for rinsing
Step 1: Rinse the Rice
Rinse your rice under cold water until the water runs mostly clear — usually 30–60 seconds of agitation. This removes excess surface starch, which is the main cause of gummy, clumped grains. For sticky rice (like Japanese short-grain), you may want some starch, so a shorter rinse or no rinse is appropriate.
Step 2: Toast (Optional but Worth It)
For basmati or jasmine rice, toasting the dry grains in a little butter or neutral oil for 1–2 minutes before adding water adds a nutty depth that plain boiling can’t replicate. This is common in Persian and Indian cooking and takes almost no extra effort.
Step 3: Add Water and Salt
Use your variety-appropriate ratio. Add at least ½ teaspoon of kosher salt per cup of dry rice — unsalted rice tastes flat no matter how good your technique is.
Step 4: Cook
Bring to a boil over medium-high, then immediately reduce to low. Set a timer for 15 minutes (white rice) or 40 minutes (brown rice). Do not stir. Do not lift the lid.
Step 5: Rest
Off the heat, lid still on, 10 minutes. Then fluff with a fork — not a spoon, which compresses the grains — and serve.

Rice Cooker vs. Stovetop vs. Oven: Which Is Best?
Rice Cooker
A dedicated rice cooker takes nearly all the guesswork out. The built-in thermostat detects when water has been absorbed (the temperature spikes above 212°F / 100°C once there’s no water left to absorb) and switches to a keep-warm mode automatically. For households that eat rice daily, a rice cooker pays for itself in consistency and saved attention.
The main limitation is flexibility — a basic rice cooker is calibrated for white rice. Cheaper models often undercook brown rice. If you cook multiple varieties, either get a model with dedicated settings or rely on the stovetop.
Tip: Even in a rice cooker, rinsing and using the correct water ratio still matter. The machine doesn’t compensate for too much water.
Stovetop
More flexible than a rice cooker and requires no extra equipment. The tradeoffs are attention and consistency — if your burner runs hot, you’ll scorch the bottom; if it runs low, you’ll undercook. A heat diffuser can help on electric ranges with unreliable simmer settings.
Oven Method
Underestimated and extremely consistent. Here’s why it works: the oven surrounds the pot with even heat from all sides, eliminating hot spots. The method:
- Preheat oven to 375°F (190°C)
- Bring water to a boil on the stovetop, pour over rinsed rice in an oven-safe baking dish
- Cover tightly with foil
- Bake 25 minutes for white rice, 60 minutes for brown
- Rest 5 minutes, then fluff
This is particularly useful when cooking large quantities — a 13×9-inch baking dish handles 3 cups of dry rice with ease and cooks more evenly than a crowded pot.
Cooking Specific Varieties: Notes That Actually Help
Basmati
Soak for 20–30 minutes before cooking if you want longer, more separated grains. Drain, then use 1.5 cups water per cup of soaked rice. The soak hydrates the outer layer so the grain elongates more during cooking — this is standard practice in Indian biryani preparation.
Jasmine
Jasmine is meant to be slightly sticky and aromatic. Use a 1:1.5 ratio but don’t over-rinse — a little surface starch is part of the texture profile. Jasmine is particularly sensitive to overcooking; even 2–3 extra minutes can make it mushy.
Brown Rice
Brown rice has an intact bran layer that slows water absorption. It needs more water and more time. The oven method is especially good for brown rice because the long cook time doesn’t cause the bottom to scorch the way it can on a stovetop.
If brown rice keeps turning out mushy or crunchy despite following these ratios, our deeper dive into How to Cook Brown Rice Without It Getting Mushy covers the extra soak time and adjustments this variety needs.
Sushi Rice
Start with short-grain Japanese rice. Cook with a 1:1.25 ratio, rest for 10 minutes, then fold in seasoned rice vinegar (typically 1 tablespoon rice vinegar + ½ teaspoon sugar + ¼ teaspoon salt per cup dry rice) while the rice is still warm. Fan the rice as you fold — the evaporating vinegar gives sushi rice its characteristic sheen.
Parboiled (Converted) Rice
Parboiled rice is partially cooked before milling, which makes it more forgiving and nutritionally denser than regular white rice. It typically needs more water (about 2:1) and more time than plain long-grain white rice. Follow the package ratio closely — it’s one of the few cases where the package instruction is reliably accurate.

Troubleshooting: What Went Wrong
Rice is mushy: Too much water, or you kept cooking after the water was absorbed. Next batch, reduce water by 2 tablespoons and pull off the heat the moment you no longer hear bubbling.
Rice is undercooked or crunchy in the middle: Not enough water, or the heat was too high and evaporated the water before absorption finished. Add 2 tablespoons of water, cover, and cook on low for another 5 minutes.
Bottom layer is burned: Heat was too high during simmering. Use a lower burner setting or a heat diffuser. Note: a golden crust on the bottom of the pot is intentional in some cuisines (Persian tahdig, Korean nurungji) — it’s a feature, not a mistake, if you’re aiming for it.
Rice is clumpy after cooking: Either not rinsed well enough, or stirred during cooking (which releases starch). Rinsing and leaving the pot alone during cooking solves both.
Rice turns hard when reheated: Add a splash of water (about 1 tablespoon per cup of rice) before microwaving, and cover loosely. The steam re-hydrates the grains. Leftover rice reheats better when stored with a damp paper towel over the top in the fridge.
Conclusion
Perfect rice isn’t about a single magic trick — it’s about understanding that each variety has its own needs, and that a few consistent habits (rinse, correct ratio, low heat, lid on, rest) handle most of the work. Once you’ve dialed in the method for the variety you cook most, it becomes genuinely automatic.
Start with the absorption method on the stovetop to get a feel for the grain and the heat. If you cook rice more than three times a week, a mid-range rice cooker with brown-rice settings is worth the counter space. And if you’re ever cooking for a crowd, try the oven — it’s the most underrated rice technique most home cooks haven’t tried yet.