How to Cook Brown Rice Without It Getting Mushy

Brown rice has a reputation problem. People either love it for its nutty flavor and nutrition, or they’ve given up on it entirely after one too many batches that came out gluey, waterlogged, or weirdly crunchy in the center. The good news: mushy brown rice is almost always a technique problem, not an ingredient problem. Get a few variables right, and the grain turns out separate, chewy, and genuinely satisfying every time.
Why Brown Rice Gets Mushy in the First Place
Brown rice still has its outer bran layer intact — that’s what makes it more nutritious than white rice. But that bran layer also changes how the grain absorbs water and heat. The starches inside swell as they cook, and if too much steam is trapped with too much water for too long, the cells burst and you end up with a sticky, soft mess.
The three main culprits are:
- Too much water. The classic package ratio of 2.5 cups of water per cup of rice is often too generous, especially on a stovetop with a tightly-fitting lid.
- Lifting the lid too early. Steam escapes, the cooking environment changes, and grains end up unevenly cooked — some mushy, some hard.
- Skipping the rest. Pulling brown rice off the heat and serving it immediately leaves excess moisture trapped in the pot.
Understanding these failure points makes the fix straightforward.

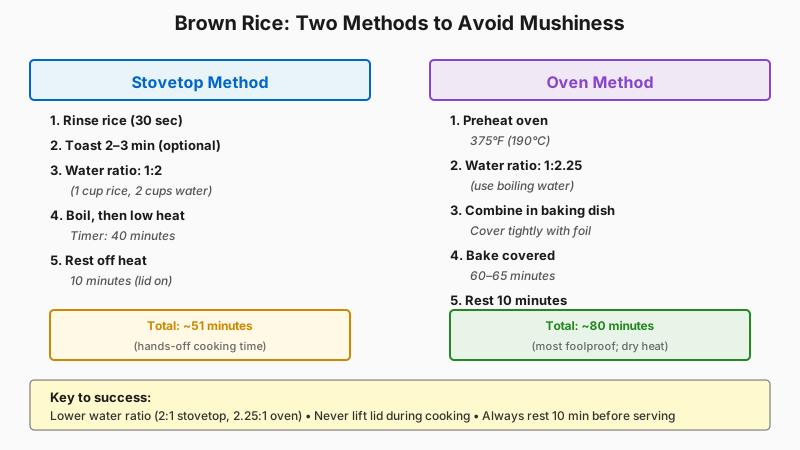
The Best Stovetop Method for Firm, Separate Brown Rice
This approach treats brown rice more like pasta than white rice — a method championed by some culinary schools and outlined in Kenji López-Alt’s food science writing. It produces reliably non-mushy results.
Step 1: Rinse the Rice
Place your dry brown rice in a fine-mesh strainer and rinse under cold running water for about 30 seconds, turning the grains with your fingers. Rinsing removes excess surface starch, which is one of the things that makes grains clump and stick together.
Some cooks skip this step and do fine — but if mush is your recurring issue, rinsing is the easiest first fix.
Step 2: Toast It (Optional but Worth It)
After rinsing, spread the rice on a dry towel for a few minutes, then add it to your pot over medium heat without any oil or water. Stir for 2–3 minutes until you can smell a faint nutty aroma. Toasting dries the surface starch and helps the grains stay distinct during cooking. It also deepens the flavor noticeably.
Step 3: Use the Right Water Ratio
For stovetop cooking, start with 1 cup of brown rice to 2 cups of water — not 2.5. If you’re at high altitude or your stove runs very low on a simmer, you may need to adjust slightly upward, but 2:1 is a better baseline for most home kitchens than what’s printed on most packages.
Add a pinch of salt. Salt seasons the grain from the inside and marginally affects the gelation of starch.
Step 4: Bring to a Boil, Then Drop the Heat Fast
Bring the pot to a full boil over high heat, uncovered. The moment it boils, drop the heat to the lowest possible setting, put the lid on, and leave it alone. Set a timer for 40 minutes.
No peeking. No stirring. No adjusting the lid. The steam inside is doing work, and disrupting it interrupts even cooking.
Step 5: Rest Off the Heat
When the timer goes off, take the pot completely off the burner. Leave the lid on and let it rest for 10 minutes. This step is not optional. The residual steam finishes cooking any remaining moisture into the grain rather than letting it pool at the bottom and make the rice soggy.
After the rest, fluff with a fork — never a spoon, which compresses the grains — and serve.

Other Reliable Cooking Methods
If white rice is more your speed, Fluffy White Rice Without a Rice Cooker: One Pot, No Gadget shows how to get fluffy results without any special equipment.
If rice noodles are also on your menu, our guide to How to Cook Rice Noodles Without Clumping: Cold Rinse Beats Clumps tackles a similar starch-and-water problem from a different angle.
Oven-Baked Brown Rice
Baking is arguably the most foolproof method because the oven’s dry, even heat prevents the temperature spikes that cause stovetop overcooking.
- Preheat your oven to 375°F (190°C).
- Bring water to a boil in a kettle. Use 2.25 cups of boiling water per cup of brown rice.
- Combine rice, water, salt, and a small pat of butter (optional, but it coats the grains and reduces sticking) in an 8x8 baking dish or oven-safe pot.
- Cover tightly with aluminum foil or a fitted lid.
- Bake for 60–65 minutes.
- Remove from the oven, leave covered, and rest for 10 minutes before fluffing.
The grain comes out firm and distinct — almost no margin for error. This method works especially well when you’re cooking a large batch (2–3 cups of dry rice).
Pasta-Method Brown Rice
This is the most unconventional approach but consistently delivers separate, non-mushy grains:
- Bring a large pot of salted water to a boil — use way more water than you think you need, like cooking pasta.
- Add the rinsed rice and cook, uncovered, for 25–30 minutes.
- Pour the rice into a strainer and drain completely.
- Return the rice to the empty pot, cover with the lid, and let it steam in its own residual heat for 10 minutes.
Because the excess water is physically drained away, there’s no chance of the grains sitting in trapped moisture. The texture is noticeably lighter than the absorption method.
Rice Cooker Tips for Brown Rice
If your rice cooker has a specific brown rice setting, use it — it extends the cooking cycle to account for the bran layer. If it only has a white rice setting:
- Use slightly less water than the cooker’s marked line (go about 10% under the brown rice line if one exists).
- After the cycle ends, leave the rice on “warm” for 10–15 minutes rather than opening immediately.
- Fluff and serve.
Don’t rinse rice before using a rice cooker with fuzzy logic or pressure settings — the moisture can affect the machine’s sensor readings in some models.
Common Mistakes and How to Fix Them
The rice is mushy on the bottom but crunchy on top. The heat was too high during the simmer. The bottom overcooked while steam couldn’t reach the top. Fix: use a thicker, heavier-bottomed pot, and keep the heat genuinely low — often lower than “low” on many gas burners requires a heat diffuser.
The rice tastes gummy or sticky throughout. Too much water, or the lid was lifted mid-cook and extra water was added. Recalibrate with the 2:1 ratio and commit to not opening the lid.
The center of the grains is still hard after 40 minutes. Water evaporated too fast because the lid didn’t seal well. Try covering the pot with a sheet of aluminum foil before putting the lid on — it dramatically improves the seal.
Batch-to-batch inconsistency. Different brands and ages of brown rice absorb water differently. Older rice (stored for many months) absorbs slightly more water. If you switch brands frequently, plan to adjust by a few tablespoons.

A Few Things That Actually Improve the Result
Soaking. Soaking brown rice in cold water for 30–60 minutes before cooking shortens the cooking time by about 10 minutes and leads to more even texture. It’s not essential, but it’s the single biggest upgrade if you have time. Drain and use fresh water for cooking after soaking.
Salt matters more than you think. Underseasoned brown rice tastes flat in a way that white rice doesn’t, because the bran has a slightly bitter edge. Don’t skip it.
Short-grain vs. long-grain. Short-grain brown rice is naturally starchier and will be chewier and stickier than long-grain, even with perfect technique. If you want fluffy and separate, buy long-grain. If you want something more substantial and cohesive (good for grain bowls or sushi-adjacent dishes), short-grain delivers.
Storing and reheating. Cooked brown rice firms up significantly in the fridge. When reheating, add a tablespoon of water per cup of rice, cover, and microwave or steam gently — this returns moisture without making it mushy again. Never reheat uncovered.
Getting Consistent Results Every Time
The pattern across every method that works is the same: control the water, control the temperature, and give the rice time to rest. Brown rice isn’t fragile — it just demands more precision than its white counterpart.
If stovetop cooking keeps giving you grief, try the oven method once. Most people who do never go back. It’s slower but genuinely hands-off, and you get a consistent result without babysitting the burner.
Once you have the basics locked in, brown rice becomes one of the easiest staples to batch-cook. Make two or three cups at once, refrigerate it for up to four days, and you have a solid base for grain bowls, stir-fries, and side dishes all week without starting from scratch each time.
If you end up with extra rice after mastering this method, check out Best Ways to Use Leftover Rice: 12 Practical Ideas for practical ways to put it to good use.