How to Cook Dried Beans from Scratch (The Right Way)

Dried beans are one of the best-value ingredients in any kitchen — cheap, long-lasting, nutritious, and far tastier than their canned counterparts when cooked properly. The catch is that most people either skip them out of habit or end up with a pot of chalky, unevenly cooked legumes after a frustrating afternoon. This guide cuts through the myths and gives you a repeatable method that works for black beans, chickpeas, pintos, cannellini, and most other common dried beans.
Choosing and Storing Dried Beans
Not all dried beans are created equal — age matters more than most recipes admit. Beans that have sat in a warehouse or pantry for two or more years will cook unevenly and may never fully soften, no matter how long you simmer them. Look for beans from suppliers that print a harvest or “best by” date on the bag. Smaller specialty grocery stores and bulk-bin shops often turn their stock more frequently than big-box retailers.
Once home, transfer beans to an airtight container and store them in a cool, dark spot. Properly stored, dried beans stay in good condition for about a year — though they remain edible well beyond that, just with longer cook times.
Quick visual check before cooking: discard any beans that are shriveled, discolored, or oddly flat. A handful of pebbles or debris is not unusual in a bag; spread the beans on a light-colored sheet tray and sort through them before rinsing.

For a closer look at another pantry legume, How to Cook Lentils from Scratch: Why Variety Choice Matters Most explains how picking the right kind changes everything about the final dish.
Do You Really Need to Soak Beans?
The soaking debate has been running for decades, and the honest answer is: soaking helps, but it is not strictly required. Here is what soaking actually does:
- Cuts cook time by 25–50%, depending on the bean variety
- Improves texture by hydrating the skin and interior more evenly
- Reduces some of the oligosaccharides — the fermentable carbohydrates that cause digestive gas — though the effect is modest
What soaking does not do: it does not remove protein, it does not make beans nutritionally inferior, and it is not a food-safety step.
If chickpeas are your bean of choice, How to Cook Chickpeas from Dried: Why Soaking Actually Matters dives even deeper into why soaking makes such a difference for them specifically.
Overnight Cold Soak (Recommended)
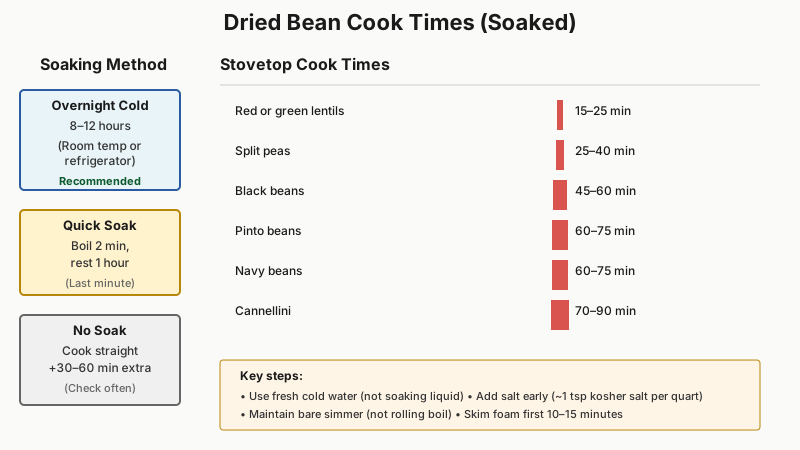
Place sorted, rinsed beans in a large bowl. Cover with cold water by at least three inches — beans expand significantly. Leave at room temperature for 8–12 hours, or in the refrigerator overnight if your kitchen is warm. Drain and rinse before cooking.
Quick Soak (When You Forgot)
Cover rinsed beans with cold water in a pot. Bring to a boil, let boil for two minutes, then remove from heat. Cover and let sit for one hour. Drain and rinse, then proceed with your recipe. The results are slightly less even than an overnight soak but perfectly workable.
No-Soak Method
Rinse the beans and go straight to cooking with fresh water. Add about 30–60 minutes to the cook time and check more frequently toward the end. This works well with lentils and split peas (which barely need soaking anyway) and acceptably with black beans and pintos. Chickpeas and large heirloom varieties benefit most from soaking.
Cooking Dried Beans on the Stovetop
This is the baseline method — no special equipment required.
Ratio: Cover soaked beans with fresh cold water by about two inches. Do not reuse the soaking liquid; most of the reasons people drain it (flavor, digestibility) are valid.
Salt: Add salt early. A persistent old myth holds that salting early toughens the skins — food science writers including Kenji López-Alt have tested this repeatedly and found the opposite: salting from the start produces beans with creamier interiors and properly seasoned flesh. Add roughly one teaspoon of kosher salt per quart of water.
Aromatics (optional but worth it): Drop in a halved onion, a few garlic cloves, a bay leaf, and a sprig of thyme or rosemary. These ingredients perfume the beans subtly and improve the cooking liquid, which you can save as a light bean broth.
Heat management: Bring the pot to a boil, then immediately reduce to a bare simmer — small bubbles breaking the surface occasionally, not a rolling boil. Boiling hard makes bean skins burst and flesh turn mushy while the center stays undercooked. Skim any foam that rises in the first 10–15 minutes.
Cook times (soaked beans, approximate):
| Bean | Stovetop Time |
|---|---|
| Red or green lentils | 15–25 minutes |
| Split peas | 25–40 minutes |
| Black beans | 45–60 minutes |
| Pinto beans | 60–75 minutes |
| Navy beans | 60–75 minutes |
| Cannellini | 60–90 minutes |
| Chickpeas | 90–120 minutes |
| Large butter beans | 60–90 minutes |
These are ranges, not guarantees — altitude, water hardness, and bean age all affect timing. Start checking 15 minutes before the lower end of the range.
How to test for doneness: Scoop a few beans and bite into them. They should be uniformly tender all the way through with no chalky or granular center. The skin should be intact but not tough. If you are making beans for a salad or dish where texture matters, pull them a minute early.

Acids and Hard Water
Two things reliably slow bean cooking: acid and very hard water. Do not add tomatoes, vinegar, citrus juice, or wine until the beans are already fully tender. Hard water (high in minerals) can prevent beans from ever fully softening. If you live somewhere with hard water, cook beans in filtered water or add a small pinch of baking soda (about ¼ teaspoon per quart) — it raises the pH slightly and noticeably speeds softening.
Cooking Beans in a Pressure Cooker or Instant Pot
A pressure cooker cuts stovetop times roughly in half and produces consistently creamy results. It is the single biggest practical upgrade for anyone who cooks beans regularly.
Basic process: Add drained soaked beans, fresh water to cover by one inch, salt, and any aromatics. Seal and cook on high pressure. Natural-release pressure for at least 15 minutes before opening — a rapid release can rupture bean skins.
Approximate high-pressure cook times (soaked beans):
- Black beans, pintos, navy: 8–12 minutes
- Cannellini, Great Northern: 10–14 minutes
- Chickpeas: 14–18 minutes
Unsoaked beans work well in a pressure cooker — add 5–8 minutes to the above times. Chickpeas unsoaked can need 30–40 minutes at high pressure.
Slow Cooker and Oven Methods
Slow cooker: This method is convenient but comes with one important caveat. Raw kidney beans contain a naturally occurring toxin called phytohaemagglutinin (PHA) that is destroyed by boiling but not by the low temperatures of a slow cooker. Always boil kidney beans hard for at least 10 minutes on the stovetop before transferring them to a slow cooker. Other bean varieties are not affected in the same way, but boiling first is still a good habit.
After that pre-boil, transfer to the slow cooker, cover with fresh water, and cook on low for 6–8 hours or high for 3–4 hours.
Oven method: Preheat to 325°F (165°C). Add soaked, rinsed beans to a Dutch oven, cover with water by two inches, add salt and aromatics, and bring to a simmer on the stovetop first. Transfer covered to the oven and bake for 75–90 minutes. The even, ambient heat produces particularly creamy beans and is great when you do not want to monitor a burner.

What to Do With the Cooking Liquid
Do not pour it down the drain. The liquid left after cooking beans — particularly chickpeas — is a genuinely useful byproduct.
- Bean broth: Refrigerate or freeze it and use as a base for soups, stews, or grain cooking (it adds body and subtle flavor).
- Aquafaba: The liquid from cooked or canned chickpeas whips into stiff peaks and functions as an egg-white substitute in meringues, mousses, and batters. It works best from chickpeas cooked with little or no salt.
- Thickening agent: Stir some cooking liquid back into mashed or refried beans for better texture.
That flavorful bean broth also makes a great base for simmering spices, so if you’re looking for a way to use it, check out How to Make a Simple Curry from Scratch: A Foolproof Guide.
Storing and Freezing Cooked Beans
Cooked beans keep in the refrigerator in their liquid for up to five days. To freeze, cool completely, then pack into flat zip-lock bags or containers with some of the cooking liquid to prevent freezer burn. Frozen beans keep well for about three months and thaw quickly in warm water or directly in a hot pan.
A useful habit: cook a large batch on a weekend and freeze in approximately 1.5-cup portions — roughly the equivalent of one 15-ounce can. That way you get scratch-cooked beans with canned-bean convenience.
Common Mistakes to Avoid
- Boiling instead of simmering: The most frequent error. Aggressive heat makes mushy outsides and undercooked centers.
- Cooking with acidic ingredients before beans are tender: Tomatoes and vinegar effectively lock in firmness.
- Using old beans without adjusting expectations: Ancient beans may cook unevenly no matter what. Buy fresh and rotate your stock.
- Not seasoning the water: Unseasoned beans taste flat even after saucing.
- Skipping the sort: That one pebble will find its way into your serving bowl.
Conclusion
Cooking dried beans from scratch is less a complicated technique than a series of small decisions: buy fresh beans, soak them when you have time, salt your water early, simmer gently, and hold back the acid. Once those habits are in place, dried beans become a kitchen workhorse — the foundation for soups, stews, grain bowls, dips, and dozens of other dishes. The slightly longer process compared to opening a can pays off in texture, flavor, and cost savings that add up noticeably over time.