How to Make a Simple Curry from Scratch: A Foolproof Guide

Making a curry from scratch sounds intimidating until you understand what a curry actually is — not a single dish, but a method. You build layers of flavour by cooking spices in fat, adding aromatics, then simmering everything in a liquid until it melds into something deeply satisfying. Once you have that rhythm, you can make a decent curry with whatever is in your fridge.
This guide walks you through that process from the ground up, with no curry paste, no jarred sauce, and no shortcuts that sacrifice flavour.
What You Need Before You Start
The Spice Base
The single biggest difference between a scratch curry and a bland stew is the spices — specifically, how you treat them. You don’t need a cupboard of forty jars. A reliable starter set:
- Cumin (whole seeds and/or ground)
- Coriander (ground)
- Turmeric (ground)
- Garam masala (a pre-blended finishing spice)
- Chilli powder or dried chillies (for heat — adjust to taste)
- Paprika (sweet or smoked, adds colour and mild depth)
Optional but genuinely useful: mustard seeds, cardamom pods, a cinnamon stick, and fenugreek.
Buy whole spices where you can and grind them yourself in a small spice or coffee grinder. The flavour difference is real — whole spices retain volatile oils far longer than pre-ground powder sitting in a jar.
If you want to build out a well-rounded collection of whole and ground spices for curries and beyond, see Build a Versatile Spice Cabinet from Scratch: Skip The Stale Jars.
The Aromatics
Every good curry starts with at least two of the following: onion, garlic, and fresh ginger. This trio is the foundation. A rough guideline for a curry serving four:
- 2 medium onions, finely diced
- 4–6 garlic cloves, minced or grated
- A thumb-sized piece of fresh ginger, grated
Fresh tomatoes or a tin of chopped tomatoes are the most common next layer — they add acidity and bulk out the sauce.
Fat and Liquid
Neutral oil, ghee, or coconut oil all work. Ghee gives a buttery richness; coconut oil edges toward Southeast Asian flavours. For the liquid component, water is fine but stock, coconut milk, or a mix of the two is better.

The Core Method, Step by Step
Step 1: Bloom the Whole Spices
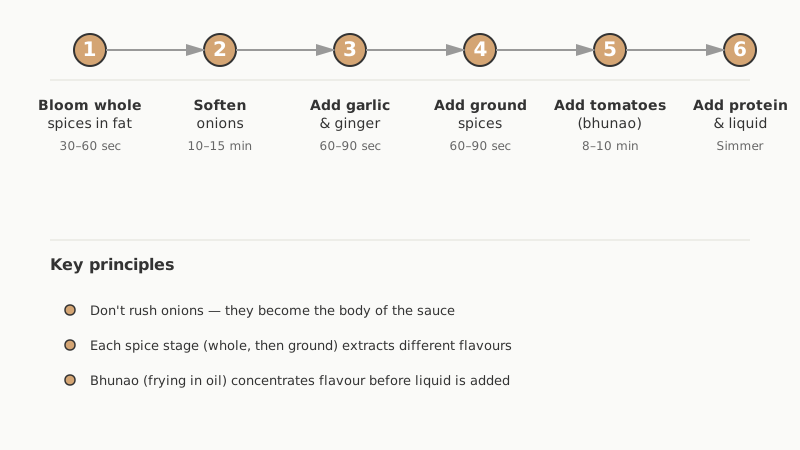
Heat two tablespoons of your chosen fat in a heavy-bottomed pan — a Dutch oven or a sturdy sauté pan works well — over medium heat. Add any whole spices first: cumin seeds, mustard seeds, cardamom pods, a cinnamon stick if using. Let them sizzle for 30–60 seconds. You’re listening for a gentle crackle and looking for the seeds to darken slightly. This step, called tempering or tadka, draws out fat-soluble flavour compounds that simply don’t release in water.
Don’t walk away. Spices can scorch in under a minute, and burnt cumin tastes bitter all the way to the end of the dish.
Step 2: Soften the Onions
Add your diced onions to the pan and cook them low and slow — 10 to 15 minutes, stirring occasionally. You want them translucent, soft, and beginning to turn golden at the edges. Rushing this step is one of the most common mistakes home cooks make. Properly cooked onions become almost sweet and provide the body of your sauce.
If the pan looks dry, add a small splash of water rather than more oil.
Step 3: Add Garlic and Ginger
Push the onions to the side, drop the heat slightly, and add your garlic and ginger. Cook for 60–90 seconds, stirring constantly. Both go from raw to bitter very quickly if they catch on the pan. You’ll notice the raw smell soften into something nuttier — that’s your cue to move on.
Step 4: Add the Ground Spices
Now add your ground spices: coriander, turmeric, chilli powder, paprika. Stir them into the onion-garlic-ginger mixture and cook for another 60–90 seconds. The heat activates them and the mixture will look almost paste-like and smell intensely fragrant. This is the masala base.
If things start to stick, add a tablespoon of water to deglaze and keep stirring.
Step 5: Add Tomatoes
Tip in a 400g tin of chopped tomatoes (or three fresh tomatoes, roughly chopped). Stir well and cook on medium heat for 8–10 minutes, until the tomatoes have broken down and the oil starts to separate around the edges of the mixture. In South Asian cooking this is called the bhunao stage — you’re essentially frying the masala in its own oil rather than boiling it. It concentrates flavour dramatically.

Step 6: Add Your Main Ingredient and Liquid
This is where you make the curry your own. Options:
- Chicken thighs (bone-in for best flavour, skinless): Add raw and simmer 25–30 minutes.
- Lamb shoulder (cubed): Add raw and simmer 45–60 minutes, or longer for very tender results.
- Chickpeas or lentils: Add cooked/tinned chickpeas and simmer 15 minutes; red lentils go in dry and cook in 20–25 minutes.
- Vegetables (cauliflower, potato, spinach, aubergine): Add harder veg early, leafy greens in the last 2–3 minutes.
Add enough liquid — water, stock, or coconut milk — to bring the sauce to your preferred consistency. Start with about 200–300ml and add more as needed. Stir, cover partially, and simmer on low.
Step 7: Finish and Adjust
Once your main ingredient is cooked through, taste the curry. Now you’re balancing:
- Salt: Add in small amounts and taste between additions.
- Acidity: A squeeze of lemon or a splash of white wine vinegar can lift a flat-tasting sauce.
- Sweetness: Half a teaspoon of sugar balances a sauce that’s too acidic from the tomatoes.
- Heat: More chilli now, or a swirl of hot sauce, goes in raw — it’ll need another 5 minutes to meld.
- Richness: A tablespoon of butter or a dollop of yoghurt stirred in off the heat rounds everything out.
Finish with a pinch of garam masala. Because garam masala is a finishing spice, adding it at the end preserves the aromatic top notes that cook off if you add it too early.
Common Variations You Can Make with This Method
Once you’re comfortable with the base method, you can branch out in a few directions without learning a completely new technique.
Coconut Milk Curry
Swap or supplement the tomatoes with a 400ml tin of full-fat coconut milk. Skip the lemon finish and use lime instead. Add a few curry leaves with the whole spices at the start if you can find them. This produces a milder, creamier sauce closer to South Indian or Sri Lankan styles.
Dry Curry (Sukha)
Use less liquid and cook it down further, so the masala clings to the meat or vegetables rather than forming a thick gravy. Works especially well with cauliflower (aloo gobi style) or green beans.
Lentil Dal
Skip the main protein entirely. Cook red lentils directly in the masala with water (roughly 3:1 water to lentils by volume) until they dissolve into a thick, comforting soup. A simple tadka poured over the top at the end — hot ghee with cumin and dried chilli — transforms it.

Since dal depends so much on picking the right variety and cooking it properly, our guide How to Cook Lentils from Scratch: Why Variety Choice Matters Most is a useful companion piece.
Practical Tips That Actually Make a Difference
Don’t crowd the pan. If you’re browning meat first (an optional but worthwhile step), do it in batches. Crowding steams instead of sears.
Marinate if you have time. Even 30 minutes of chicken or lamb in yoghurt, turmeric, and salt before adding to the curry makes the protein noticeably more tender.
Make it ahead. Curry tastes better the next day. The spices continue to infuse and the sauce thickens. Reheat gently with a small splash of water.
Freeze in portions. Most curries (not those with cream or yoghurt stirred in) freeze well for up to three months. Make a double batch while you have everything out.
Watch the heat. Most curry problems — bitterness, burning, rubbery meat — come from cooking on too high a heat for too long. Low and slow is almost always the right answer after the initial frying stages.
Serving Suggestions
Basmati rice is the classic pairing: rinse it until the water runs clear, then cook it in a 1:1.5 ratio of rice to water. A piece of naan or roti makes the meal more filling and is useful for scooping.
A simple raita — plain yoghurt with grated cucumber, a pinch of cumin, and salt — cools the palate and takes about two minutes to make. Fresh coriander scattered over the top adds brightness.
Building Your Confidence
The best thing about cooking a curry from scratch is that the method is forgiving once you understand the logic. Spices bloom in fat. Onions provide body. Tomatoes give acidity. Liquid controls consistency. Each step builds on the last.
Get the first batch done — even if it’s imperfect — and you’ll notice exactly what to adjust next time. Maybe the onions needed longer, or the chilli level was off, or it wanted more garam masala at the end. That feedback loop is how you cook, rather than just follow a recipe.
A curry made this way, with ingredients you chose and spices you handled yourself, tastes like something you actually made. That’s worth the effort.