How to Properly Measure Flour for Baking: Spoon In, Level Off
A batch of cookies that spreads flat, a loaf of bread that bakes up dense, a cake that tastes dry — these are classic symptoms of too much flour. And the most common cause isn’t a bad recipe. It’s the way flour gets scooped into a cup.
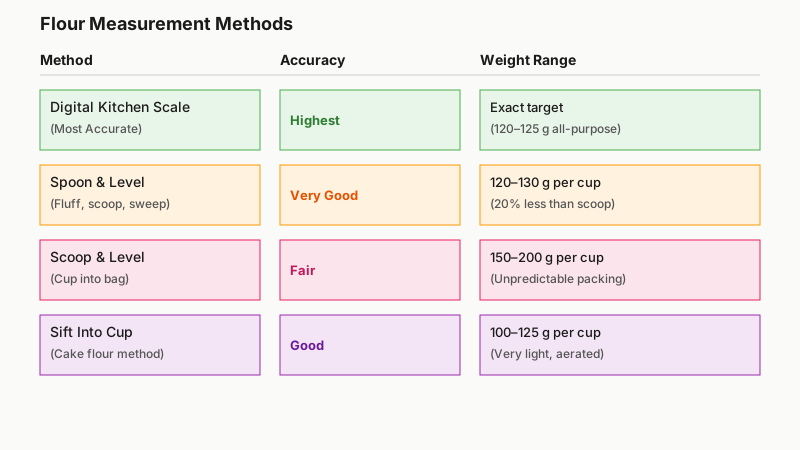
Measuring flour sounds like a minor step, but it has an outsized effect on baked goods. A cup of flour measured by scooping the cup directly into the bag can weigh anywhere from 150 grams to over 200 grams, depending on how compacted the flour is. Most recipes are written to a target of around 120–130 grams per cup. That discrepancy alone can throw off an entire recipe.
This guide breaks down every reliable method — from a kitchen scale to the spoon-and-level technique — so you can pick the one that works for your setup and stick with it consistently.
Why Flour Measurement Goes Wrong So Often
Flour is deceptive. It looks like a simple dry ingredient, but its density changes constantly depending on:
- How long it has been sitting. Flour that has been in a sealed container for weeks settles and compacts. A cup scooped from a settled bag weighs noticeably more than one from a freshly opened bag.
- Humidity. Flour absorbs moisture from the air, which increases its weight slightly and can change how it behaves in a dough.
- The container shape. A narrow canister packs flour tighter than a wide, shallow one.
- How you scoop it. Digging a measuring cup straight into a bag compresses the flour. You can pack in 20–30% more than the recipe intends without realizing it.
None of this means baking is fragile or unforgiving — it means a consistent measuring method matters more than most people expect.

The 7 Methods, Ranked by Accuracy
1. A Digital Kitchen Scale (Most Accurate)
If you bake more than occasionally, a digital kitchen scale is the single best investment you can make. It removes all variables: no scooping, no leveling, no compaction. You weigh exactly what the recipe calls for.
How to do it:
- Place your mixing bowl on the scale.
- Press the tare button to zero it out.
- Spoon or pour flour directly into the bowl until you hit the target weight.
Most professional recipes published in grams or ounces assume this method. If your recipe lists only volume measurements (cups), a reliable conversion for all-purpose flour is 120–125 grams per cup, though this varies slightly by flour type:
- All-purpose flour: ~120–125 g per cup
- Bread flour: ~120–130 g per cup
- Cake flour: ~100–112 g per cup (it’s finer and lighter)
- Whole wheat flour: ~120–130 g per cup
Check the recipe’s source for the conversion they used — some cookbook authors bake to 130 g, others to 115 g. When in doubt, use the author’s stated weight, or 120 g as a neutral default.
If you’re ready to ditch cups altogether, Best Kitchen Scales for Baking: How to Choose and Use One walks you through picking the right model and using it correctly.
2. The Spoon-and-Level Method
This is the standard technique described in most American baking books written before weight measurements became common. Done correctly, it produces consistent results without a scale.
How to do it:
- Fluff the flour in its container with a fork or spoon first — this aerates it and loosens compaction.
- Use a spoon to scoop flour gently into the measuring cup. Don’t press down or tap.
- Once the cup is overfilled, use the flat back of a butter knife to sweep across the top, leveling it flush.
This single step — fluffing and spooning rather than scooping — can reduce the amount of flour in a cup by 20% compared to direct scooping. If you’ve always scooped and your cookies always seem cakey, this change alone may fix it.
3. The Scoop-and-Level (Understand Its Limits)
Scooping the measuring cup directly into flour is what most home bakers do instinctively, and it isn’t wrong — as long as you understand it packs more flour in and you’re consistent about it.
Some older American recipes were actually written assuming this method, so the ratio of flour to other ingredients already accounts for a slightly heavier cup. The problem comes when you scoop with a recipe written for the spoon-and-level standard.
If you know your recipe source assumes scoop-and-level, go ahead and do it. But don’t switch methods mid-recipe or between recipes without thinking about it.
4. Sifting Into the Measuring Cup
For cake flour especially, sifting flour directly into the measuring cup before leveling gives you a very light, aerated measurement. This technique appears frequently in old-fashioned American layer cake recipes that call for “1 cup sifted cake flour.”
Note: “1 cup sifted flour” and “1 cup flour, sifted” mean different things:
- 1 cup sifted flour = sift first, then measure (lighter)
- 1 cup flour, sifted = measure first, then sift (heavier)
Read the recipe carefully. This distinction matters more with cake flour than with all-purpose.
5. Measuring by Volume With a Liquid Measuring Cup (Don’t Do This)
Liquid measuring cups — the tall glass or plastic ones with a pour spout — are designed for fluids. Using them for flour produces unreliable results because you can’t properly level them and they’re often harder to fill evenly. Use dry measuring cups (the stackable, flat-topped kind) for all dry ingredients.
6. Tablespoon Measuring for Small Quantities
For small amounts — less than ¼ cup — measuring in tablespoons is often more accurate than using a small measuring cup. Spoon flour into the tablespoon and level as you would a larger cup. This matters in recipes for things like thickening a sauce or making a small pastry.
7. The Dip-and-Tap Method (a Common Mistake)
Some bakers dip the measuring cup into the flour and then tap it on the counter to settle it before leveling. This reintroduces the packing problem the spoon-and-level method tries to avoid. Tapping compresses the flour and increases the weight per cup. Skip the tapping.

Different Flours, Different Behavior
Not all flour measures the same, and that’s worth knowing before you swap one type for another.
All-Purpose Flour
The most forgiving. Works with spoon-and-level reliably. If you’re learning to bake, this is the flour to calibrate your technique on.
Once you’ve got flour measurement down, put it to the test in How to Make Bread Without a Machine: Just Flour Water Yeast And Hands, where accurate ratios make all the difference.
Bread Flour
Higher protein content makes it slightly denser. A cup may weigh 5–10 grams more than all-purpose. In a bread recipe that’s already being judged by dough feel and elasticity, this difference is usually correctable by hand, but weight measuring remains cleaner.
Cake Flour
Fine, soft, and very prone to clumping and compaction. The gap between a loosely measured cup and a packed cup is larger here than with all-purpose. Sifting helps, but weight measuring is really the right call for delicate cakes.
Whole Wheat Flour
Heavier and coarser. Recipes that mix whole wheat and all-purpose flour benefit most from a scale, since the density difference between the two means volume-based substitutions are often off.
Gluten-Free Flour Blends
These vary wildly by brand — some are light as powdered sugar, others dense as fine cornmeal. Always follow the weight measurement if provided, because volume equivalents printed on the bag may not match what your specific blend actually weighs.
Practical Tips for Consistent Results
Store flour in a wide container. A wide-mouthed canister makes it easier to spoon flour out without disturbing the surrounding flour. Narrow bags encourage scooping.
Fluff before every use. Give the flour a quick stir with a fork before you measure, especially if it’s been sitting. Takes five seconds and improves consistency.
Use the same measuring cup set consistently. Measuring cup sets are not standardized to an exact milliliter. A “1 cup” cup from one brand may measure slightly differently from another. Whichever set you use, stick with it across your recipes.
If a recipe is failing repeatedly, check the flour first. Before adjusting leavening, salt, or oven temperature, verify how your flour measurement compares to the recipe’s intended weight. This is the single most common source of unexplained failures in baking.
Consider the author’s method. When trying a new recipe, check whether the author specifies a measuring method or provides weights. Serious Eats, King Arthur Baking, and Bon Appétit now routinely include gram weights alongside cup measures. Recipes from these sources are generally calibrated by weight even if cups are listed.

A Quick Reference: Cup to Gram Conversions
| Flour Type | 1 Cup (approx.) |
|---|---|
| All-purpose flour | 120–125 g |
| Bread flour | 120–130 g |
| Cake flour | 100–112 g |
| Whole wheat flour | 120–130 g |
| Almond flour | 96–100 g |
| Oat flour | 90–100 g |
These are approximations. When a recipe provides its own gram weight, use that.
Conclusion
Measuring flour properly isn’t about being obsessive — it’s about understanding that a small, consistent action at the start of a recipe determines how the whole thing turns out. A digital scale is the cleanest solution if you bake regularly. If you prefer cups, the spoon-and-level method is reliable and free. The worst option is no method at all: scooping inconsistently and hoping for the best.
Pick one approach, use it every time, and the variables that cause unexplained baking failures quietly disappear.