How to Clean a Wooden Cutting Board Properly: Prevent Cracks Daily

A wooden cutting board is one of those kitchen tools that rewards good habits. Treat it right and it lasts decades; neglect it and you end up with a cracked, warped, bacteria-harboring slab you’d rather hide in the back of a cabinet.
This guide covers the full cleaning routine — daily washing, deep sanitizing, odor removal, and ongoing care — so your board stays safe to use and genuinely good-looking for the long haul.

Why Wooden Boards Need a Specific Cleaning Approach
Wood is porous. Unlike plastic or glass, it absorbs moisture — which is both its strength and its vulnerability. The grain can pull small amounts of liquid in during washing and release it during drying, which is why soaking a wooden board or running it through a dishwasher will eventually split it along the grain or warp it beyond use.
At the same time, that porosity isn’t the bacterial nightmare it’s sometimes made out to be. Research from the University of California, Davis found that bacteria drawn into the wood grain during cutting tend not to multiply and often die off — whereas bacteria on a plastic board with deep knife scars can actually be harder to dislodge. The takeaway isn’t that you can ignore cleaning, but that a well-maintained wooden board is genuinely hygienic when you treat it correctly.
The key variables are: how quickly you clean after use, whether you let it dry completely between uses, and how often you condition the wood.
For more ways to keep your kitchen tidy beyond the cutting board itself, 10 Tips for Keeping a Clean Kitchen Every Day offers a broader set of daily habits worth adopting.
The 7-Step Daily and Deep-Clean Routine
Step 1: Scrape the Board Immediately After Use
As soon as you’re done prepping food, use a bench scraper or the flat edge of a knife to sweep debris off the surface. The less time food residue sits on the wood, the easier everything else becomes. If you’ve been cutting raw meat, poultry, or fish, do this right away — don’t let it sit while you finish cooking.
Step 2: Wash with Mild Dish Soap and Warm Water
Contrary to the old piece of advice that you should never use soap on wood, a small amount of mild dish soap is perfectly fine. The concern was historically about harsh lye-based soaps; modern dish soap won’t strip a properly oiled board. Use a damp sponge or cloth, scrub the surface, sides, and any juice grooves with warm (not hot) water, and keep the wash brief — under a minute of contact time.
What to avoid:
- Soaking in a sink of water — prolonged immersion is the fastest way to crack the board
- The dishwasher — the combination of heat, steam, and prolonged moisture will warp nearly any wooden board
- Bleach as a routine cleaner — it dries out the wood fiber over time (it does have its place after raw meat — see Step 4)
Step 3: Rinse and Stand Upright to Dry
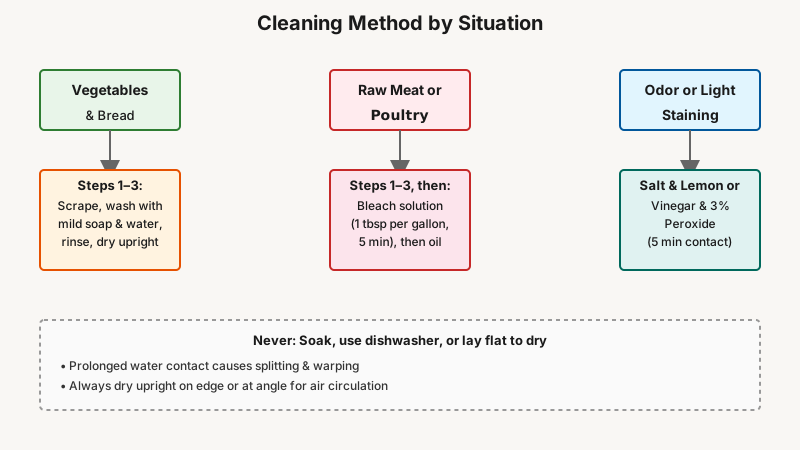
Rinse the board quickly under running water to remove soap residue, then — and this matters — stand it upright on one edge or prop it at an angle so air can circulate around both sides. Laying it flat on a damp countertop traps moisture against one face, which leads to warping over time. Let it dry completely before storing or reusing.

Step 4: Deep-Sanitize After Raw Meat or Poultry
For everyday vegetable chopping, steps 1–3 are enough. But after handling raw meat or poultry, you want a proper sanitizing pass — and it’s worth being precise about what actually sanitizes.
Diluted bleach — the option that actually sanitizes: Mix one tablespoon of unscented liquid bleach per gallon of cool water, flood the surface, let it stand for five minutes, then rinse thoroughly and stand the board upright to dry. That dilution is the standard one for sanitizing food-contact surfaces. Bleach is drying to wood, so oil the board once it’s completely dry — but after a board has held raw chicken, this is the pass that counts.
White vinegar or 3% hydrogen peroxide — useful, but not sanitizers: Spray across the surface, let it sit for five minutes, wipe, and rinse. Both reduce surface bacteria, and using vinegar followed by peroxide (sequentially, never mixed together in one bottle) works better than either alone. What neither one is, at household strength, is a registered sanitizer — at these concentrations they don’t reliably kill Salmonella or E. coli, so don’t count on them as your only step after raw protein. Where they shine is routine upkeep, odor, and light staining, where they’re a real upgrade over plain soap and water.
Step 5: Remove Odors with Salt and Lemon
If your board has picked up the smell of garlic, onion, or fish, the fix is simple: pour a generous layer of coarse kosher salt over the surface, then use the cut face of half a lemon to scrub the salt into the grain in circular motions. The salt acts as a mild abrasive and draws moisture out of the surface; the lemon juice neutralizes odor compounds.
Leave the paste on for a few minutes, then scrape and rinse. This also brightens a board that’s started to look dingy.
Step 6: Remove Stains with a Baking Soda Paste
For stubborn stains — the deep pink left by beets, the grey tinge from certain proteins — make a paste from baking soda and water (roughly 1 tablespoon baking soda to 1 teaspoon water). Apply it to the stain, scrub gently with a soft brush, and rinse. Baking soda is mildly alkaline and abrasive enough to lift surface staining without gouging the wood.
For very deep stains on an older board, fine-grit sandpaper (220 grit) can resurface the wood — sand in the direction of the grain, then re-oil before use.
Step 7: Oil and Condition the Wood Regularly
This is the step most people skip, and it’s arguably the most important for longevity. Dry wood cracks; conditioned wood stays supple and resists moisture absorption during cleaning.
Use food-grade mineral oil — it’s inexpensive, odorless, tasteless, and won’t go rancid. Avoid olive oil, vegetable oil, or coconut oil; these are all unsaturated fats that will eventually oxidize inside the wood and turn rancid, creating an unpleasant smell.
How to oil the board:
- Make sure the board is completely dry (ideally at room temperature for several hours after washing)
- Pour a small amount of food-grade mineral oil onto the surface
- Rub it in with a clean cloth, working in the direction of the grain
- Coat all surfaces — top, bottom, and all four sides
- Let it absorb for at least two hours, or overnight
- Wipe off any excess oil that hasn’t been absorbed
How often? A new board benefits from oiling every week for the first month. After that, once a month is the typical maintenance rhythm — though dry climates or heavy daily use may call for more frequent conditioning. A good test: sprinkle a few drops of water on the surface. If they bead up, the board is well-conditioned. If they soak in immediately, it’s time to oil.

Handling Common Problems
If you’re tackling grime throughout the kitchen, not just on your cutting board, How to Deep Clean Kitchen Appliances Step by Step walks through the process for your other appliances.
Warping
A warped board can sometimes be coaxed back into shape. Place it concave-side-down on a damp towel (or with the concave side facing down on a wet surface), then set it in sunlight or a warm spot for several hours. The moisture swells the drier, concave face; the warmth encourages the wood to relax. Once flat, oil both sides equally — uneven oiling is often what caused the warp in the first place.
Deep Knife Grooves
Grooves that are deep enough to harbor debris and resist cleaning can be sanded out. Start with 80-grit sandpaper to remove the worst of the damage, progress through 120-grit, then finish with 220-grit, always sanding with the grain. Wipe away dust with a barely damp cloth, let it dry fully, and oil thoroughly before putting the board back in use. A resurfaced board can feel almost new.
Mold Spots
If you see dark spots forming, especially near edges or the underside, the board has been drying improperly. Scrub the affected area with a paste of salt and baking soda, rinse, and let it dry completely in sunlight if possible — UV light has a mild disinfecting effect on surface mold. If mold has penetrated deeply, sanding down to clean wood is the right call. Persistent mold on a board that never seems to dry completely (due to its environment or thickness) is a sign to retire it.
When to Replace the Board
Wooden boards don’t last forever. If the surface has deep, unsandable grooves running across the grain, if the wood has split through rather than just surface-cracked, or if there’s persistent mold despite thorough cleaning, it’s time for a replacement. A board that’s structurally sound but stained or scarred can usually be rescued with sanding; one that’s structurally compromised can’t.
Quality end-grain boards made from hard maple or walnut are worth the investment — they’re self-healing in a limited sense (the knife cuts between wood fibers rather than across them), and they respond especially well to oiling.
Practical Summary
The full routine sounds involved, but the daily practice is quick: scrape, wash briefly with soap and warm water, rinse, and stand upright to dry. A diluted-bleach sanitizing pass takes five extra minutes after raw protein. Salt-and-lemon odor treatment is a once-in-a-while job. Oiling once a month keeps the wood from cracking.
The difference between a cutting board that lasts two years and one that lasts twenty isn’t the brand or the price — it’s whether you dry it upright and oil it regularly. Those two habits alone will outperform any expensive cleaner or treatment.