How to Temper Chocolate for Truffles and Coating at Home

Tempering chocolate sits at the edge of kitchen chemistry and patience. Get it right and your truffles snap cleanly, your coating gleams, and the chocolate melts smoothly on the tongue. Get it wrong and you end up with a grey, streaky shell that crumbles instead of cracks. The good news: tempering at home is genuinely learnable, and you don’t need professional equipment to do it well.
What Tempering Actually Does
Chocolate is mostly fat — cocoa butter, specifically — and cocoa butter can crystallize in six distinct forms. Only one of those forms, called Form V (or beta crystals), gives you the glossy, snappy result you’re after. The other five produce dull, soft, or crumbly chocolate.
When you melt chocolate completely, all those crystal structures break down. Tempering is the process of cooling and agitating the melted chocolate in a controlled way so that Form V crystals are the ones that grow — and nothing else. The goal is less about hitting magic temperatures and more about seeding the chocolate with the right crystal type before you coat or mold anything.
This matters more for truffles than for, say, a ganache filling, because the truffle shell or coating is what people see and feel first.

Temperature Targets by Chocolate Type
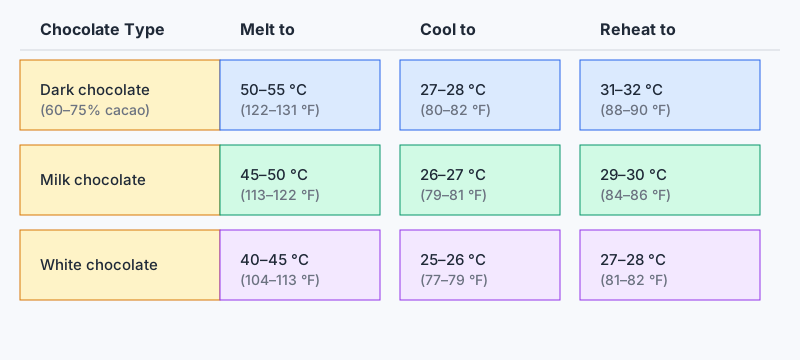
Each chocolate type has different cocoa butter and sugar ratios, which shifts the tempering window. These ranges are well-established in professional confectionery:
Dark chocolate (60–75% cacao)
- Melt to: 50–55 °C (122–131 °F)
- Cool to: 27–28 °C (80–82 °F)
- Reheat to: 31–32 °C (88–90 °F)
Milk chocolate
- Melt to: 45–50 °C (113–122 °F)
- Cool to: 26–27 °C (79–81 °F)
- Reheat to: 29–30 °C (84–86 °F)
White chocolate
- Melt to: 40–45 °C (104–113 °F)
- Cool to: 25–26 °C (77–79 °F)
- Reheat to: 27–28 °C (81–82 °F)
White chocolate is the trickiest because its working temperature window is narrow — sometimes only a degree or two — and it scorches easily. If you’re new to tempering, start with dark chocolate, which gives you a little more room for error.
A digital probe thermometer accurate to ±0.5 °C is not optional here. An instant-read candy thermometer works, but a fast-read probe gives you more control.
Three Methods for Home Tempering
Tabling (The Classic Method)
This is what pastry chefs do on marble slabs. You melt the chocolate fully, pour about two-thirds of it onto a cold marble or granite surface, and work it back and forth with a palette knife and bench scraper until it thickens and cools to the target lower temperature. Then you add it back to the remaining third (still warm in the bowl), stir well, and check the temperature.
Tabling is fast once you know it — often 3–5 minutes of active work — but it requires a stone surface and some practice to judge consistency. The chocolate should ribbon thickly off the spatula and start to set on the cold slab rather than flowing freely.
Seeding (Most Reliable for Home Cooks)
Melt two-thirds of your chocolate completely. Finely chop the remaining third — or use callets/pistoles, the small disc-shaped pieces sold by most professional chocolate brands. Add the unmelted chocolate to the hot batch in two or three additions, stirring constantly. The solid pieces act as seed crystals in Form V, gradually cooling the mixture while introducing the right crystal structure.
Continue adding and stirring until the chocolate reaches the lower cooling temperature listed above. If it gets there before all the pieces dissolve, remove the unmelted chunks with a spoon. Then gently warm it back to the final working temperature.
Seeding is forgiving and doesn’t require a marble slab. The main failure point is adding too much seed chocolate at once, which can overshoot the cooling target and make the mixture too thick to work with.
Microwave Method (Quickest, Highest Risk)
Melt chocolate in short 20–30 second bursts at 50% power, stirring between each. Stop when about 90% has melted and stir the residual heat through. This method can preserve some Form V crystals if you’re careful not to overheat, but it’s easy to scorch white or milk chocolate and hard to monitor precisely.
Use the microwave method only for dark chocolate and only if you have a reliable thermometer. It’s a reasonable shortcut when you’re coating small quantities.

Testing for a Good Temper
Before you start coating, always do a set test. Dip a palette knife, a small piece of parchment, or your finger (briefly) into the tempered chocolate and set it aside at room temperature (not in the fridge). In 3–5 minutes it should:
- Look glossy, not streaky or dull
- Feel cool and firm when you touch it
- Snap cleanly when you bend the parchment
If it sets unevenly, stays tacky, or shows grey streaks, the temper hasn’t worked. Re-melt and try again — this is normal, especially the first few times.
Fat bloom (the grey-white haze) and sugar bloom (a rough, grainy surface) both ruin appearance, though only fat bloom is a sign of tempering failure. Sugar bloom happens when moisture touches the chocolate surface and isn’t your temper’s fault.
Coating Truffles Effectively
Before you dip anything, make sure your ganache centers are fully chilled and firm — ideally refrigerated for at least two hours after rolling. Cold centers help the shell set faster once dipped, reducing drips and uneven coverage.
Work quickly. Tempered chocolate has a short working window, often 15–25 minutes before it starts to thicken in the bowl as more crystals form. Keep your bowl over a heating pad or warm water bath set to the working temperature, checking with your thermometer every few minutes.
Dipping technique for a clean coat:
- Drop a truffle center into the chocolate and use a dipping fork (or a regular dinner fork with the middle tines bent) to roll it fully submerged.
- Lift it out and tap the fork handle gently against the bowl rim to knock off excess chocolate — this is the step most beginners skip, and it’s why shells end up too thick.
- Drag the bottom of the fork across the bowl rim to cut the chocolate flow cleanly, then set the truffle on parchment.
- For a second coat (recommended for a thicker shell), let the first coat set fully — 10 minutes at room temperature — and dip again.
If the truffle footprint (the little puddle that forms at the base) bothers you, use a toothpick to tidy it within a minute of placing the truffle, before the chocolate firms completely.
Common Problems and Their Fixes
Chocolate is too thick to dip: The temperature has dropped too far. Warm it gently, 5 seconds at a time in the microwave or over warm water, stirring and checking the thermometer. Don’t rush.
Shell is too thin and ganache shows through: Your centers were too warm and began melting on contact. Re-chill centers more aggressively before the second attempt.
Grey streaks after setting: Classic fat bloom — the temper broke at some point, most likely the chocolate got too warm during the working stage or too cold during cooling. Re-melt and re-temper.
Chocolate seizing (turning lumpy and grainy): A small amount of water got in. Even a droplet can seize chocolate completely. If this happens, add more warm cream or a neutral oil and stir through — you won’t recover a proper temper, but the mixture becomes usable for ganache or sauce instead.

A Note on Chocolate Quality
Temperingexaggerates differences in chocolate quality. Cheap compound chocolate (the kind made with palm oil instead of cocoa butter) doesn’t need tempering and is designed to melt and set without it — but it also tastes waxy and flat. Real couverture chocolate, which typically contains 31–38% cocoa butter, tempers beautifully and produces that professional snap.
Brands like Valrhona, Callebaut, and Guittard are widely available to home cooks online or through specialty bakers’ supply stores. Buying in 1–2 kg bags rather than bars is substantially cheaper per gram if you make truffles regularly.
If you’re building out your home confectionery skills, our guide to How to Make Clarified Butter and Ghee at Home covers another fat-based kitchen staple worth mastering.
Frequently Asked Questions
Can I temper chocolate without a thermometer?
Technically yes — experienced chocolatiers can judge temperature by lip-touch or the thickening texture of the chocolate. In practice, skipping the thermometer as a beginner nearly always means a failed temper. The working windows are only a few degrees wide. Buy a digital probe; it’s a one-time investment that fixes most tempering failures immediately.
Why does my chocolate look perfect but turn grey overnight?
This is gradual fat bloom — the temper was marginal, and Form V crystals slowly converted to less stable forms at room temperature. It means the chocolate was slightly over- or under-tempered at the working stage. Store finished truffles in a cool, stable environment (around 16–18 °C / 61–64 °F) rather than the fridge, which can cause condensation and accelerate bloom.
Can I re-temper chocolate I’ve already used?
Yes. Leftover tempered chocolate that has set can be re-melted and re-tempered as many times as you like, provided it hasn’t seized or been contaminated with water or cream. Just start the process from scratch — melt fully, then temper again.
How much chocolate do I need for coating truffles?
A minimum batch of 300–400 g is strongly recommended even if you’re only coating 20–30 truffles. Working with less makes it hard to submerge a truffle fully and maintain consistent temperature. You can always save and re-temper the excess.
Does dark, milk, or white chocolate matter for beginner practice?
Start with a mid-range dark chocolate, around 60–65% cacao. It has the widest temperature window, the most forgiving behavior during cooling, and the clearest snap-and-gloss signal when you succeed. Milk and white chocolates narrow that margin considerably and reward you more once you’ve built some baseline feel for the process.
Sources
- https://www.seriouseats.com/how-to-temper-chocolate
- https://pmc.ncbi.nlm.nih.gov/articles/PMC7999663/ — Characterisation of Fat Crystal Polymorphism in Cocoa Butter (Foods, 2021)
- https://www.ncbi.nlm.nih.gov/pmc/articles/PMC8408162/ — Tempering of cocoa butter and chocolate using minor lipidic components
- https://pubmed.ncbi.nlm.nih.gov/33467907/ — Molecular Origins of Polymorphism in Cocoa Butter