Crispy Fried Eggs With Perfect Runny Yolks: Lacy Edges, Silky Centers

There’s a version of a fried egg that most home cooks have never quite nailed — the one where the whites are shatteringly crisp at the edges, browned and lacy underneath, while the yolk sits domed and trembling, completely liquid inside. It’s not complicated, but it does require a few deliberate choices about fat, heat, and timing. Get those right and you’ll never settle for a rubbery, steamed-in-the-pan egg again.
This guide covers the method in detail, the fat choices that change the result, surface-by-surface pan comparisons, and the common mistakes that pull you away from that ideal combination of crisp and runny.
Why Texture Contrast Is the Whole Point
A perfectly crispy fried egg is essentially a study in contrast. The white needs to set fast and hard at the bottom while the yolk receives almost no direct heat at all. That’s a narrow window — one that’s easier to hit when you understand why it exists.
Egg whites begin to set around 62°C (144°F) and are fully firm above roughly 80°C (176°F). Yolks start to thicken at about 65°C (149°F) and become fully set well above 70°C (158°F). So the gap between a runny yolk and a set one is genuinely small. Your job is to cook the white fully before the yolk crosses that threshold.
The solution is high heat and generous fat — enough to cook the white violently fast while the yolk, sitting higher in the pan and insulated by its own mass, barely warms through.

Choosing the Right Fat
Fat is not just a cooking medium here — it’s an active ingredient that determines flavor, browning, and how crisp the edges get.
Olive Oil (Extra Virgin)
This is the classic choice for Spanish-style huevos fritos and arguably produces the best result. Use a generous pour — at least 2–3 tablespoons in a small pan — and get it hot enough that it shimmers and starts to smoke very lightly before the egg goes in. The oil essentially deep-fries the underside of the white, creating those characteristic brown, bubbled, lacy edges. The flavor adds a mild fruitiness that complements the egg without overwhelming it.
Butter
Butter produces a richer, more golden result, but it requires more care. Because of its milk solids, butter burns faster than oil. If you want crispiness from butter, use clarified butter (ghee) so you can push the heat higher without scorching. Regular unsalted butter works well at medium-high heat and gives beautiful golden color, but the edges won’t go as dark or lacy as with olive oil.
Neutral Oils (Avocado, Grapeseed, Refined Coconut)
High smoke-point neutral oils — avocado oil in particular — let you push heat the furthest without burning. The result is excellent crispiness with a clean flavor. Good if you want the egg to taste purely of egg. Refined coconut oil adds a faint sweetness that some people like with runny yolks.
Bacon or Rendered Pork Fat
Cooking your egg in leftover bacon fat from the same pan is a legitimate technique. The rendered fat is already hot, already seasoned, and adds a smoky depth. The whites crisp up beautifully. Just watch your heat — the fat can burn quickly if it’s been sitting over high heat while you cooked the bacon.
Pan-by-Pan: Which Surface Works Best
The pan you choose shapes the result more than most people expect.
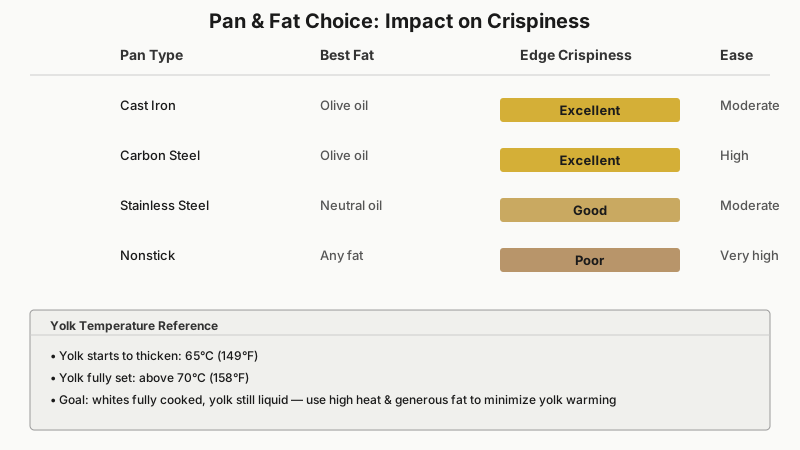
Cast Iron Skillet
Cast iron retains heat aggressively and distributes it evenly once fully preheated. This makes it excellent for high-heat crisping — the moment your egg hits the surface, it meets consistent, intense heat across the whole white. Preheat cast iron for at least 3–5 minutes before adding fat. The downside: it’s unforgiving if you haven’t seasoned it well, and eggs can stick.
Carbon Steel Pan
A well-seasoned carbon steel pan is the professional kitchen’s choice. It heats faster than cast iron, responds to temperature changes more quickly, and develops a reliable nonstick surface over time. Many experienced cooks consider it the best all-round pan for fried eggs.
Stainless Steel
Stainless steel can absolutely produce crispy eggs, but only if you’ve preheated it properly (the water-bead test — a drop of water should skitter and evaporate on contact) and used enough fat. Eggs will stick badly to inadequately heated stainless. When done right, the crust is excellent.
Nonstick (PTFE or Ceramic)
Nonstick pans are the easiest surface but the worst for crispiness. Their whole design goal — preventing sticking — also prevents the aggressive browning you want. You can get a decent result on medium-high heat, but you’ll rarely achieve the dark, lacy edges of a cast iron or carbon steel egg. Nonstick also degrades quickly at the temperatures needed for real crisping.

The Method, Step by Step
Once you’ve chosen your fat and your pan, the actual process is fast — under two minutes from egg to plate.
1. Preheat the pan properly. Place your pan over medium-high to high heat (gas is more responsive; electric works fine, just give it longer). For cast iron or carbon steel, allow 3–5 minutes. For stainless, 2–3 minutes.
2. Add fat generously. Don’t be timid. For a 20–22 cm (8–9 inch) pan, use 2–3 tablespoons of olive oil or 1.5 tablespoons of ghee. The fat should shimmer immediately and, with olive oil, produce a tiny wisp of smoke.
3. Crack the egg into a small bowl first. This gives you control. If a shell fragment drops in or the yolk breaks, you catch it before it hits hot fat. Slide or gently pour the egg from the bowl into the pan close to the surface to prevent the yolk from breaking on impact.
4. Tilt the pan and baste. Immediately tilt the pan so the fat pools to one side, then use a spoon to ladle hot fat over the white (not the yolk directly unless you want it to start cooking from the top). This speeds up setting of the white. The edges will bubble, blister, and go brown within 30–45 seconds.
5. Watch the white, not the clock. The white is ready when it’s fully opaque with no translucent jelly near the yolk. At high heat, this takes 60–90 seconds. The yolk should still look raw and liquid — it will be slightly warmed through from residual heat.
6. Remove early and let carry-over do its work. Slide the egg onto a warm plate, not a cold one. The yolk will continue warming from the residual heat in the white for another 20–30 seconds. Season with flaky salt and cracked pepper immediately.
Common Mistakes and How to Fix Them
Pale, rubbery whites with a set yolk. This is the too-low-heat problem. The white took so long to cook that the yolk had time to warm through. Fix: higher heat, more fat, shorter cook time.
Crispy edges but raw, watery whites near the yolk. You pulled the egg too early. Give it another 15–20 seconds or baste the white more aggressively with hot fat to speed up setting near the yolk.
Burnt bottom, still-runny white in the center. The pan was uneven, or you used a thin pan that has hot spots. Try a heavier pan or lower the heat slightly and extend the cook time by 20 seconds.
Yolk breaks in the pan. Usually caused by cracking directly into a hot pan or letting the egg drop from too high. Crack into a bowl and slide in gently.
Egg sticks and tears. Not enough fat, or the pan wasn’t hot enough before the fat went in. With stainless steel, make sure the pan is properly preheated using the water-bead test before adding oil.
If your egg troubles start earlier in the pan, before you even get to frying, our guide to Fluffier Scrambled Eggs: The Cornstarch Method Explained tackles a different but equally common breakfast frustration.
Serving and Pairing Ideas
A crispy, runny-yolk egg works as a finishing element on top of almost anything — fried rice, grain bowls, avocado toast, braised beans, or a simple pile of roasted vegetables. The liquid yolk functions as a sauce the moment you break it, coating whatever sits beneath it.
For a more complete dish, try it on thick-cut sourdough rubbed with garlic, topped with flaky salt and a drizzle of the same olive oil you cooked it in. A scattering of fresh herbs — chives, parsley, or tarragon — and a few chili flakes round it out without complicating what’s essentially a perfect thing.

For the classic breakfast plate, pair your eggs with Crispy Oven Bacon: The Foolproof Method That Works Every Time for a crunchy, no-fuss side that cooks hands-off while you focus on the yolks.
Frequently Asked Questions
Can I get crispy eggs without a lot of oil?
You can get some browning with less fat, but genuine lacy, crispy edges require enough oil to partially submerge and baste the white as it cooks. Cutting back significantly means a pale, less textured result. Two tablespoons is a practical minimum.
What temperature is a ’runny yolk’ actually at?
A runny yolk that’s still fully liquid is typically below 65°C (149°F). Between 65°C and 70°C, it becomes jammy. Above 70°C, it starts to set solid. A fast cook over high heat keeps the yolk well under 65°C while fully cooking the white.
Does the egg’s freshness affect crispiness?
Yes, noticeably. Fresh eggs have thicker whites that spread less in the pan, which means less thin, feathery white to crisp up and more compact structure. Older eggs have thinner, more watery whites that spread further and can go rubbery at the edges. For best results, use eggs that are less than a week old.
Can I make crispy fried eggs on an induction cooktop?
Absolutely. Induction heats a cast iron or carbon steel pan efficiently. Just allow the full preheat time (4–5 minutes on high) since the pan’s mass takes time to reach cooking temperature, and then proceed as normal.
Is covering the pan with a lid a good idea?
Covering the pan traps steam, which cooks the yolk from the top — useful if you want a basted or over-easy result, but it defeats the purpose here. For a fully runny yolk with crispy whites, keep the pan uncovered and rely on fat-basting instead.
The Takeaway
Crispy fried eggs with runny yolks come down to heat, fat quantity, and timing. Use a cast iron or carbon steel pan, heat it properly, use more oil than feels comfortable, crack the egg in from a bowl, and pull it from the heat the moment the white is fully opaque. Everything else — fat type, seasoning, what you serve it on — is personal preference. Master the fundamentals and the whole thing takes under two minutes.