How to Roast a Head of Garlic: Sweet Caramelized Cloves From Your Oven

Roasting a head of garlic transforms one of the kitchen’s sharpest, most pungent ingredients into something soft, golden, and almost sweet. The cloves turn buttery and spreadable, the harsh allicin compounds mellow through heat, and the result is a deeply savory paste that improves nearly everything it touches — from a simple baguette to a pot of mashed potatoes.
The process is easy, forgiving, and barely requires a recipe. But a few details — oven temperature, moisture, timing — separate truly excellent roasted garlic from a batch that dries out or burns. This guide covers everything from basic technique to what to do with the finished product.
What You Need Before You Start
The short list of equipment and ingredients makes this one of the lowest-barrier techniques in cooking:
Ingredients
- 1 whole head of garlic (or several — they keep well and take the same time regardless of quantity)
- 1–2 teaspoons of olive oil
- A pinch of kosher salt
- Optional: a small sprig of fresh thyme or rosemary
Equipment
- A sharp serrated knife
- Aluminum foil
- A small oven-safe dish or a muffin tin (useful for roasting multiple heads)
- An oven
That’s genuinely it. No special garlic roaster required, though they do exist and work well if you roast garlic frequently.
Choosing the Right Head of Garlic
Look for a head that feels firm when you squeeze it — no give, no hollow spots. Soft or spongy cloves are past their prime and won’t roast evenly. The outer papery skin should be tight and dry, not peeling away in chunks. Bigger heads tend to have larger individual cloves, which means more paste per head and a shorter chance of individual cloves burning before others cook through.
Hardneck varieties (like Rocambole or Porcelain) tend to have more complex flavor and larger cloves. Softneck varieties (the supermarket standard) work perfectly well and are more widely available. Either will roast beautifully.

Step-by-Step: How to Roast a Head of Garlic
Step 1: Preheat the Oven
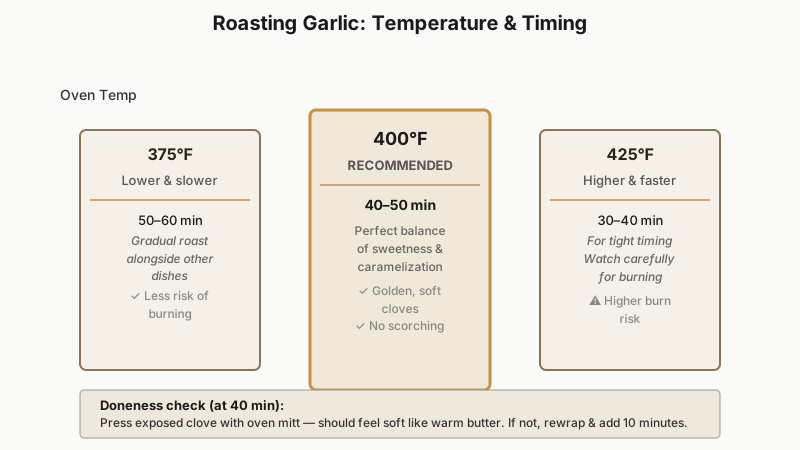
Set your oven to 400°F (200°C). This is the sweet spot for most home ovens — hot enough to caramelize the natural sugars in the garlic without scorching the outer papery layers before the interior softens. You can go lower (375°F) for a more gradual roast if you’re doing it alongside something else, or up to 425°F if you’re tight on time, but watch more carefully.
Step 2: Prepare the Garlic
With a serrated knife, cut off roughly the top quarter of the head — the pointed tip end, not the root end. You want to expose the tops of most of the individual cloves so the oil can penetrate and the moisture can escape properly. Don’t cut so deep that you separate the cloves from each other; you want the head to hold together.
Leave the papery outer skin completely intact. It acts as both an insulator and a natural steamer, keeping the cloves moist while they soften.
Step 3: Season and Wrap
Place the cut head on a square of aluminum foil, cut-side up. Drizzle 1–2 teaspoons of olive oil directly over the exposed clove tops, letting it seep down into the gaps. Add a pinch of salt. If you’re using herbs, tuck them around the sides before wrapping.
Wrap the foil loosely around the head — a tent shape rather than a tight seal. You want a little room for steam to circulate inside the packet, but you don’t want it so loose that the garlic dries out entirely. Think steam bath, not pressure cooker.
Step 4: Roast
Place the foil packet directly on the oven rack or in a small oven-safe dish (using a dish prevents dripping oil from hitting your oven floor). Roast for 40–50 minutes.
At the 40-minute mark, carefully open the foil and press on one of the exposed cloves with a finger — protected by oven mitts, obviously. It should feel completely soft, like pressing into warm butter. If there’s resistance, rewrap and give it another 10 minutes. A few of the outermost exposed clove tops may have taken on some golden-brown color; that’s exactly right.
For a slightly more caramelized, nuttier result, open the foil for the last 10 minutes of roasting. The exposed cloves will deepen in color and the flavor becomes more concentrated — less sweet, more savory and complex.
Step 5: Cool and Extract
Let the roasted head cool for at least 10–15 minutes before handling it. The cloves retain heat for longer than you expect.
To extract the paste, simply squeeze the base of the head — the root end — with your fingers, pushing upward. The cloves will pop out of their skins in soft, golden mounds. Alternatively, use a small fork or butter knife to scoop individual cloves from their skins.
The resulting paste should be deeply golden, smooth enough to spread with almost no effort, and fragrant in a rounded, mellowed way — nothing like the sharp raw clove you started with.

Flavor Variations Worth Trying
The basic method is a template, not a rule. A few adjustments that actually make a difference:
Add a splash of white wine. Pour a teaspoon or two of dry white wine into the foil packet alongside the oil. It adds acidity and keeps the interior extra moist, producing a slightly more complex, less purely sweet result.
Use butter instead of olive oil. A small knob of unsalted butter melted over the cut surface gives the roasted cloves a richer, more indulgent flavor — particularly good if you’re folding the result into mashed potatoes or a cream sauce.
Try smoked salt or finishing salt. Swap the plain salt for a smoked variety, and you add a subtle wood-fire quality that complements garlic’s natural sweetness.
Roast a whole tray. Four or five heads take the same oven time as one. Roast them all, squeeze out the paste, and refrigerate or freeze what you don’t use immediately. It’s one of those batch-cooking moves that genuinely saves time during the week.
If you enjoy this kind of low-and-slow caramelization, our guide to How to Roast Vegetables in the Oven: 7 Rules for Perfect Results shows how the same principles apply to a whole range of vegetables.
How to Use Roasted Garlic
Roasted garlic is versatile enough to be worth keeping in your refrigerator as a standing ingredient. Here are the highest-impact uses:
- Spread on bread: The simplest application — warm crusty bread, a generous smear of roasted garlic, a sprinkle of flaky salt. It needs nothing else.
- Stir into mashed potatoes: Replace or supplement raw garlic with an entire head’s worth of roasted paste for mashed potatoes with a much rounder, sweeter garlic flavor.
- Blend into salad dressing or vinaigrette: Whisk two or three cloves of paste into a basic vinaigrette. It emulsifies the dressing and adds body.
- Mix into softened butter: Combine with herbs to make a compound butter for steak, roasted chicken, or corn on the cob.
- Stir into soups and sauces: A spoonful added near the end of cooking a tomato sauce, a butternut squash soup, or a white bean stew deepens the flavor without any harsh edge.
- Spread under chicken skin: Tuck the paste directly against the meat before roasting a whole chicken or bone-in thighs for subtle, even garlic flavor throughout.
- Add to hummus: Substitute roasted garlic for the raw garlic in any hummus recipe. The result is noticeably mellower and more crowd-pleasing.
Roasted garlic also makes a fantastic rub or stuffing addition, so if poultry is on the menu, check out How to Roast a Whole Chicken: Crisp Skin Starts With Prep for another way to put your oven to good use.
Storing Roasted Garlic
Properly stored roasted garlic keeps for up to 1 week in the refrigerator. Place the squeezed-out cloves (or paste) in a small airtight jar, cover with a thin layer of olive oil, and seal. The oil prevents oxidation and keeps the paste from drying out.
For longer storage, freeze individual portions. Spoon the paste into an ice cube tray, freeze until solid, then transfer the cubes to a zip-lock bag. Each cube is roughly equivalent to an entire head’s worth of cloves and keeps well for up to 3 months in the freezer.
One important safety note: do not store garlic submerged in olive oil at room temperature for more than a couple of hours. Garlic in oil creates a low-oxygen, low-acid environment that, in rare cases, can support the growth of Clostridium botulinum, the bacteria responsible for botulism. Refrigeration prevents this risk, which is why the jar goes straight into the fridge.

Troubleshooting Common Problems
The cloves dried out and turned leathery. The foil packet was likely too loose, or the oven ran hot. Make sure the foil wraps snugly enough to trap steam, and consider adding a small splash of water or wine to the packet.
The outer cloves burned while the inner ones stayed firm. The oven was too hot, or the head was cut too aggressively (exposing too much of each clove). Try 375°F and a shallower cut — just enough to expose the tips.
The paste tastes bland. Salt at the beginning, not just at the end. Also, some heads of garlic are simply milder than others — this is a variety-and-freshness question more than a technique failure. A very fresh, pungent hardneck variety will always produce more flavor than a supermarket softneck that has been sitting in a crate for weeks.
The head fell apart in the oven. The root end was probably cut instead of the tip. The root holds the whole structure together — never cut it.
A Practical Note on Quantities
One head of garlic yields roughly 2–3 tablespoons of paste, depending on the size of the head and how much of the papery inner skins end up in the mix. For most applications — a vinaigrette, a side of mashed potatoes, a spread for four people — one head is sufficient. For a large batch of compound butter or a soup that calls for strong garlic presence, plan on two or three heads.
Roasting multiple heads costs you nothing in extra time or effort, and the payoff of having roasted garlic ready in the fridge throughout the week is significant. Consider making it a Sunday habit.
Conclusion
Roasting a head of garlic is one of those techniques that rewards you out of proportion to the effort involved. Cut, oil, wrap, wait. Forty minutes later you have something genuinely transformative — a condiment, a base, a secret ingredient. Once you start keeping roasted garlic in the refrigerator regularly, it’s hard to stop finding places to use it.