Natural Fabric Dyeing with Kitchen Scraps: From Onion Skins To Color

Before synthetic dyes took over in the mid-1800s, every color you wore came from something that grew, bled, or decayed. Onion skins, walnut shells, indigo leaves — household waste was the entire palette. That knowledge mostly went quiet for about a century, but it never disappeared, and there are good reasons to revisit it: natural dyeing produces colors that synthetic processes can’t quite replicate, it turns scraps you’d otherwise bin into something beautiful, and the chemistry is genuinely interesting to learn.
This guide covers the full process from fiber preparation through to finishing — no specialist studio required, just a stovetop, some patience, and the vegetable peelings you were about to throw away.
Why Kitchen Scraps Work as Dye Sources
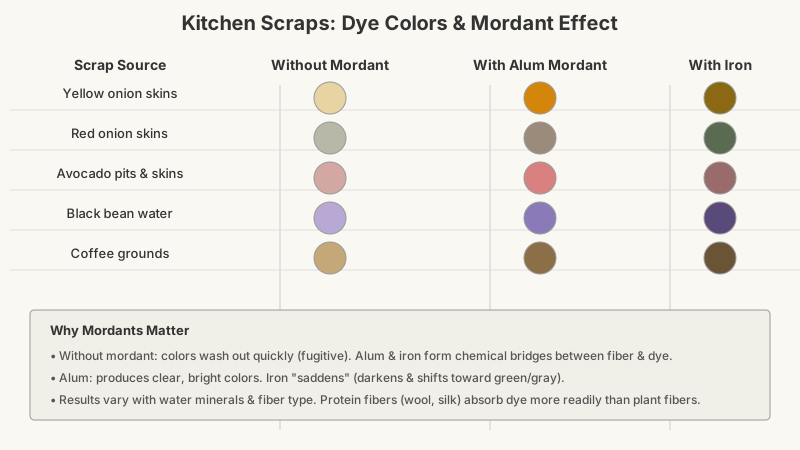
Plant matter contains pigment molecules — flavonoids, carotenoids, tannins, anthocyanins — that bond with textile fibers under heat. The catch is that most plant pigments don’t bond strongly on their own. They need a mordant: a metallic salt (or tannin) that forms a chemical bridge between the fiber and the dye molecule, locking the color in place.
Without a mordant, most colors wash out quickly. With one, they can last for decades.
Common kitchen-derived dye sources and the colors they yield:
| Scrap | Color Range |
|---|---|
| Yellow onion skins | Rich gold to burnt orange |
| Red onion skins | Dusty green, soft khaki |
| Avocado pits and skins | Dusty rose to salmon pink |
| Black bean soaking water | Cool lavender to slate blue |
| Turmeric (fresh or dried) | Vivid yellow (fugitive — fades faster) |
| Pomegranate rind | Warm yellow, tan |
| Beet skins and tops | Muted pinkish-tan (surprises most people — not hot pink) |
| Chamomile flowers | Soft cream to warm yellow |
| Coffee grounds | Warm brown, buff |
| Red cabbage | Blue-purple to green (pH-dependent) |
Note that the result also depends on your mordant, your water’s mineral content, and the fiber itself. Natural dyeing involves variables — that’s part of its character.

Since you’ll be collecting and storing food scraps for weeks before dyeing, it’s worth checking How to Prevent Fruit Flies in Your Kitchen Naturally so your dye stash doesn’t attract unwanted visitors.
What You’ll Need Before You Start
Fiber Choice Matters
Natural dyes bond most readily to protein fibers — wool, silk, alpaca — because their surface chemistry (amino acids) interacts strongly with mordants and dye molecules. Plant-based fibers like cotton, linen, and hemp can also take natural dye well, but they need extra preparation (usually a tannin pre-bath or a higher mordant concentration).
Synthetic fibers (polyester, acrylic, nylon) generally won’t absorb natural dyes in any lasting way. Don’t waste your kitchen scraps on them.
For beginners, undyed wool yarn or wool fabric is the easiest starting material. The color uptake is fast and the results are forgiving.
Mordants to Have on Hand
- Alum (potassium aluminum sulfate): The most widely used mordant for beginners. Produces clear, bright colors. Food-grade alum is sold in the spice aisle as a pickling ingredient and works perfectly.
- Iron (ferrous sulfate): Darkens and shifts colors toward green or gray — called “saddening.” Use sparingly; too much makes fibers brittle.
- Tannin: Found naturally in oak galls, black tea, or pomegranate rind. Acts as a mordant on its own for plant fibers, or as a pre-mordant step before alum.
- Cream of tartar: Not a mordant itself, but used alongside alum to brighten color and protect fiber softness.
Copper sulfate is sometimes listed in older recipes. It works, but requires careful handling and disposal — alum is a safer starting point.
Equipment
Dedicate equipment to dyeing and keep it separate from cooking. You’ll need:
- A stainless steel or enamel pot (not aluminum or cast iron, which react with dye chemistry)
- Long-handled spoons or dowels for stirring
- A kitchen scale (measuring by weight, not volume, gives consistent results)
- Rubber gloves
- A thermometer is helpful but not essential
The Full Process, Step by Step
Step 1: Scour the Fabric
Scouring means washing the fiber thoroughly to remove oils, finishes, and dust that would block dye uptake. For wool, dissolve a small amount of pH-neutral dish soap (or proper wool wash) in warm — not hot — water. Submerge the fiber, let it soak 20 minutes, and rinse gently without agitating. Sudden temperature changes and agitation cause wool to felt irreversibly.
For cotton or linen, you can use a slightly warmer temperature and a little more soap.
Step 2: Mordant the Fiber
For alum mordanting, a common ratio is 15% weight of fiber (WOF): if you’re dyeing 100g of wool, dissolve 15g of alum in hot water, add it to a pot filled with enough warm water to let the fiber move freely, then add the pre-wetted fiber. Raise the temperature slowly over 30–45 minutes to about 80°C (175°F) for wool, hold for 45 minutes, then let it cool in the bath before removing.
You can mordant and dye in the same session or mordant ahead of time and store damp fiber in the fridge for a few days.
Step 3: Prepare the Dye Bath
Collect your kitchen scraps over time — onion skins especially accumulate fast if you cook regularly. A general starting point: use roughly equal weight of dye material to dry fiber weight (1:1 ratio), though more material produces deeper color.
Place scraps in the pot, cover generously with water, and simmer for 30–60 minutes to extract the pigment. Strain out the plant material, leaving only the dye liquor. The smell at this stage can be pungent — good ventilation helps.
For avocado pits: chop or break them up (they’re hard — use a hammer wrapped in a cloth). Simmer for at least an hour; the pink develops slowly.
For black beans: don’t heat the bean water at all. Soak dried black beans overnight, drain off the soaking liquid, and use that directly as a cold dye bath. Heat destroys the blue/purple pigment.
Step 4: Dye the Fiber
Add the pre-wetted, mordanted fiber to the strained dye bath. Raise the temperature slowly and hold it in the range your fiber tolerates — for wool, stay under 85°C (185°F) and avoid boiling. Stir gently and regularly to ensure even color.
Dye time varies from 30 minutes to several hours depending on how deep a color you want. Deeper color requires more time and more dye material, not higher heat.
For exhaust dyeing: once the fiber has absorbed as much color as you want, remove it and add a fresh (unmordanted) piece of fiber to the remaining dye bath. You’ll get a lighter shade from the exhausted bath — a useful way to create tonal gradations from one dye session.

Step 5: Rinse and Finish
Let the fiber cool in the dye bath before removing it. Then rinse in water of similar temperature, gradually working toward cool water. Wring gently (or for wool, press — don’t twist), and hang to dry out of direct sunlight.
For iron afterbath (optional): dissolve a small amount of ferrous sulfate (roughly 2–4% WOF) in hot water, add the dyed fiber for 10–20 minutes, then rinse thoroughly. This shifts colors significantly — yellows become olive-green, pinks can shift to mauve or gray. It’s a powerful variable to experiment with.
Troubleshooting Common Problems
Uneven, blotchy color: Usually caused by the fiber not being fully wetted before entering the dye bath, or by insufficient stirring. Crowding the pot is another common culprit — fiber needs room to move.
Color much paler than expected: The dye material may have been insufficient, or the mordant may not have bonded properly. Check whether the fiber was scoured thoroughly.
Turmeric yellows fading fast: Turmeric is a direct dye — it doesn’t need a mordant to strike, which also means it bonds weakly. It’s best used for projects where some fading is acceptable, or in a mordanted bath that includes a tannin layer to help retention. It will fade with washing and sun exposure.
Red cabbage going green: Red cabbage contains anthocyanins, which are pH indicators. In alkaline water (high mineral content, or if you’ve added baking soda) the color shifts toward green; in acidic conditions (add a splash of vinegar) it shifts toward pink-purple. This behavior makes it a fascinating dye to experiment with, but not a reliable one.
Storing Scraps and Building a Dye Stash
You don’t have to dye immediately after generating scraps. Dry onion skins at room temperature and store them in a paper bag — they keep for months. Avocado pits can be dried and stored similarly, or frozen. Coffee grounds and black bean water are best used fresh or frozen promptly.
Building a small dye scrap stash over several weeks means you can run a proper dye bath (with enough material for good depth) rather than using a tiny amount and getting a washy result.

If you’re saving onion skins in a jar under the sink, you may also want our tips in How to Deodorize a Kitchen Smelling of Fish or Onions to keep that stash from making your whole kitchen smell like onions.
A Note on Lightfastness and Managing Expectations
Natural dyes vary significantly in how they hold up over time. Onion skin and pomegranate rind dyes, properly mordanted with alum, are reasonably lightfast for home use. Beet and red cabbage are not — they’re worth doing for the experience and for decorative projects, but won’t survive years of regular washing and sunlight.
This isn’t a flaw so much as a characteristic. Colors that shift and fade gently over time have their own appeal. If you want maximum longevity, focus on tannin-rich dye sources (pomegranate, oak gall, black walnut) and alum or iron mordanting.
Conclusion
Natural dyeing with kitchen scraps rewards patience and curiosity more than technical precision. The variables — water chemistry, fiber type, heat, mordant choice — mean that results are never completely predictable, and that’s genuinely interesting rather than frustrating once you embrace it.
Start with a bag of yellow onion skins and a skein of wool, mordant with alum, and see what comes out. The gold you’ll get is warmer and more complex than anything you can buy in a bottle. From there, the experimenting writes itself.