How to Troubleshoot Common Plumbing Leaks Yourself

A single dripping faucet can waste more than 3,000 gallons of water per year — enough to fill a small swimming pool. Yet most household plumbing leaks are surprisingly fixable without calling in a professional, provided you know where to look and what you’re dealing with. This guide walks through the most common leak types, how to diagnose them, and the practical steps to stop them.
Start Here: How to Find a Hidden Leak
Before you grab any tools, figure out whether you actually have a leak and roughly where it is. Many leaks hide behind walls or under slabs for months before causing visible damage.
The Water Meter Test
This is the fastest way to confirm a leak somewhere in your plumbing system:
- Turn off every water fixture in the house — taps, appliances, ice makers, irrigation.
- Locate your water meter (usually near the street or property boundary).
- Note the reading and check back in 15–30 minutes without using any water.
- If the dial or digital counter has moved, water is escaping somewhere.
Some meters have a small triangular or star-shaped leak indicator that spins even when the main dial is still — watch for that.
Check Your Water Bill
A spike in usage that doesn’t match your behavior is often the first sign of a slow leak. Compare three or four consecutive months; a steady upward creep is a red flag.
Visual Clues to Look For
- Dark stains or soft spots on drywall or ceilings
- Peeling paint or wallpaper near pipes
- Musty odor in cabinets under sinks
- Warped or discolored flooring, especially near toilets and dishwashers
- Wet patches on the lawn in dry weather (possible underground supply line leak)

Dripping Faucets: The Most Common Household Leak
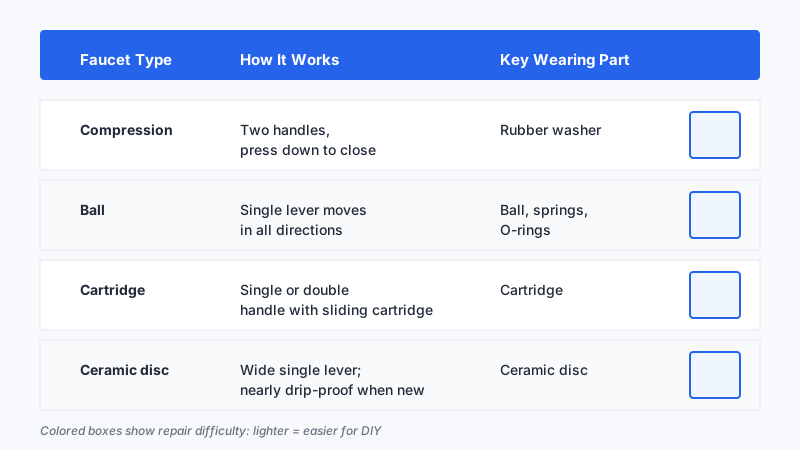
A dripping faucet is almost always a worn internal component — a washer, O-ring, or ceramic cartridge that no longer seals properly under pressure. The fix depends on your faucet type.
Identifying Your Faucet Type
| Type | How It Works | Key Wearing Part |
|---|---|---|
| Compression | Two separate handles, press down to close | Rubber washer |
| Ball | Single lever moves in all directions | Ball, springs, O-rings |
| Cartridge | Single or double handle with a sliding cartridge | Cartridge |
| Ceramic disc | Wide, single lever; nearly drip-proof when new | Ceramic disc |
Step-by-Step: Fixing a Compression Faucet
Compression faucets are the oldest type and still common in older homes. They drip because the rubber washer at the bottom of the stem wears flat.
- Shut off the water supply at the valves under the sink, or at the main if there are no isolating valves.
- Open the faucet to release pressure and let residual water drain.
- Remove the handle — usually a screw hidden under a decorative cap on top of the handle.
- Unscrew the packing nut with an adjustable wrench, then pull out the stem.
- Inspect the washer at the stem’s base. If it’s flattened, cracked, or misshapen, pry it off with a screwdriver and fit an exact replacement (bring the old one to the hardware store to match the size).
- Check the O-ring on the stem itself; replace it if it’s grooved or brittle.
- Reassemble, turn the water back on, and test.
For ball, cartridge, or ceramic-disc faucets, the repair logic is the same — isolate, disassemble, replace the failing component, reassemble — but the internals differ. Many hardware stores sell faucet-specific repair kits that include every part you might need, which removes the guesswork.
When to Just Replace the Faucet
If the valve seat (the surface the washer presses against) is pitted or corroded, replacing washers won’t stop the drip for long. A valve seat grinder can resurface it, but for a faucet older than 15–20 years, replacement is often the better investment.
Toilet Leaks: Silent Water Wasters
Toilets account for a large share of residential water waste, largely because internal leaks are invisible — water seeps from the tank into the bowl without ever hitting the floor.
The Food Coloring Test
Drop 5–10 drops of food coloring or a dye tablet into the toilet tank. Wait 10–15 minutes without flushing. If color appears in the bowl, water is leaking past the flapper.
Fixing a Faulty Flapper
The flapper is the rubber valve at the bottom of the tank. Over time it warps, hardens, or accumulates mineral deposits that prevent a full seal.
- Turn off the shut-off valve behind the toilet.
- Flush to empty the tank.
- Unhook the flapper from the overflow tube ears and disconnect the chain from the flush lever.
- Take the old flapper to the store for a match, or note your toilet’s brand — many manufacturers make model-specific flappers.
- Snap the new flapper onto the overflow tube, attach the chain (leave about half an inch of slack), and turn the water back on.
A properly fitting flapper costs $5–$15 and takes under 10 minutes to install.
Fill Valve Issues
If the toilet keeps running after the tank refills — or runs in short bursts periodically — the fill valve may be worn or set too high. The water level in the tank should sit about an inch below the top of the overflow tube. If it’s higher, water constantly drains into the bowl.
Adjust the float arm or float ball downward (on older ballcock assemblies) or turn the adjustment screw on a modern float cup fill valve. If adjusting doesn’t solve it, a complete fill valve replacement (around $10–$20) is straightforward: turn off the supply, flush, sponge out remaining water, disconnect the supply line, unscrew the locknut under the tank, and swap in the new unit.
Leaks at the Base of the Toilet
Water pooling around the base is usually a failed wax ring — the seal between the toilet outlet and the floor drain flange. This is a bigger job (you need to remove and reset the toilet) but still DIY-able. If you also notice the toilet rocking, the closet bolts may be loose or the flange cracked, which should be inspected before re-setting.

Under-Sink Leaks: Supply Lines and Drain Connections
Cabinets under bathroom and kitchen sinks are prime leak territory. Pull everything out and look carefully — leaks here are often slow drips that only become visible when you wipe a hand along each joint.
Supply Line Leaks
Braided stainless steel supply lines (the flexible tubes connecting shut-off valves to the faucet) can leak at either end:
- At the valve end: Tighten the compression nut by hand, then a quarter turn with a wrench. Don’t overtighten — that can crack the fitting.
- At the faucet end: Same approach. If tightening doesn’t help, the ferrule inside may be damaged; replace the line.
- The line itself is bulging or damp: Replace it immediately. A burst supply line can release water at full mains pressure into a closed cabinet — serious damage in minutes.
Replace supply lines every 10 years as a preventive measure, especially plastic-jacketed lines, which degrade faster than braided steel.
P-Trap and Drain Leaks
The P-trap — the curved pipe under the sink — can leak at its slip-joint fittings. These often just need the plastic slip nuts tightened by hand (rarely with tools, as overtightening cracks them). If the pipe itself is cracked or the rubber washers inside the fittings are flattened, replace the P-trap assembly. A full replacement kit costs under $15 at any hardware store.
If the drain itself is slow rather than leaking, our guide How to Unclog a Drain Naturally: Baking Soda Beats Harsh Chemicals offers a simple fix before you start dismantling pipes.
Pipe Joint Leaks and Slow Seeps
Leaks at threaded or soldered pipe joints are more serious but sometimes manageable without soldering skills.
Threaded Joints
If water weeps from a threaded connection:
- Turn off water, dry the joint thoroughly.
- If the connection can be unscrewed, wrap the male threads with 2–3 layers of PTFE (thread seal) tape before reassembling.
- If disassembly isn’t practical, epoxy pipe repair compounds or plumber’s tape can stop small seeps temporarily — but treat these as emergency measures, not permanent fixes.
Small Pinhole Leaks in Copper Pipe
Pinholes in copper are usually caused by corrosion and are more common in homes with aggressive (low-pH) water. Temporary options:
- Pipe repair clamp: A rubber gasket and metal clamp that compresses over the hole — available at hardware stores and effective as a short-term patch.
- Epoxy putty: Knead equal parts together, press over the dry pipe, and allow to cure per instructions.
Both are stopgap measures. The permanent fix is cutting out the damaged section and replacing it with a new piece of copper (soldered or using push-fit connectors like SharkBite fittings, which require no torch or special tools).
Push-Fit Connectors: A DIY-Friendly Option
SharkBite-style push-fit fittings have genuinely changed what a non-plumber can tackle. You cut the pipe cleanly and square, deburr the edge, and push the fitting on — it locks by internal teeth and an O-ring seal. They work on copper, CPVC, and PEX. Some plumbers are skeptical of them for permanent in-wall applications, but they’re broadly accepted and code-compliant in most jurisdictions for accessible locations.

Safety and When to Call a Professional
Knowing your limits is part of good troubleshooting. Stop and call a licensed plumber if:
- You’ve found the leak but it involves a main shut-off valve that won’t close fully
- The pipe is galvanized steel and showing widespread corrosion (a systemic problem, not a one-spot fix)
- The leak is inside a wall or under a concrete slab
- There’s any sign of sewage backup or gray water contamination
- You smell gas near any work area — stop immediately, leave the building, and call your gas utility
Also: always photograph your work before reassembling anything, and keep a basic plumbing kit on hand — an adjustable wrench, slip-joint pliers, PTFE tape, a few spare flappers, and a set of replacement supply lines covers 80% of common emergencies.
Once your leaks are under control, tackling other sources of waste around the house is a great next step, as covered in How to Make Your Home More Energy Efficient: Seal, Insulate, Save.
Practical Conclusion
Most plumbing leaks follow a short list of causes — worn rubber, loose fittings, corroded metal, or a failed seal. The diagnostic steps are logical and methodical: confirm the leak exists, narrow its location, identify the component, and replace or reseal it. None of that requires professional training for the problems covered here.
The bigger mistake is ignoring a small drip. A steady leak at 10 drops per minute adds up to roughly 500 gallons per month. The water damage compounds invisibly until you’re facing mold remediation or structural repairs. Fix it early, fix it yourself, and you’ll save both water and money.