How to Organize Digital Photos: A Step-by-Step System

Thousands of photos sitting in random folders with names like “DSC_4891.jpg” — most of us have been there. The problem isn’t taking pictures; it’s what happens after. Cameras and phones shoot constantly, cloud services sync everything automatically, and before long you have duplicates scattered across three devices, a hard drive, and two different apps. This guide cuts through the chaos with a practical, repeatable system you can actually stick to.
Why Most Photo Libraries Fall Apart
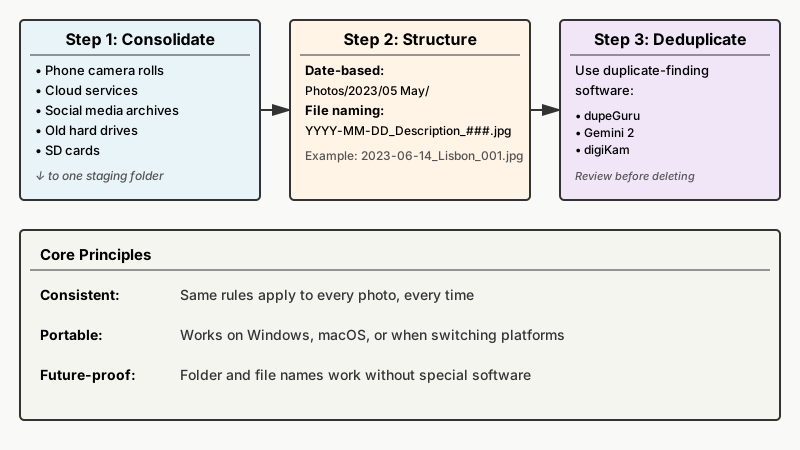
The failure point is almost never a lack of tools. People download a new app, spend a weekend sorting, then fall back into the same habits because there’s no underlying structure. A good organization system has to be:
- Consistent — the same rules apply to every photo, every time
- Portable — your structure works whether you’re on Windows, macOS, or switching platforms
- Future-proof — folder and file names that make sense without relying on any particular software
Before touching a single file, decide on a structure. Trying to sort and rename at the same time is how sorting sessions stall at 11 PM.
Step 1 — Consolidate Everything First
The single most useful thing you can do before organizing is gathering all your photos into one place. That means:
- Phone camera rolls — both current and any old phones you still have access to
- Cloud services — Google Photos, iCloud, Amazon Photos, Dropbox
- Social media archives — Facebook and Instagram let you download your full photo history
- Old hard drives and USB sticks — that external drive from five years ago almost certainly has photos on it
- SD cards — especially if you own a DSLR or mirrorless camera
Copy everything to a single staging folder on your computer or a large external drive. Don’t delete anything yet — just get it all in one place. Yes, it will be messy. That’s fine for now.

How to Export from Cloud Services
Google Photos: Use Google Takeout to export your entire library. Choose JPEG format and include metadata. Exports arrive as zip files — download all parts before extracting.
iCloud Photos: On a Mac, open the Photos app, go to Preferences → iCloud, and make sure “Download Originals” is enabled. Then use File → Export → Export Unmodified Originals. On Windows, the iCloud app can sync your library to a local folder.
Amazon Photos: Go to the Amazon Photos website, select all photos, and use the download option. Large libraries may require downloading in batches.
Step 2 — Choose a Folder Structure That Lasts
The most durable folder structure is date-based, because dates are objective and universal. A year-based top level, with month subfolders, works for most people:
Photos/
  2019/
    01 January/
    02 February/
    ...
  2020/
    ...
If your life has strong thematic categories — travel, family events, professional work — add a parallel structure:
Photos/
  By Year/
    2022/
      05 May/
  By Album/
    Travel/
      Greece Trip/
    Family/
      Grandma's 80th Birthday/
The key principle: pick one structure and standardize it. Mixing both inside the same folder tree creates confusion fast.
Naming Files Sensibly
Camera-generated filenames like “IMG_3047.jpg” are nearly useless. A better convention is:
YYYY-MM-DD_Description_###.jpg
For example: 2023-06-14_Lisbon-street-market_001.jpg
Starting with the date (in ISO 8601 format: year, month, day) means files sort chronologically in any file explorer, on any operating system, without needing special software. The description gives you context at a glance. The sequence number avoids collisions when you have multiple shots from the same day and event.
You don’t have to rename every single file manually. Tools like ExifTool (free, command-line), digiKam (free, desktop), and Photomechanic (paid, used by professional photographers) can batch-rename thousands of files using embedded EXIF date data in minutes.
Step 3 — Remove Duplicates Without Losing Anything
Duplicates are inevitable when you’ve pulled photos from multiple sources. The same shot might live in Google Photos, your iCloud backup, and a folder you manually copied two years ago.
Do not delete duplicates by eye — you will make mistakes and you will regret it. Use dedicated duplicate-finding software:
- dupeGuru (free, cross-platform) — compares files by content, not just filename, so it catches duplicates even when they’ve been renamed
- Gemini 2 (Mac, paid) — well-regarded for its smart scanning and simple removal workflow
- digiKam (free) — has a built-in duplicate finder alongside its other features
Always review the duplicate list before deleting. Move suspected duplicates to a trash folder first, wait a couple of weeks, then delete permanently. One false removal of an irreplaceable photo is not worth the saved disk space.

Step 4 — Cull Ruthlessly (But Smartly)
Consolidating and deduplicating reveals a second problem: hundreds of near-identical shots. Three almost-identical photos of the same plate of food, eight burst-mode shots of a child mid-run, twelve slightly different angles of the same landmark. Most of these don’t need to be kept.
Culling — choosing keepers and discarding rejects — is the most time-intensive part of the process, but it pays off enormously in the long run. A library of 5,000 well-chosen photos is far more enjoyable to browse than 40,000 that include every failed attempt.
A practical approach:
- Work in events, not dates. Go through a trip or occasion as a unit, not day by day.
- Flag keepers first. Don’t decide what to delete — decide what to keep. Everything unflagged is a candidate for removal.
- Be honest about technical quality. A blurry, poorly exposed shot of a great moment is still a poor photo. Keep the best version and let the rest go.
- Set a time limit. Spending two hours on one vacation’s photos is a sign you need to move faster. Speed forces decisiveness.
Software like FastRawViewer (fast image browsing, paid) or even the built-in Photos app on Mac can make culling quicker than standard file browsers.
The same discipline required to delete mediocre photos applies to physical spaces too, as explained in How to Keep a Workspace Tidy: Design a System That Fights Friction.
Step 5 — Pick a Long-Term Storage Strategy
Once your library is sorted, you need a storage plan that protects it. The industry standard recommendation is 3-2-1 backup: three copies of your data, on two different media types, with one copy offsite.
In practical terms for a home user:
- Primary copy on your computer or a main external drive
- Second local copy on a separate external hard drive or NAS (network-attached storage)
- Offsite copy in cloud storage: Backblaze Personal Backup (~$99/year for unlimited storage), Google One, or Amazon Photos (free unlimited photo storage for Prime members)
Cloud sync services like Google Photos or iCloud are convenient but not the same as a backup — they mirror deletions and can sync corruptions. Dedicated backup services like Backblaze keep versioned copies, which is the critical difference.
If you decide cloud storage is part of your strategy, our companion piece How to Back Up Photos to the Cloud: Stop Assuming You’re Covered explains why simply syncing your photos isn’t the same as having a real backup.
Cloud Photo Management vs. Local File Management
Some people prefer managing everything inside a cloud photo app (Google Photos, Apple Photos). Others prefer keeping files organized in a folder system they control. Both approaches work — the wrong choice is having no deliberate approach at all.
If you use a cloud app as your primary tool, make sure you also export and back up locally at least once a year. Platform policies, pricing, and company situations change; your photo archive shouldn’t depend entirely on one company’s continued service.

Step 6 — Add Metadata and Tags (Selectively)
Metadata — information embedded in or alongside a photo file — is what makes a large library searchable. EXIF data captures the camera settings, date, and GPS location automatically. You can add to this with:
- Keywords/tags for subjects (“dog”, “beach”, “architecture”)
- Star ratings to mark your best shots
- Captions for context that dates won’t provide (who was there, what was happening)
- Geotags if your camera doesn’t record GPS automatically
The caveat: tagging every photo is unrealistic and leads to abandoning the system. Tag selectively — your best photos, any image you’re likely to search for, and anything with faces or events worth identifying. Tools like digiKam, Adobe Lightroom, and Apple Photos write metadata to standard XMP sidecar files or directly into JPEGs, keeping your tags portable across software.
Maintaining the System Going Forward
A one-time organization sprint does nothing if new photos pile up in disorder. The fix is a simple monthly routine:
- Import photos from your phone and camera at the end of each month — or immediately after a significant event
- Quick cull — delete obvious failures, burst extras, and screenshots you don’t need
- File into folders using your date-based structure
- Confirm backup ran — check your offsite backup completed successfully
Fifteen to thirty minutes a month is enough to prevent the next accumulation crisis. The organizing sprint was the hard part; maintenance is genuinely light if you stay consistent.
If digital clutter tends to creep back into your life across the board, our guide to How to Declutter a Digital Inbox: Clearing The Backlog Without Burnout offers a similar approach for taming an overflowing email account.
Conclusion
Organizing digital photos isn’t complicated in theory — it just requires a few decisions made once and a light habit built afterward. Settle on a folder structure, adopt a consistent naming convention, eliminate duplicates carefully, back up in multiple places, and spend a short block of time each month on imports. That’s the whole system. The photos you actually want to revisit will be easy to find, and the ones wasting space will be gone.
The best time to set this up was whenever your library first got out of hand. The second best time is now.