How to Remove Odors from a Refrigerator: Fix It With Household Staples

A fridge that smells bad is more than unpleasant — it can signal a real hygiene problem, and left unchecked, odors transfer to food and drinks. The good news is that most refrigerator smells are fixable within a few hours using things you probably already have at home. This guide walks through the root causes, the most effective remedies, and the habits that stop odors from coming back.
Why Refrigerators Develop Odors
Before throwing baking soda at the problem, it helps to know what you’re actually dealing with.
Bacterial and Mold Growth
Cold slows but doesn’t stop bacterial growth. Spills, forgotten leftovers, and condensation create pockets of moisture where mold and bacteria thrive — especially in the vegetable crisper, door gaskets, and drip trays. These microorganisms produce volatile organic compounds (VOCs) that your nose picks up as sour, musty, or rotten smells.
Cross-Contamination Between Foods
Strong-smelling foods — raw fish, aged cheese, cut onions, fermented items — release aromatic compounds that absorb into other foods, into plastic shelves, and into the fridge lining itself. Soft plastics are especially porous and hold onto these molecules even after the food is gone.
If lingering smells and stains have also taken hold on your countertops or cutting boards, Fix Stubborn Odors and Stains on Countertops and Cutting Boards can help you tackle those surfaces too.
Temperature Problems
A fridge running warmer than 4°C (40°F) accelerates spoilage dramatically. If you notice recurring or intense odors, check the temperature with a standalone thermometer. The thermostat display is sometimes off by several degrees.
The Drip Tray and Drain
Many people never clean the drip tray — the shallow pan that collects condensation under or behind the fridge. Over time it fills with a stagnant, bacteria-rich film that produces a persistent musty or sour smell that seems to come from nowhere.

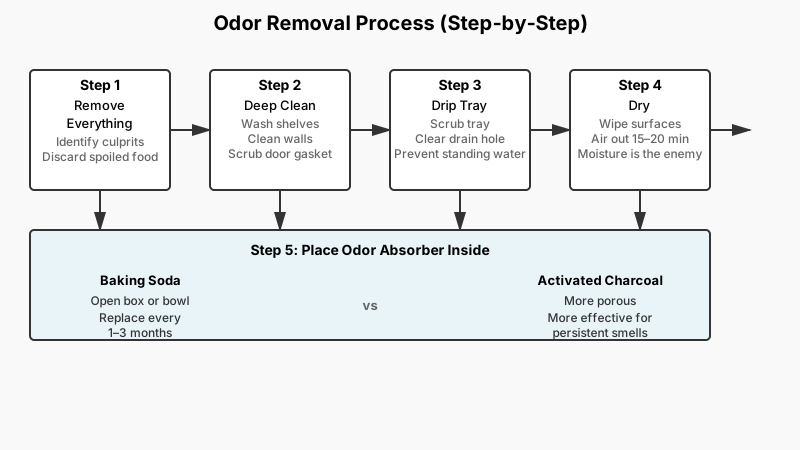
The Step-by-Step Deodorizing Process
Don’t just mask the smell — eliminate its source. Work through these steps in order.
Step 1: Remove Everything and Identify the Culprit
Take out all food and place it in a cooler with ice. Check every item: leftover containers, produce bags, condiment bottles with crusty lids, anything wrapped in foil. Look for:
- Visible mold or slime
- Liquids that have thickened or separated
- Produce that feels soft, wet, or discolored
- Meat or fish past its use-by date
Toss anything suspicious. One forgotten half-avocado wedged behind a drawer can be the entire source.
Step 2: Deep-Clean Every Surface
Remove all shelves, drawers, and bins and wash them in the sink with warm soapy water. For stubborn residue, soak for 10–15 minutes before scrubbing. Then clean the interior walls, ceiling, and floor of the fridge with one of these solutions:
- White vinegar and water (1:1 ratio): Effective at cutting grease and neutralizing alkaline odors. The vinegar smell itself dissipates within minutes of the fridge being closed.
- Baking soda paste (3 tablespoons baking soda + 1 quart warm water): Mild abrasive, safe on all surfaces, neutralizes acids.
- Dish soap and warm water: Good for general grime, but doesn’t neutralize odors as well as the above two.
Pay special attention to the door gasket — the rubber seal running around the door frame. Mold loves the folds of this seal. Use a toothbrush or cotton swab dipped in vinegar solution to scrub inside each groove. If the gasket has black mold embedded in the rubber itself, it may need replacing.
Step 3: Clean the Drip Tray and Drain Hole
Locate your drip tray (consult the manual — position varies by model). Pull it out, empty it, and scrub it with a diluted bleach solution (1 tablespoon bleach per quart of water). Rinse thoroughly.
Find the drain hole at the back of the interior (usually at the bottom, behind a cover or panel). Clear it with a pipe cleaner or a turkey baster filled with warm water. A blocked drain leads to standing water — a direct odor source.
Step 4: Dry Everything Thoroughly
Moisture is the enemy. Wipe down all surfaces and shelves with a dry cloth before reassembling. Leave the fridge open for 15–20 minutes if possible to air out.

Step 5: Place an Odor Absorber Inside
Once the fridge is clean, deploy one of these:
Baking soda: An open box or bowl placed at the back of the fridge absorbs odors through adsorption — molecules stick to the surface of the sodium bicarbonate. Replace it every 1–3 months for best results.
Activated charcoal: More porous than baking soda and arguably more effective, especially for persistent smells. Activated charcoal pouches are available online and in hardware stores. One 50–100g pouch can last 2–3 months before recharging (set it in direct sunlight for a few hours to reactivate).
Coffee grounds: A bowl of dry, fresh coffee grounds absorbs odors quickly and works well for a short-term fix — say, 24–48 hours after a deep clean.
Commercial refrigerator deodorizers: Products using zeolite or activated carbon are available from appliance retailers. They tend to last longer than baking soda and are worth considering if odors recur frequently.
Specific Odor Scenarios
Different smells need slightly different approaches.
Rotten Food Smell (Sulfur or Decay)
This is the most intense type. After removing the offending food, wipe the area with white vinegar, then place a bowl of activated charcoal inside overnight with the fridge running but as empty as possible. Repeat if necessary.
Fish Odor
Fish smell is caused by amines — alkaline compounds. White vinegar (acidic) neutralizes them chemically. Wipe affected surfaces with undiluted white vinegar, let it sit for five minutes, then wipe clean.
Musty or Mold Smell
This usually points to the gasket, drip tray, or a drain blockage. Bleach solution is your best tool here — but use it only on non-porous surfaces and rinse thoroughly so food isn’t exposed to residue.
Chemical or Plastic Smell (New Fridges)
Brand-new fridges often smell of outgassing plastic and manufacturing residue. Wipe the interior with a baking soda solution, leave the door ajar for a day with the appliance running, and place a bowl of activated charcoal inside. This typically resolves within a few days of normal use.
Power Outage Aftermath
If food spoiled during an extended power cut, the smell can be extreme. After discarding all food, wash the interior with a solution of 1 tablespoon baking soda per quart of water, then follow with a diluted bleach wipe-down. Leave balled-up newspaper or activated charcoal inside overnight; newspaper is surprisingly effective at absorbing stubborn organic odors.

Preventing Odors Long-Term
A clean fridge that smells neutral is mostly a maintenance question.
Store Food Properly
- Use airtight containers for leftovers, cut produce, and strong-smelling foods. Glass containers are better than plastic for containing odors because they don’t absorb aromatic compounds.
- Wrap raw meat and fish tightly in plastic or store in sealed containers — and keep them on the lowest shelf to prevent drips.
- Don’t store uncovered food directly on shelves.
Keep an Ongoing Odor Absorber
An open box of baking soda or an activated charcoal pouch in the back of the fridge should be permanent. Set a calendar reminder to swap it out every two to three months.
Do a Weekly Sweep
Once a week — shopping day is a natural trigger — check the produce drawers and any open containers for items past their prime. Five minutes now prevents a major clean-up later.
Monthly Wipe-Down
A quick monthly wipe of shelves and the gasket with diluted vinegar takes about 10 minutes and prevents buildup.
While you’re on a cleaning roll, How to Remove Grease Buildup from Kitchen Cabinets to keep the rest of your kitchen looking as fresh as your fridge.
Check the Temperature
Maintain 1–4°C (34–40°F) for the main compartment and -18°C (0°F) for the freezer. A $10 standalone thermometer is a worthwhile investment — built-in thermometers often read several degrees off.
Pull the Fridge Out Annually
Once a year, slide the fridge away from the wall and clean the drip tray, the condenser coils (dusty coils make the fridge run warm), and the floor underneath. This single habit prevents most of the chronic odor problems that resist other fixes.
When to Call a Technician
If you’ve thoroughly cleaned the fridge and odors persist, consider:
- A failing door seal: A gasket that no longer seals properly allows humid, warm air in continuously, encouraging mold. A new gasket is inexpensive and usually user-installable.
- A malfunctioning defrost drain: If water pools inside the fridge, the drain heater or drain path may be blocked by ice. This is a technician job.
- Refrigerant leak: A sweet, chemical smell (sometimes described as ether-like) that doesn’t respond to cleaning can indicate a refrigerant leak. Stop using the appliance and call a certified appliance technician.
Conclusion
Removing a refrigerator odor is rarely complicated, but it does require going beyond surface-level spraying and targeting the actual source — whether that’s a forgotten container, a grimy gasket, or a neglected drip tray. Work through the cleaning steps methodically, deploy an odor absorber, and build a few simple habits into your routine. Most people who do this find their fridge stays fresh indefinitely without needing repeated deep cleans.