How to Poach an Egg Perfectly: Why Egg Freshness Beats Fancy Tools

Poaching an egg sounds deceptively simple — drop an egg into hot water and wait. Yet for most people it produces a stringy, broken mess that belongs in the bin, not on toast. The difference between a perfectly poached egg and a disaster usually comes down to three things: egg freshness, water temperature, and technique. Get those right and you will turn out eggs with a tight, silky white and a warm, runny yolk every single time.
Why Freshness Is Non-Negotiable
The single biggest variable in poached egg quality is how old your eggs are. A fresh egg has thick, dense albumen (the white) that clings close to the yolk. An older egg has watery, thin albumen that spreads the moment it hits water, creating those ragged wisps everyone hates.
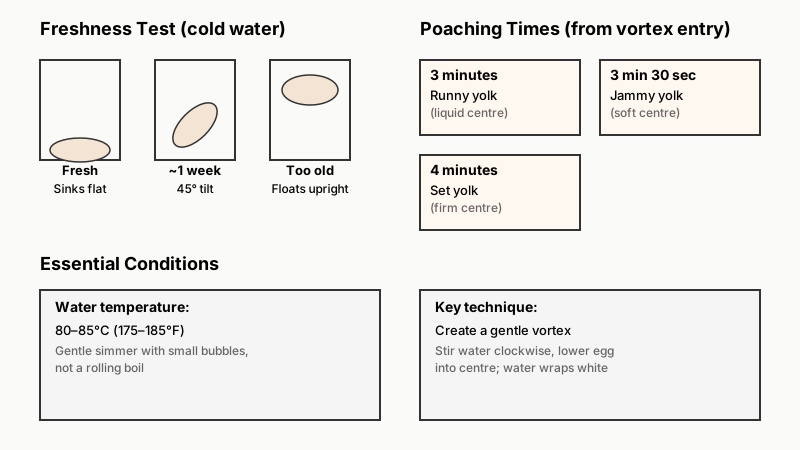
To test freshness, lower your egg gently into a glass of cold water before you even crack it. A fresh egg sinks and lies flat on the bottom — the air cell inside is still small. An egg that tilts at a 45-degree angle is about a week old and will still poach acceptably. One that stands upright or floats is too old for poaching; use it for scrambled eggs or baking instead.
If you buy from a farmers’ market or keep backyard chickens, freshness is rarely a problem. Supermarket eggs can be several weeks old by the time they reach the shelf, so it is worth doing the float test every time.

Equipment You Actually Need
You do not need any specialist gadgets. Avoid silicone poaching pods and microwave poachers — they steam rather than poach the egg, producing a rubbery result with none of the delicate texture you are after. All you need is:
- A wide, shallow saucepan or sauté pan — at least 7–8 cm (3 inches) of water depth
- A slotted spoon for lifting the egg
- A small ramekin or cup to crack the egg into first
- A kitchen timer
- White wine vinegar or cider vinegar (optional but helpful)
The ramekin is important. Cracking an egg directly over the pan gives you almost no control over where it lands or how gently it enters the water. Cracking into a cup first means you can check for broken yolk, remove any stray shell, and lower the egg in one smooth, controlled movement.
On the Vinegar Debate
Adding a splash of white wine vinegar — roughly one tablespoon per litre of water — helps the albumen coagulate faster, which keeps the white tighter. It does not make the egg taste of vinegar provided you keep the quantity modest. That said, if your eggs are very fresh and your technique is solid, you can skip it. Vinegar is a crutch, not a requirement.
The Step-by-Step Method
Here is the method refined over many breakfasts. Follow it precisely the first few times, then adjust timing to taste.
Step 1 — Bring water to a gentle simmer. Fill your pan with about 8 cm of water and heat over medium. You want the water at around 80–85°C (175–185°F) — below a rolling boil, which would batter the egg apart. Look for small, lazy bubbles drifting up from the base of the pan, not a vigorous churn. If you have a thermometer, use it until you can read the water by sight.
Step 2 — Add vinegar. Stir in one tablespoon of white wine vinegar per litre of water.
Step 3 — Crack your egg into a ramekin. Do this a few seconds before you cook, not well in advance. If the yolk has broken, set it aside and crack another.
Step 4 — Create a gentle vortex. Stir the water in a circle with a spoon to create a slow whirlpool. Lower your ramekin right to the water surface and tip the egg into the centre of the vortex. The spinning water wraps the white around the yolk naturally. This trick is most useful when cooking a single egg; for multiple eggs, skip it and just lower them in gently, spaced apart.
Step 5 — Do not touch it. Set a timer for 3 minutes for a runny yolk, 3 minutes 30 seconds for a slightly jammy yolk, and 4 minutes if you prefer it more set. Resist the urge to prod or stir.
Step 6 — Lift and drain. Slide a slotted spoon under the egg and lift it out. Hold it over the pan for a few seconds, then blot the base of the spoon lightly on a folded piece of kitchen paper to remove excess water before plating.
Step 7 — Season immediately. A pinch of flaky sea salt and freshly cracked black pepper, applied the moment the egg hits the plate, makes a meaningful difference to the final flavour.

Cooking Multiple Eggs at Once
Poaching four eggs for a weekend brunch is entirely doable. Crack each egg into its own small cup. Lower them into the water one by one, about 30 seconds apart, working around the pan clockwise so you know the order. They will not stick to each other if you space them roughly 5 cm apart. Adjust the heat if the water starts to boil aggressively.
Alternatively, poach eggs in advance: cook them for 2 minutes 30 seconds, then transfer immediately to a bowl of ice water. They will keep in cold water in the fridge for up to 24 hours. To reheat, drop them into simmering water for 60–90 seconds. This is how busy brunch kitchens plate eggs Benedict for a full dining room simultaneously.
Troubleshooting Common Problems
Stringy, wispy whites: Almost always an old egg or water that is too hot. Check freshness and lower your heat.
Egg sticking to the pan bottom: The water is not hot enough and the egg has settled before the white began to set. Try lifting it gently with a spoon after about 30 seconds; it should release cleanly once the base of the white is cooked.
Yolk broken on entry: This usually happens when you crack directly into the pan without a ramekin, or when you drop the egg from too high. Always use the ramekin method and keep the cup at water level.
Flat, spreading egg: A freshness problem. Use the float test before you cook.
Rubbery, overcooked white: Water temperature is too high or timing ran long. Aim for 80–85°C and stick to 3–3 minutes 30 seconds for most purposes.
What to Serve With a Perfectly Poached Egg
A poached egg is one of the more versatile things you can have in your repertoire. The obvious pairing is thick toast — sourdough or a proper white loaf, generously buttered — but the egg works just as well on other bases.
Eggs Benedict is the classic: toasted English muffin, a slice of Canadian bacon (or smoked salmon for Eggs Royale), and hollandaise sauce. The hollandaise itself is a separate project, but the poached egg technique is exactly the same.
On grain bowls and salads: A runny poached egg on a warm farro or barley salad acts as a sauce in its own right once the yolk breaks. It pulls the whole bowl together in a way a fried egg simply cannot.
On braised greens: Kale or spinach wilted in garlic and olive oil, topped with a poached egg and a handful of toasted pine nuts — a quick weeknight dinner that requires almost no effort once your poaching technique is solid.
Shakshuka variation: Rather than letting the eggs poach directly in the tomato sauce, some cooks poach them in water and add them to the sauce at the last moment. This gives cleaner whites and a more delicate texture than the traditional method.

If you’re planning a fuller spread around your poached eggs, 15 Easy Weeknight Dinner Recipes Ready in 30 Min can help you round out the meal without extra stress.
A Few Notes on Pan Choice and Heat Sources
Induction hobs give you precise, responsive heat control, which makes holding a simmer much easier. Gas hobs are fine but may need a lower flame setting than you expect. Electric resistance hobs can be sluggish to respond, so bring the water to temperature before you lower the heat to a simmer and give it a minute or two to stabilise.
Use a light-coloured or stainless steel pan if possible — you can see the egg clearly against a pale background. A dark non-stick pan is not a problem technically, but it makes it harder to judge the state of the white.
Since getting the heat right matters just as much in other quick-cooking techniques, How to Season a Stir Fry Properly: Why Timing Beats Your Sauce Recipe offers a useful parallel on why timing trumps equipment.
The Conclusion
Poaching an egg well is a skill that takes maybe three or four attempts to internalize. Once you have it, it is automatic: fresh egg, low simmer, ramekin method, three minutes. You do not need a poaching rack, special cups, or a culinary school education.
The only thing standing between most people and a perfect poached egg is the habit of buying the freshest eggs available and keeping the water below a boil. Sort those two things out and everything else follows naturally.