How to Organize Under the Kitchen Sink: Map It, Then Buy Bins

Under the kitchen sink is one of those spaces that quietly collects chaos — a graveyard of half-empty spray bottles, mystery sponges, and plastic bags stuffed inside other plastic bags. Unlike a pantry or a linen closet, it has pipes cutting through the middle of it, awkward corners, and an irregular footprint that makes standard storage solutions fit badly. Getting it genuinely organized takes a bit more thought than just buying a bin and calling it done.
This guide covers a practical, step-by-step approach — from clearing out and assessing the space to choosing the right products and maintaining order long-term.
Step 1 — Empty Everything Out and Start Clean
Pull everything out. Yes, everything. Lay it on the kitchen floor so you can actually see what you’ve been storing.
While the cabinet is empty, do three things:
- Check for moisture or leaks. Run your hand along the bottom of the cabinet and around the pipes. A damp base board is a sign of a slow drip that will rot your cabinet floor if ignored. Deal with any leak before you put a single item back.
- Wipe down the interior. A damp cloth with a mild all-purpose cleaner handles most grime. Let it dry fully.
- Line the floor (optional but useful). A sheet of vinyl shelf liner protects the cabinet base from drips and future spills, and it’s easy to wipe clean. Cut it to fit around the pipes.
Once the cabinet is clean, go through everything you pulled out. Toss anything expired — cleaning products do have a shelf life, typically printed on the label. Consolidate duplicates. If you have three bottles of the same dish soap, decant them into one.

Step 2 — Map the Space Before You Buy Anything
This is where most people go wrong: they head to a home goods store, buy a set of baskets, and come home to find the pipes are in the way.
Measure first. Note:
- The interior width at the front and back (it often tapers)
- The height from floor to the bottom of the sink basin
- The diameter and position of the drain pipe and the P-trap (that curved pipe)
- Any shut-off valves on the side walls, which stick out and reduce usable depth
Sketch a rough outline on paper. This five-minute step saves you a return trip to the store.
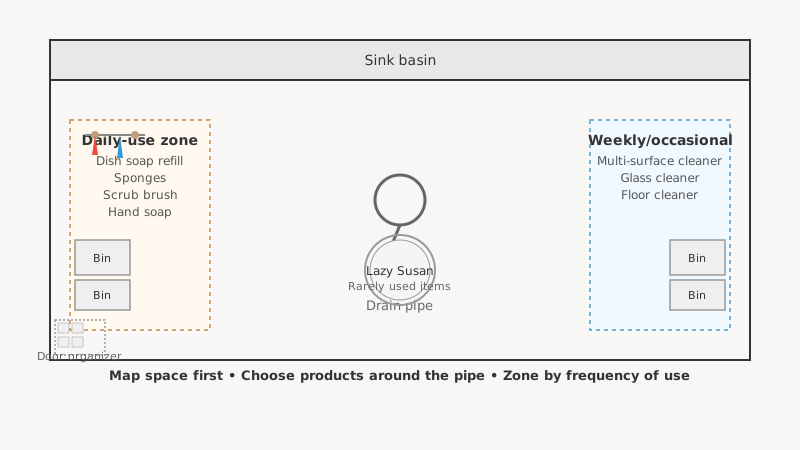
Identify your zones. Even a small cabinet benefits from a loose zoning system:
- Daily-use zone: dish soap refill, sponges, scrub brush, hand soap backup
- Weekly/occasional zone: multi-surface cleaner, glass cleaner, floor cleaner
- Rarely used: drain cleaner, rubber gloves, extra trash bags
Items you reach for every day should be at the front, within easy reach. Things you use once a month can live in the back or up high.
Step 3 — Choose Storage Solutions That Actually Fit the Space
The pipe down the center is non-negotiable, so choose products designed to work around it — or flexible enough to adapt.
Stackable Bins and Pull-Out Drawers
Plastic pull-out drawers or stackable bins with a cutout at the back work well on either side of the drainpipe. Look for ones labeled “under-sink” — they’re designed with a notch or an open back so they can slide around the pipe. A two-tier pull-out with a slim profile (around 8–10 inches wide) fits neatly on each side of most standard pipes.
A Tension Rod for Spray Bottles
This is genuinely one of the most effective under-sink tricks: a spring-loaded tension rod (the kind sold for shower curtains) installed horizontally near the top of the cabinet, where it clears the sink basin. Hang spray bottles by their trigger handles. This frees up the entire floor of the cabinet for other things. A single rod costs very little and takes about 30 seconds to install.
A Lazy Susan
A small turntable works well for cleaning products you don’t use daily. It lets you spin and grab items from the back without crouching and reaching. Choose a model with a raised lip so bottles don’t slide off.
Over-the-Door Organizers
The inside of the cabinet door is almost always wasted space. Slim door-mount organizers — either a wire rack or a fabric pocket panel — are good for small items: extra sponges, gloves, a small flashlight, or dish-soap packets. Check the door’s swing clearance first; some cabinets have a shelf or the P-trap positioned close enough that a bulky door organizer will hit it when you close up.
Stackable Canisters for Small Items
Loose sponges, scrub pads, and twist-ties have a way of migrating everywhere. Small stackable canisters or a desktop organizer tray corrals them in one spot. Clear containers help because you can see when you’re running low without having to rifle through everything.

Step 4 — Handle the Awkward Stuff
Trash Bags
A large roll of trash bags is unwieldy. A few options work well: a slim pull-out drawer dedicated to bags, a wall-mounted dispenser (adhesive-backed) on the interior side wall, or simply folding bags and tucking them flat in a labeled container. Avoid stuffing them in a single plastic grocery bag hanging from a hook — it’s the thing that causes the chaos in the first place.
Cleaning Gloves
Rubber gloves go stiff and cracked when they’re squished at the bottom of a pile. Hang them from a hook on the cabinet door or drape them over a tension rod so they dry out after use and keep their shape.
Pipe Clearance
If the P-trap hangs unusually low or the shut-off valves protrude far out from the wall, your floor space is genuinely reduced. In this case, focus almost entirely on door organizers and wall-mounted hooks rather than floor storage. A few well-chosen hooks can do more work than a stack of bins that doesn’t fit.
Step 5 — Think About Safety, Especially If You Have Kids
Under the kitchen sink is one of the most common places households store toxic cleaning products — and one of the first places curious children investigate.
If you have young children, fit the cabinet with a childproof latch. These are inexpensive and attach to the inside of the door frame. Magnetic cabinet locks, which require a magnetic key to open, are more secure than spring-loaded clips and harder for small hands to defeat.
Even with a latch in place, the standard advice from poison control organizations is to keep the most hazardous products (bleach, oven cleaner, drain unclogger) in a locked or high cabinet rather than under the sink if at all possible. Move them to a garage shelf or a high laundry-room cabinet and reclaim that under-sink space for safer everyday items.
Step 6 — Put It Back Strategically
Now that you have clean storage solutions and a zoned plan, load the cabinet deliberately:
- Front and center: Daily items — dish soap refill, current sponge, hand soap backup
- Pull-out drawers or bins (left of pipe): Cleaning sprays and cloths
- Pull-out drawers or bins (right of pipe): Trash bags, rubber gloves
- Lazy Susan at back: Infrequently used products like drain cleaner or furniture polish
- Door organizer: Extra sponges, small accessories
- Tension rod (top): Spray bottles
Label bins if more than one person uses the kitchen. A simple piece of tape and a marker does the job; a label maker is a minor luxury that makes it easier to maintain the system.

Once the space under the sink is sorted, it’s worth tackling the cabinets above it too, and How to Organize Kitchen Cabinets: Assign Zones By Daily Habit shows how to assign zones by daily habit.
Maintaining the System
Organization isn’t a one-time event. Under the sink is one of those places that drifts back toward chaos because it’s dark, out-of-sight, and convenient to shove things into.
A few habits help:
- One-in, one-out: When you buy a new cleaning product, check whether you already have something similar before putting it away.
- Monthly 30-second check: Open the cabinet and look. If something is out of place, fix it now rather than letting it start a pile.
- Wipe down the liner every couple of months. It collects drips from bottles you didn’t notice were leaking at the lid.
- Check for leaks periodically. A few seconds looking at the P-trap connection and the supply-line fittings can catch a small drip before it becomes water damage.
If keeping this system tidy inspires you to tackle other food storage chaos, How to Organize a Pantry: 9 Practical Steps That Last offers nine practical steps that last.
The Realistic Bottom Line
A well-organized under-sink cabinet doesn’t require a big budget or a weekend project. The core investment is about 20 minutes to clear and measure the space, another 20 to buy what actually fits, and 30 minutes to reassemble. The tension rod trick alone transforms the space for most people.
The bigger payoff is practical: you stop buying duplicate spray bottles because you couldn’t find the first one, you catch small leaks before they cause damage, and you’re not crouching and excavating every time you want a sponge. It’s a genuinely useful upgrade for one of the most-used and least-considered spots in the kitchen.