How to Organize Cables Behind a Desk: Audit First, Then Tame It

If you’ve ever reached behind your desk and pulled out a fistful of tangled cords, you already know the problem. A chaotic cable situation isn’t just an eyesore — it creates real friction: dust accumulates faster, troubleshooting becomes a chore, and swapping out a single device can mean dismantling half your setup. This guide covers practical, tested methods for getting cables genuinely under control, whether you’re working with a minimalist standing desk or a multi-monitor gaming rig.

Why Cable Management Is Worth the Effort
Before diving into the how, it helps to understand what you’re actually solving. A well-organized cable run does three things:
- Reduces dust buildup. Loose cables on the floor act like nets for pet hair and dust bunnies, which can eventually work their way into equipment fans.
- Makes troubleshooting faster. When every cable is labeled and routed logically, tracing a connection takes seconds instead of minutes.
- Protects cables from damage. Cables that droop freely can be pinched by chair wheels or bent sharply at connectors, shortening their lifespan.
None of this requires expensive gear. Most of the methods below cost under $30 total if you buy selectively.
Step 1 — Audit Before You Buy Anything
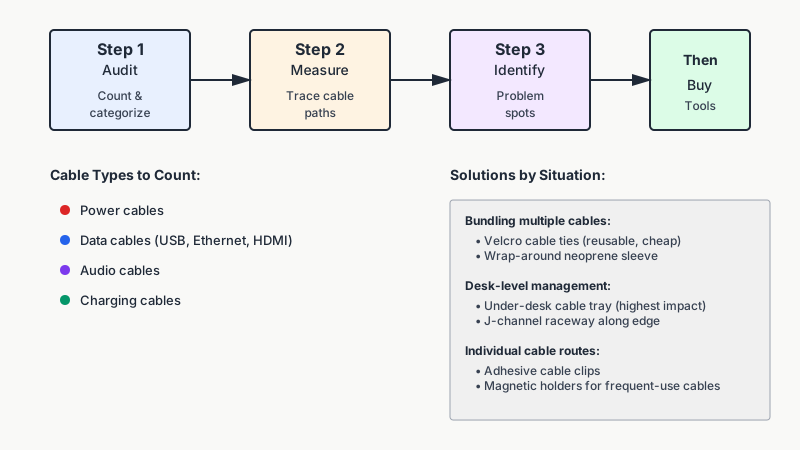
The single biggest mistake people make is buying a cable management kit before they know what they’re dealing with. Spend five minutes on an audit first.
Count and categorize your cables:
- Power cables (monitor, PC tower, laptop adapter, desk lamp)
- Data cables (USB, Ethernet, DisplayPort, HDMI)
- Audio cables (headset, speakers, microphone)
- Charging cables (phone, headphones, tablet)
Measure the runs. Use a piece of string to trace the path each cable would ideally take from device to outlet. This tells you how much sleeve or conduit to buy — and where you’ll need adhesive clips mounted.
Identify problem spots. Is the main tangle behind the monitor? Underneath the desk surface? Near the floor? Knowing this focuses your solution.
Only after this audit should you open a browser and start shopping.
This same map-before-you-buy approach works wonders in other cluttered zones, as shown in How to Organize Under the Kitchen Sink: Map It, Then Buy Bins.
12 Methods to Tame the Tangle
1. Velcro Cable Ties
Velcro ties are the workhorse of cable management — reusable, cheap, and available everywhere. Use them to bundle cables that travel the same route. Unlike zip ties, they’re easy to undo when you need to swap a device. A pack of 100 runs about $7–10 and will outlast your current desk setup.
Tip: Bundle cables by category (power separate from data) so you’re not pulling on a USB cable when you mean to trace a power line.
2. Cable Sleeves (Wrap-Around)
A split-loom or wrap-around neoprene sleeve gathers multiple cables into a single visual element. It’s ideal for the vertical run from your desk surface down to the floor. They’re especially effective on sit-stand desks, where you need the cable bundle to flex as the desk rises and falls — in that case, a coiled or accordion-style sleeve handles the movement better than a rigid conduit.
3. Under-Desk Cable Trays
A metal or plastic raceway mounted to the underside of your desk is the single highest-impact upgrade for most setups. You screw or clamp the tray to the desk, lay your power strip inside it, and run all your cables through. From the front, the desk looks almost wire-free.
Look for trays with at least 4 inches of width if you want to fit a standard power strip inside. J-channel cable raceways are a simpler alternative — you mount them like a gutter along the desk edge and cable ties hold the bundle in place.

4. Adhesive Cable Clips
Cable clips with an adhesive base let you route individual cables along a specific path — around the back edge of a desk, along a wall, or up a monitor stand. 3M Command strips are the gold standard for surfaces you don’t want to drill into, since they peel off without damage.
Where they work best: Single cable runs like an Ethernet cable along a baseboard, or a monitor power cable up the back of a monitor arm.
5. Magnetic Cable Holders
These small silicone or plastic cradles use a magnet or adhesive to hold individual cable tips at the edge of your desk when they’re not plugged in — useful for frequently-used USB-C or Lightning cables you don’t want sliding behind the desk. A minor detail, but it cuts the “where did I put that cable?” problem to zero.
6. Cable Raceways Along Walls
If your desk is against a wall, a paintable plastic raceway channel is a nearly invisible way to route cables from desk level to a baseboard outlet. You cut it to length with scissors or a hacksaw, snap in the cables, and close the cover. Paint it to match the wall color and it nearly disappears.
7. Furniture Grommets
If you’re setting up a new desk or have a drill, adding a grommet hole lets cables pass straight through the desk surface rather than draping over the edge. This alone can eliminate the biggest visual mess for setups where devices sit on top of the desk and the power strip lives below.
Rubber grommets in a 60mm or 80mm diameter are standard for most home office desks and cost $5–15.
8. A Dedicated Power Strip Position
Where you place the power strip matters more than most people realize. If it sits on the floor, every cable has to travel downward, creating a vertical tangle. Mount it underneath the desk in a cable tray (Method 3), and suddenly most of your cable runs are short, horizontal, and easy to manage.
Choose a power strip with adequate spacing between outlets. Many newer designs include individual outlet spacing so large adapters don’t block adjacent slots — a small detail that prevents the “I need to unplug two things to fit one” problem.
9. Label Everything
Labelmaking sounds tedious until the first time you need to trace a specific cable without disturbing anything else. A label maker isn’t necessary — a strip of masking tape and a marker works fine. Label both ends of every cable with the device it belongs to. This is especially helpful behind desktop towers where five identical black cables disappear into the back.
10. Reduce Cable Count First
Sometimes the best cable management is fewer cables. Consider:
- A USB hub or KVM switch to consolidate multiple USB device cables into one run to the computer
- A monitor with built-in USB ports so peripheral cables don’t have to travel to the tower
- Wireless peripherals (keyboard, mouse, headset) to eliminate some cables entirely
- A single multi-port charger to replace three or four individual charging adapters
Each cable eliminated is one you never have to manage. This step often makes the physical management far simpler.
11. Anchor Cables to Fixed Points
Cables that are free to move will migrate into chaos. Use clips, ties, or raceways to anchor every cable at multiple points along its run. A rule of thumb: anchor at least every 12–18 inches along horizontal runs and every 6–8 inches along vertical runs where gravity pulls the cable out of position.
12. Create a Maintenance Habit
Cable organization isn’t a one-time project. Devices get added, cables get replaced, and things shift. A 10-minute review every few months catches drift before it becomes another full tangle. Check that Velcro ties are still snug, that no new cables have been casually dropped behind the desk, and that labels are still legible.
Specific Solutions for Common Desk Setups
Sit-Stand (Height-Adjustable) Desks
The challenge here is the vertical run from desk to floor changes length as the desk moves. Use a coiled or accordion cable sleeve for the main bundle and leave extra cable length — about 12–18 inches of slack — to accommodate the full height range. Route the slack neatly in the tray at desk level so it pays out smoothly when the desk rises.
Avoid rigid raceways for the segment that travels with the desk. Reserve those for the fixed wall section.
Corner Desks and L-Shapes
The inside corner of an L-shaped desk is usually a dead zone that becomes a cable graveyard. Mount a cable tray along both desk panels meeting at the corner, and use a flexible conduit sleeve to bridge the corner turn. Adding a grommet in the corner area lets cables pass cleanly from one surface to the other without draping.
Laptop-Only Setups
A single laptop generates fewer cables than a desktop tower but still needs management if you use an external monitor, a docking station, and a few peripherals. A docking station or hub is the key piece — it turns seven individual cables into one single cable to the laptop. Route the hub underneath the desk and your cable count drops dramatically.

What to Buy: A Practical Shopping List
You don’t need to buy everything at once. Start with what solves your biggest pain point and add as needed.
| Item | Approximate Cost | Priority |
|---|---|---|
| Velcro cable ties (100-pack) | $7–10 | High |
| Under-desk cable tray | $15–30 | High |
| Cable sleeve (wrap-around, 6 ft) | $8–15 | High |
| Adhesive cable clips | $5–10 | Medium |
| Wall-mount raceway (6 ft) | $10–18 | Medium |
| Desk grommet (60–80mm) | $5–15 | Medium |
| Label maker or masking tape | $0–20 | Medium |
| USB hub or docking station | $20–80 | Situational |
Total for a complete setup with most items: roughly $50–100, though many people solve 80% of the problem with just Velcro ties, a cable tray, and a sleeve.
If your desktop surface itself still feels cluttered once the cables are tamed, our roundup of Best Desk Organizers for a Small Workspace can help you finish the job.
Conclusion
Organizing cables behind a desk is one of the better home office investments you can make — not because it looks nice (though it does), but because it makes your workspace easier to use and maintain. The method that matters most depends on your setup: a cable tray does the heavy lifting for most desks, a proper sleeve handles the sit-stand challenge, and label everything once so you never have to guess again.
Start with the audit. Measure the runs. Then pick two or three methods from this list rather than trying to implement all twelve at once. An afternoon of focused effort typically gets a messy cable situation to a manageable one — and the result tends to stay that way with minimal upkeep.