How to Organize a Pantry: 9 Practical Steps That Last

A disorganized pantry isn’t just annoying — it costs you money. Duplicated cans, expired spices, and lost jars of tahini you bought twice are all symptoms of a system that never existed. The good news: pantry organization isn’t complicated, and once you set it up properly, maintaining it takes almost no effort at all.
This guide skips the fantasy pantries from home renovation shows and focuses on what actually works in a real kitchen — whether your pantry is a walk-in closet, a single tall cabinet, or three awkward shelves above the fridge.
Step 1: Empty Everything Out First
Before you buy a single bin or label, pull everything out. Yes, everything. Place it on the kitchen table or counter so you can see what you’re working with.
This step does three things:
- Reveals what you actually have. Most people discover duplicates, forgotten items, and a surprising number of things they don’t cook.
- Lets you check expiration dates. Toss anything past its date, and set aside anything close to expiring so you’ll cook it soon.
- Gives you a clean slate. You can wipe down shelves, check for crumbs or pests, and start fresh.
Don’t skip this. Organizing on top of clutter just creates organized clutter.

Step 2: Sort Into Categories That Match How You Cook
The single biggest organizing mistake is sorting by container type (“all the cans together”) rather than by use. A better approach mirrors how you actually reach for things.
Common pantry categories that work:
- Baking supplies – flours, sugars, baking powder, vanilla extract, chocolate chips
- Grains and pasta – rice, oats, quinoa, all pasta shapes
- Canned and jarred goods – beans, tomatoes, broth, sauces, condiments
- Snacks – crackers, nuts, dried fruit, granola bars
- Breakfast – cereals, instant oatmeal, pancake mix
- Oils, vinegars, and sauces – cooking oils, soy sauce, hot sauce
- Spices and seasonings – though many people prefer a separate dedicated spice drawer or rack
- Appliance and tool overflow – if your pantry stores small appliances
Tailor categories to your household. If you bake once a year, don’t dedicate a prime shelf to it. If you meal-prep grains every Sunday, put them at eye level.
Step 3: Assign Zones Based on Frequency of Use
Once you have categories, you need a physical strategy for where each zone lives.
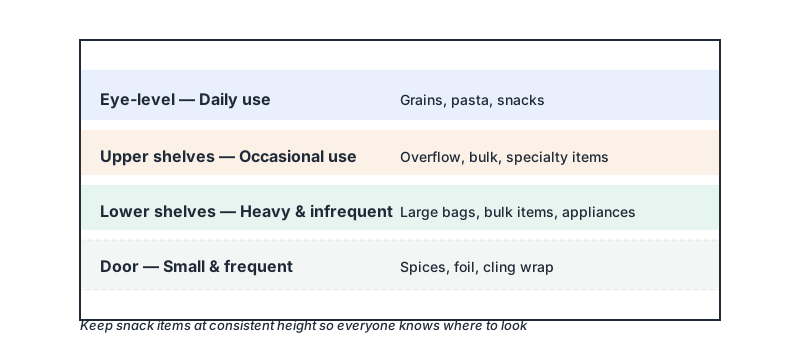
Eye-level shelves are prime real estate — put your daily-use items here. That’s typically grains, pasta, snacks, and anything you grab multiple times a week.
Upper shelves work well for overflow, bulk items, or things you use occasionally — extra cooking oil, backup cans of broth, specialty flours.
Lower shelves are ideal for heavy items that don’t need frequent access — large bags of rice, bulky appliances, or bottles of water.
Door space, if your pantry has a door with depth, is excellent for spices, small jars, foil, and cling wrap.
One specific rule worth keeping: keep snack items at a consistent height in every household so everyone knows where to look. This reduces the “where is the granola” question.
If you enjoyed zoning your shelves this way, our guide How to Organize Kitchen Cabinets: Assign Zones By Daily Habit applies the same logic to the cabinets right next to your pantry.
Step 4: Choose Containers That Actually Fit Your Shelves
Before you go container shopping, measure your shelves. Shelf depth varies wildly — a standard kitchen cabinet is typically 12 inches deep, while a walk-in pantry shelf might be 16–20 inches. Buying bins that don’t fit, or that are too tall to stack, is one of the most common (and expensive) organizing mistakes.
A few container types worth knowing:
Airtight Canisters
Ideal for flour, sugar, oats, rice, and any grain you buy in bags. Bags are awkward, prone to spilling, and attract pests. Transferring to airtight containers extends shelf life and makes quantities visible at a glance. Look for square or rectangular shapes — they use shelf space more efficiently than round canisters.
Clear Bins with Handles
Pull-out bins work well for grouping smaller items in a deep shelf — snack bars, packets of instant oatmeal, sauce pouches. The handle lets you pull the whole category forward without digging.
Lazy Susans (Turntables)
Perfect for a corner cabinet or deep shelf holding oils, vinegars, and condiment bottles. A single spin gives you full access without moving everything.
Stackable Can Organizers
If you go through canned goods regularly, a can organizer that uses a first-in, first-out system prevents cans from sitting forgotten at the back.
You don’t have to buy premium brands. Dollar stores and basic retail bins work just as well if the dimensions are right.

Step 5: Decant Wisely — Not Obsessively
Decanting (transferring packaged goods into uniform containers) looks great in photos but can be overkill if taken too far. You don’t need to decant every single item.
Worth decanting:
- Bulk grains, flours, sugars — bags are messy and don’t stack
- Cereals and crackers — keeps them fresh longer, especially if you don’t finish them quickly
- Coffee and tea — airtight containers preserve flavor
Skip decanting for:
- Canned goods — the can is already the container
- Items you use up quickly (a loaf of bread, a fresh bag of pasta you’ll finish this week)
- Anything with important label info you’ll lose — some items have cooking instructions or allergy info printed on the original packaging
If you do decant, attach a small label to the canister with the item name and, where relevant, the expiration date from the original bag.
Step 6: Label Everything — Even the Obvious
Labeling sounds pedantic until you’re staring at four white powders wondering which is powdered sugar and which is cornstarch.
Labels serve two purposes beyond identification: they tell everyone in the household where things go, which is how you maintain the system long-term without nagging.
Practical labeling options:
- A label maker produces the cleanest result and takes less than an hour to do an entire pantry
- Chalkboard labels written with a chalk pen look good and can be rewritten when contents change
- Masking tape and a marker is free and perfectly functional
Label both the container and the shelf position if you have the patience — when a container is removed for use, you’ll know exactly where it goes back.
Step 7: Handle the Spice Problem Separately
Spices deserve special mention because they create a unique organizational challenge — they’re small, uniform-looking, and you typically have dozens of them.
Three systems work well:
- A dedicated spice drawer with labels on the lid, laid flat, so you can read every name at a glance. This is arguably the most functional setup if you have a drawer to spare.
- A tiered shelf riser inside the pantry, which creates two rows of visibility so nothing hides behind anything else.
- A wall-mounted magnetic rack, which removes spices from the pantry entirely and puts them near the stove.
Avoid storing spices above the stove — the heat and steam degrade them faster. A cool, dark pantry shelf is better for longevity.
Also: audit your spices when you reorganize. Dried spices don’t go “bad” in a dangerous sense, but they lose potency. Ground spices are best within one to two years; whole spices last a bit longer. If a spice smells like nothing when you crush a bit between your fingers, it’s time to replace it.
Step 8: Apply a “One In, One Out” Rule for Maintenance
The most common reason pantries fall back into chaos: no maintenance system. People reorganize once, then gradually stop putting things back correctly.
The simplest maintenance rule is one in, one out applied at the category level. When you buy a new bag of pasta, it goes into the grains section and you check whether the old bag needs finishing. When you grab the last granola bar, it goes on the shopping list.
A few habits that keep a pantry organized long-term:
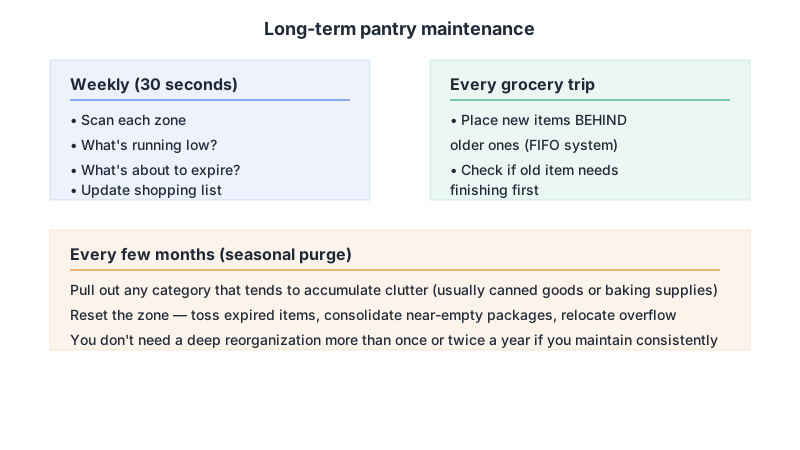
- Grocery put-away routine: When unpacking groceries, actively place new items behind older ones (FIFO — first in, first out). This prevents things from sitting at the back forever.
- Weekly 30-second scan: Before your weekly grocery run, look at each zone quickly. What’s running low? What’s about to expire?
- Seasonal purge: Every few months, pull out any category that tends to accumulate clutter — usually canned goods or baking supplies — and reset it.
You don’t need a deep reorganization more than once or twice a year if you maintain consistently.

Step 9: Solve the Small-Pantry Problem Specifically
If you’re working with a single cabinet or a few overcrowded shelves rather than a dedicated pantry, the same principles apply — you just have to be more ruthless about what gets pantry space at all.
Tactics for tight spaces:
- Add a shelf insert or riser to double the usable layers in a single-height cabinet shelf.
- Use the inside of cabinet doors with an adhesive door organizer or over-the-door pocket holder for flat items like spice packets, foil, and wax paper.
- Move rarely-used bulk items elsewhere — a shelf in a hallway closet, a dedicated cabinet in a laundry room, or under-bed storage for sealed, long-shelf-life dry goods.
- Cut the collection. Small pantries require hard choices. If you have 14 different condiments but a 12-inch shelf, you need fewer condiments — not a better organizational system.
Small-pantry organization is, fundamentally, an editing problem as much as a storage problem.
A Quick Note on Products
You can spend a significant amount on pantry organization products. You can also spend almost nothing. The difference between a $200 premium canister set and a $30 set from a discount retailer is mostly aesthetic — both keep grain fresh and visible.
Invest where function matters most for your specific setup: a good lazy Susan for a deep corner shelf, airtight canisters for bulk dry goods, and a label maker if you’re doing multiple cabinets. Skip the matching aesthetic bins if your budget is limited — mismatched containers that fit your shelves beat beautiful ones that don’t.
Once your pantry is organized, Cook With What You Have: A Practical Pantry Guide is a great next read for turning that newfound visibility into fewer wasted ingredients and easier weeknight meals.
Conclusion
Organizing a pantry isn’t a one-time project you complete and forget — it’s a system you design once and maintain lightly. The core logic is simple: know what you have, group it by how you use it, make it visible, and make it easy to put things back where they belong.
Start by emptying the pantry completely, sort by use case rather than container type, and only then introduce containers and labels. Do it in one focused session — most pantries, even larger ones, can be fully reorganized in two to three hours. After that, a few minutes a week keeps the system intact indefinitely.
The goal isn’t a photo-ready pantry. It’s a pantry you can navigate in the dark, a grocery list you can write in under two minutes, and food that actually gets used before it expires.