How to Organize a Cluttered Garage: Zones Before Shelving, Not After

Most garages don’t become disaster zones overnight. It happens gradually — a holiday box shoved in the corner, tools dropped on a shelf after a weekend project, sports equipment piled near the door “just for now.” By the time you notice, the floor has disappeared and parking the car inside feels like a pipe dream.
This guide walks you through a proven, practical system for reclaiming that space — from the first brutal sort to the final shelf label — so the garage stays organized long after the initial effort.
Step 1: Empty Everything Out First
The single biggest mistake people make is trying to organize a garage while still standing inside it. Pull everything onto the driveway or lawn. Every box, every loose tool, every mystery bag. Yes, all of it.
Working with an empty shell lets you:
- See the full floor space and wall surface you’re working with
- Identify damage, pests, or mold you’d otherwise miss
- Make honest decisions about each item without the pressure of surrounding clutter
Do this on a dry day when you have a full day or weekend committed. Trying to rush a partial sort almost always ends with everything shoved back in.

The Four-Zone Sort
As items come out, sort them into four physical areas — not mental categories:
- Keep — Used at least once in the past year, or has clear seasonal value
- Donate / Sell — Works fine, but you genuinely don’t use it
- Trash / Recycle — Broken, expired, or a duplicate nobody needs
- Relocate — Belongs in the house, a storage unit, or another outbuilding
Be honest. A third set of golf clubs from 2010, two broken weed trimmers, and a fondue pot don’t belong in a garage — or anywhere you’re paying to organize.
The same zone-by-habit logic works indoors too, as shown in How to Organize Kitchen Cabinets: Assign Zones By Daily Habit.
Step 2: Plan the Zones Before You Buy a Single Shelf
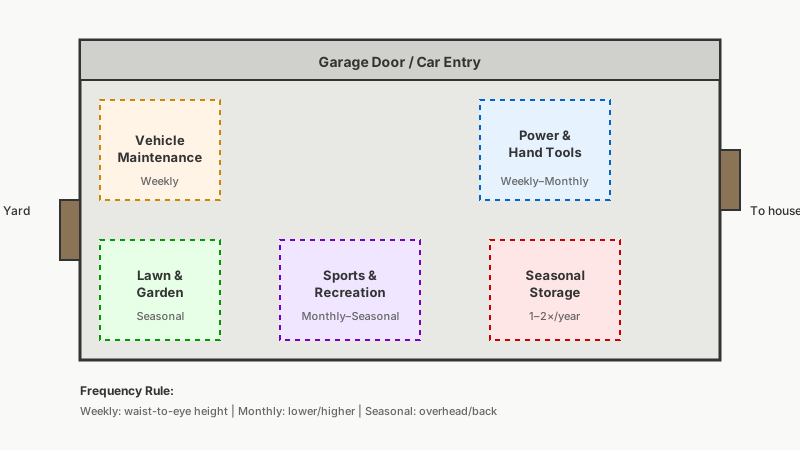
After the sort, stand in the empty garage and think about use, not aesthetics. Zoning means grouping items by activity category and storing them where you use them most.
Common garage zones:
- Vehicle maintenance (oils, fluids, tire pressure gauge, jumper cables) — near the front
- Power tools and hand tools — along one wall, ideally opposite the car doors
- Lawn and garden — near the side or rear entry closest to the yard
- Sports and recreation — accessible without moving everything else
- Seasonal storage — overhead or at the back, since frequency of access is low
- Household overflow (paper goods, cleaning supplies) — near the interior door
Sketch a rough floor plan on paper. It doesn’t need to be precise. The point is to commit to a layout before you start spending money on storage hardware.
The Frequency Rule
Items used weekly go at waist-to-eye height and within easy reach. Items used monthly go lower or higher. Items used once or twice a year go in overhead storage or deep shelving at the back. This single principle eliminates most garage re-cluttering.
Step 3: Choose Storage Systems That Actually Fit Your Space
Garages vary enormously — a one-car attached garage in a townhouse is a different challenge from a three-car detached barn. The storage approach should match the actual dimensions and wall material, not a Pinterest ideal.
Wall Storage
Pegboard remains one of the most cost-effective tool storage options available. A 4×8 sheet of standard pegboard costs roughly $30–$50 at a home improvement store, and the hook systems allow you to reconfigure as your tool collection changes. Mount it on furring strips to create clearance behind the board for hooks.
Slotted wall panels (slatwall) are more durable and carry heavier items than pegboard. The accessories — bins, shelves, hooks — are interchangeable and widely available. Expect to pay more upfront, but the system is more versatile for garages that store heavy gear.
French cleats are increasingly popular among woodworkers and garage organizers who want a fully customizable solution. You cut 45-degree-angled strips from plywood, mount them horizontally across a wall, then hang shop-made or purchased accessories anywhere along the cleat. The flexibility is hard to beat, and the system handles substantial weight when properly anchored into studs.

Shelving
Freestanding metal shelving units (wire or solid steel) are the workhorses of garage storage. Look for units rated for at least 200 lbs per shelf if you’re storing anything heavier than empty bins. Bolt them to the wall studs for safety — a loaded shelf that tips is a serious hazard.
Built-in or semi-permanent shelving along the back wall makes sense if you plan to stay in the house long-term. Pre-made cabinet systems from manufacturers like Gladiator, Husky, or NewAge Products are popular options, though prices range widely — basic setups start around $300 and full wall systems can run several thousand dollars.
Overhead Storage
Ceiling space is almost always underutilized. Ceiling-mounted platforms (typically adjustable from 22 to 48 inches below the ceiling) work well for tubs of seasonal decorations, camping gear, and anything you access infrequently. Make sure you account for garage door clearance and avoid blocking any lighting fixtures or openers.
Floor Space
Protect concrete floors from oil stains and moisture with interlocking floor tiles or a roll-out epoxy mat. Beyond aesthetics, a clean floor surface makes it genuinely easier to sweep and spot spills — which in turn makes you more likely to maintain the space.
Step 4: Label Everything and Make the System Obvious
A garage organization system fails when the next person to use it can’t figure out where things go. Clear labeling removes that ambiguity.
For bins and boxes, a simple label maker works fine. For zones, consider labeling shelves or wall sections with broad category names (“Garden,” “Automotive,” “Hand Tools”). If your household includes kids, picture-based labels on lower shelves help them return items without guessing.
Transparent bins beat opaque ones almost every time. Being able to see that a bin contains extension cords rather than having to open six identical red containers saves time and keeps things from getting reshuffled.
The Return-to-Home Rule
Every item needs an assigned home — a specific shelf position, hook, or bin — not just a general zone. “Somewhere in the automotive area” turns into a pile within weeks. “Second shelf, left side, blue bin” actually works.
Hang a laminated sheet near the main entry listing the zones and what lives where if your household struggles to maintain the system. It sounds excessive until you’ve re-organized the same garage twice.
Step 5: Handle Hazardous Materials Properly
Garages accumulate hazardous materials faster than almost any other room: old paint cans, pesticides, motor oil, fertilizer, pool chemicals, propane cylinders. These need specific handling — both for safety and legal disposal.
- Old latex paint: Many municipalities accept dried latex paint in regular trash. Dry it out using a paint hardener product or by leaving the can open until solidified.
- Oil-based paint and solvents: Treated as hazardous waste. Check your county’s household hazardous waste (HHW) program for drop-off locations and schedules.
- Motor oil: Most auto parts retailers (AutoZone, O’Reilly, Advance Auto) accept used motor oil for recycling at no charge.
- Propane tanks: Retailers like Home Depot and Lowe’s offer exchange programs; full tanks are also accepted at many hazardous waste events.
- Pesticides and herbicides: HHW programs are typically the right route. Never pour these down a drain.
Store any remaining chemicals in a locked cabinet, away from heat sources and out of reach of children. Flammables should not share a cabinet with oxidizers.

Step 6: Build Maintenance Into the Routine
Organization isn’t a one-time event. Garages drift back toward chaos because maintenance never gets scheduled.
A few habits that actually stick:
The ten-minute rule: Before leaving the garage after any project, spend ten minutes returning tools and materials to their homes. This is far easier than a monthly re-sort.
Seasonal check-ins: Twice a year — roughly when the clocks change — do a 30-minute sweep. Pull anything that’s migrated to the wrong zone, toss expired chemicals, and assess whether your current system is still working for how you’re actually using the space.
A donation box near the door: Keep a cardboard box or bin designated for items you decide to get rid of. When it’s full, it leaves. This prevents the “I’ll deal with it later” pile from forming.
One-in, one-out for tools: Before buying a new tool or piece of equipment, decide what leaves. This keeps volume from creeping back up.
For another example of a system designed to stay organized long after the initial cleanup, see How to Organize a Pantry: 9 Practical Steps That Last.
Putting It All Together
Organizing a cluttered garage isn’t complicated, but it does require a specific sequence: empty first, sort honestly, plan zones before purchasing storage, then install and label. Skipping the planning phase — going straight to buying shelving — is how people end up with a slightly tidier version of the same problem.
The time investment up front, typically one to two full weekends for an average two-car garage, pays off for years. You get the parking space back, tools are findable in under 30 seconds, and the whole house benefits when overflow storage is actually functional rather than a place things go to be forgotten.