How to Make Iced Coffee at Home: Skip Dilution, Nail Flavor

Making genuinely good iced coffee at home is cheaper, faster, and — once you know what you’re doing — consistently better than anything you’ll get from a drive-through. The problem is that most guides either oversimplify (just pour hot coffee over ice!) or overcomplicate things with equipment most people don’t own. This article covers seven real methods, explains the science behind each one, and tells you honestly when each method shines and when it doesn’t.
Why Iced Coffee Is More Than Just Cold Coffee
The difference between good iced coffee and a watery, bitter disappointment usually comes down to two things: dilution and extraction temperature.
When you pour hot coffee directly over ice, roughly 20–30% of your drink ends up being melted ice water. That’s not always terrible, but it means you need to compensate. Cold or room-temperature brewing, on the other hand, extracts flavor differently — generally producing a smoother, less acidic cup because heat drives out more of the volatile acids and bitter compounds.
Neither approach is universally superior. They just suit different goals.

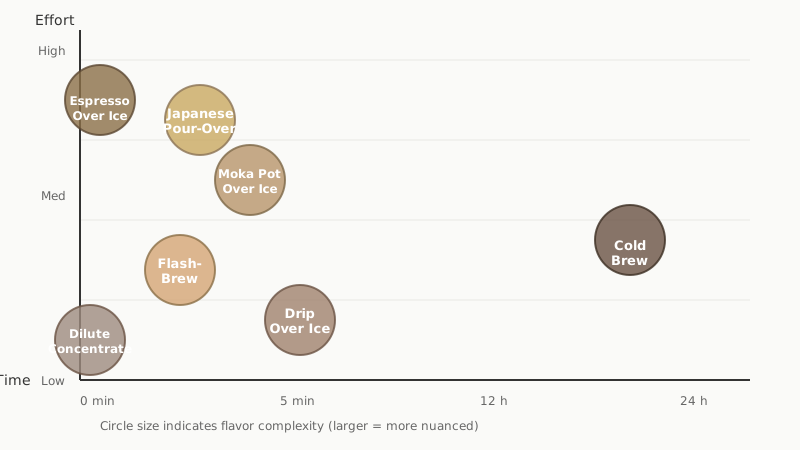
The 7 Methods, Ranked by Effort
If you plan to grind your own beans for any of these methods, our roundup of Best Manual Coffee Grinders for Home: Grind Quality Over Hype can help you choose the right tool.
1. Flash-Brew (Hot Bloom, Ice Catch)
Best for: Speed, bright flavor, preserving single-origin character.
Flash-brewing is what many specialty coffee shops use. You brew hot coffee directly onto a bed of ice, which immediately chills it before dilution can take hold — as long as you account for the ice in your recipe.
How to do it:
- Weigh out your ice — typically half the total water weight you’d normally use (e.g., 150 g ice for a 300 g brew).
- Place the ice in your carafe or serving vessel.
- Brew your pour-over or drip coffee using only the remaining water (150 g at brewing temperature, around 93°C / 200°F).
- The concentrated hot coffee hits the ice and chills instantly.
- Stir and serve over more ice.
This method preserves floral, fruity, and delicate notes that cold brew often mutes. It’s fast — under 5 minutes.
2. Cold Brew Concentrate
Best for: Smooth, low-acid coffee; batch brewing; convenience.
Cold brew has become ubiquitous for a reason. Steeping coarsely ground coffee in cold or room-temperature water for 12–24 hours produces a concentrate that stores well in the fridge for up to two weeks.
Basic ratio: 1 part coffee to 4 parts water (by weight) for concentrate, then dilute 1:1 with water or milk before drinking.
Steps:
- Grind coffee coarsely — similar to sea salt in texture.
- Combine grounds and cold water in a jar or pitcher. Stir well.
- Cover and refrigerate for 12–18 hours (or leave at room temperature for 12 hours, which speeds things up slightly).
- Strain through a fine-mesh sieve lined with a paper coffee filter, or use a purpose-built cold brew maker.
- Store concentrate in the fridge and dilute to taste when serving.
Cold brew is forgiving with bean choice — it tends to smooth out harsh or low-quality beans more than any hot-brew method will.
3. Standard Drip Over Ice
Best for: Using what you already have; quick daily iced coffee.
If you have a drip machine and want iced coffee in minutes, brew a slightly stronger-than-normal pot (use about 25% more coffee than your usual ratio), then pour it hot over a tall glass of ice. This compensates for the dilution from melting ice.
It’s not the most nuanced approach, but it works — and it’s the path of least resistance on a Tuesday morning.
4. Japanese Iced Pour-Over
Best for: Manual brewing enthusiasts who want precision without a long wait.
This is a refined version of flash-brewing specific to pour-over technique. The Specialty Coffee Association popularized the method, and it’s standard practice in third-wave coffee bars.
The core idea: brew at a 1:15 coffee-to-water ratio, but substitute half the brew water with ice in the server below. So for 20 g of coffee, you’d use 150 g hot water to brew and 150 g ice in the vessel beneath.
The result is vibrant, clear, and complex — especially good with light-roast, single-origin coffees.

5. Espresso Over Ice (Iced Americano or Shaken Espresso)
Best for: Espresso machine owners; bold, concentrated flavor.
If you have an espresso machine or a Moka pot, pull one or two shots directly over ice for an iced Americano. Or pull the shots, pour them into a cocktail shaker with a bit of ice and simple syrup, shake vigorously for 15–20 seconds, then strain over fresh ice for a shaken espresso — the shaking aerates and chills it simultaneously, producing a slightly frothy, café-style result.
A Moka pot doesn’t produce true espresso, but its concentrated brew works well in this role.
6. Instant Coffee Iced Coffee (Dalgona-Style and Beyond)
Best for: No equipment; travel; quick experimentation.
Instant coffee is underrated for iced applications. The classic dalgona method — whipping 2 tablespoons of instant coffee, 2 tablespoons of sugar, and 2 tablespoons of hot water into a stiff foam, then spooning it over cold milk and ice — went viral for good reason. It actually tastes good, and the texture is unlike anything else.
You can also simply dissolve instant coffee in a small amount of hot water, chill it, and pour over ice with milk. Not sophisticated, but fast and functional.
7. Toddy-Style Room Temperature Brew
Best for: Making large batches; people who find cold brew too slow.
Room-temperature brewing splits the difference between hot brew and cold brew. Use the same ratio as cold brew concentrate (1:4), but steep at room temperature (around 20°C / 68°F) for 12 hours instead of in the fridge. Strain and refrigerate immediately.
The resulting brew is slightly more acidic than cold brew but smoother than hot brew — a middle-ground that some people prefer, and it saves fridge space during the steep.
The Key Variables You Can Actually Control
Once you’ve picked a method, these four factors determine the final cup:
Grind size: Too fine for cold brew and you’ll get over-extracted, bitter coffee. Too coarse for pour-over and it’ll taste weak and sour. Match your grind to your method.
Coffee-to-water ratio: The single biggest lever. Most home brewers under-dose. For iced coffee that will be diluted by ice, start stronger than you think you need to.
Bean roast level: Medium roasts are versatile for all methods. Light roasts shine in flash-brew and pour-over, where their brightness comes through. Dark roasts work particularly well in cold brew and espresso-based drinks, where their chocolatey, low-acid character reads as smooth rather than harsh.
Water quality: Coffee is over 98% water. If your tap water tastes off, your coffee will too. Filtered water makes a noticeable difference, especially for cold brew where no heat masks off flavors.

For a deeper dive into how grind consistency affects extraction before you even add ice, see How to Brew Better Coffee at Home: Why Grind Timing Beats Bean Price.
Sweeteners, Milk, and Add-Ins
Hot coffee melts sugar instantly. Cold coffee doesn’t. If you want sweetened iced coffee, use:
- Simple syrup (equal parts sugar and water, dissolved over heat): dissolves into cold coffee without graininess. Make a batch on Sunday and it lasts two weeks in the fridge.
- Brown sugar simple syrup: adds a slight molasses note that pairs well with cold brew.
- Flavored syrups: vanilla, hazelnut, cardamom — all dissolve the same way.
For milk, whole milk adds body and sweetness. Oat milk is the closest plant-based match in terms of texture and how it integrates with coffee. Coconut milk adds a tropical note that works surprisingly well with dark roast cold brew.
For a creamier result without dairy, blend a little coconut cream with your cold brew and pour over ice — it’s thick, rich, and requires no special equipment.
Common Mistakes and How to Fix Them
Watery, bland result: You didn’t brew strongly enough to compensate for ice dilution. Either reduce ice volume, brew more concentrated, or switch to flash-brew where you control exact dilution.
Bitter taste: Over-extraction. For cold brew, steep shorter or grind coarser. For hot methods, reduce brew time or water temperature slightly.
Cloudy cold brew: Normal and harmless. If it bothers you, strain through a paper filter rather than just a mesh sieve.
Coffee tastes flat or stale: Your beans are old. Ground coffee goes stale in days; whole beans within a few weeks of the roast date. Buy fresher beans and store them in an airtight container away from light.
Practical Conclusion
There’s no single best method — the right choice depends on your time, equipment, and taste preferences. For most people starting out, cold brew concentrate is the most forgiving option: make a batch on Sunday evening and you have iced coffee ready through the week. If you want more brightness and are already making pour-over coffee, try flash-brewing at least once — the difference in flavor clarity is striking.
The consistent variable that separates good from mediocre iced coffee at home is coffee strength before dilution. Get that right, and almost every method works.