How to Make Clarified Butter and Ghee at Home

Making clarified butter and ghee at home takes about 30 minutes, costs a fraction of store-bought versions, and gives you a fat with a smoke point high enough to handle serious heat. Both products start with the same process — gently melting butter until the milk solids separate — but ghee goes a step further, browning those solids before straining. That small difference creates a richer, nuttier flavour and a longer shelf life.
This guide covers both methods in full, explains why each step matters, and walks through common mistakes you can actually fix.
What Clarified Butter and Ghee Actually Are
Butter is roughly 80% fat, 16–17% water, and 3–4% milk solids (proteins and lactose). When you clarify it, you remove both the water and the milk solids, leaving pure butterfat. That removal does two things: it raises the smoke point from around 150–175°C (300–350°F) for whole butter to roughly 250°C (480°F) for clarified butter and even higher for ghee, and it extends shelf life because the milk proteins that cause rancidity are gone.
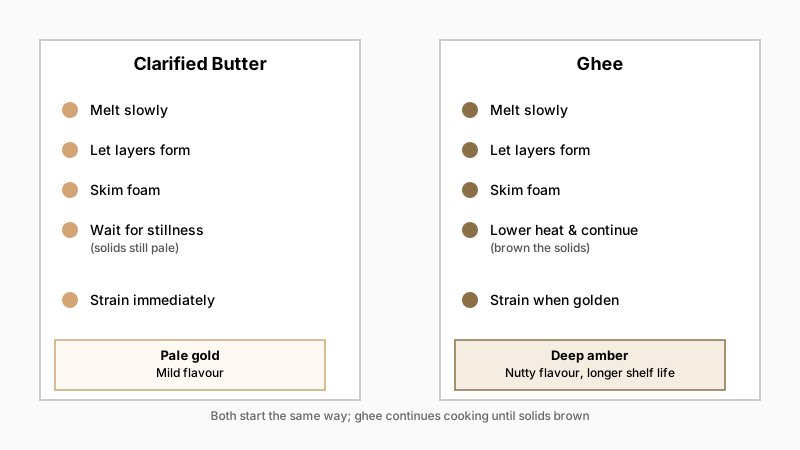
Clarified butter is strained as soon as the solids sink or float, keeping a pale golden colour and a clean, mild flavour. French-style clarified butter — the base for hollandaise and beurre blanc — is this product.
Ghee continues cooking until the milk solids turn golden brown and the water fully evaporates. The result is a deeper amber colour, a pronounced nutty aroma, and a product that can sit at room temperature for weeks without spoiling. Ghee is central to South Asian cooking and Ayurvedic practice, but its utility is broad — high-heat sautéing, finishing sauces, spreading on flatbreads.

Ingredients and Equipment
Choosing Your Butter
Start with unsalted butter. Salt doesn’t ruin the process, but it concentrates during reduction and can make the final product too salty for many uses. For ghee especially, the flavour is cleaner without it.
Higher-fat European-style butters (84% fat vs. the American standard of 80%) yield slightly more finished product per pound and tend to produce a richer ghee. Grass-fed butter, if it’s within your budget, has a more complex flavour profile — this shows up noticeably in ghee, less so in mild clarified butter. Any quantity from 225g (½ lb) upward works; smaller amounts cook faster and are easier to monitor.
If your butter is too cold to cube or work with easily, How to Soften Butter Quickly: Skip The Microwave Meltdown offers faster and safer alternatives than the microwave.
Equipment You Need
- Heavy-bottomed saucepan: distributes heat evenly and reduces hot spots that scorch the solids before you’re ready
- Fine-mesh strainer lined with a double layer of cheesecloth, or a clean muslin cloth — the cheesecloth catches fine protein particles that a strainer alone misses
- Glass jar or heatproof container for storing
- Thermometer (optional, but useful for ghee)
Avoid non-stick pans; you lose the visual cues from watching the bottom of the pan, and you want to see when the solids begin to brown.
Step-by-Step: Clarified Butter
-
Cut butter into even chunks. This isn’t strictly necessary but helps it melt evenly without any piece sitting on the bottom long enough to scorch.
-
Melt over low-to-medium heat. Don’t rush it. A gentle melt over 5–8 minutes gives the fat and water time to separate cleanly. You’ll hear a quiet crackling and sputtering — that’s water evaporating.
-
Watch the three layers form. As the butter melts, white foam rises to the top (denatured whey proteins), clear golden butterfat sits in the middle, and milk solids settle to the bottom.
-
Skim the foam. Use a spoon to remove the white foam from the surface. You don’t have to get every last bit; the cheesecloth will catch the rest.
-
Watch for stillness. Once the sputtering stops and the foam thins out, the water is largely gone. The bottom solids remain pale cream or white. This is your stopping point for clarified butter — don’t let them brown.
-
Strain carefully. Pour slowly through your cheesecloth-lined strainer into a heatproof jar. The result should be a clear, pale-gold liquid.
-
Cool and store. Cover loosely until cool, then seal. Clarified butter keeps refrigerated for up to two months, or frozen for six.

Step-by-Step: Ghee
Ghee follows the same opening steps, then diverges after the foam stage.
1–4. Follow the clarified butter steps above: cut, melt slowly, let layers form, skim foam.
-
Lower the heat and continue cooking. Rather than straining when the solids are still pale, keep the pan on low heat. The remaining water continues to evaporate (you’ll hear less sputtering as it does), and the milk solids on the bottom begin to change colour.
-
Watch the colour of the solids. At first they’ll look creamy, then pale tan, then golden brown. The foam will largely disappear from the surface, and the liquid itself will deepen to amber. A faint nutty, toasty aroma is your signal — not a burnt one.
-
Don’t walk away. The difference between perfect ghee (golden solids, amber liquid) and burnt ghee (black solids, acrid smell) is 60 to 90 seconds of unattended heat. Keep the flame low. If you have a thermometer, the butterfat should sit around 120–130°C (250–265°F) during this stage.
-
Strain immediately. The moment the solids hit golden brown, take the pan off the heat and pour through cheesecloth into your jar. The residual heat can continue to cook the solids if you linger.
-
Store at room temperature or refrigerate. Properly made ghee — with all water removed — can sit in a sealed jar at room temperature for 2–4 weeks without spoiling, or refrigerated for up to three months. Don’t contaminate it with a wet spoon; that shortens shelf life quickly.
Yield: 450g (1 lb) of unsalted butter produces roughly 340–370g of ghee, depending on the butter’s fat content.
Troubleshooting Common Problems
Ghee is cloudy: Either some water remained (the foam didn’t fully dissipate before you strained) or the cheesecloth didn’t catch fine particles. Solution: reheat gently and strain again through a fresh layer of cheesecloth.
Burnt smell or black solids: Heat was too high or you got distracted. Unfortunately, there’s no rescuing this batch — the scorched proteins impart a bitter, acrid taste that permeates the fat. Start over with fresh butter.
Too much foam, can’t see the solids: This usually means the heat is too high. Drop it to the lowest setting and let the foam subside naturally. Skimming helps.
Pale, watery result: The temperature never got high enough for full separation, or you strained too early. Return to the pan for another 5–10 minutes of gentle heat.
Solids stuck to the pan and burnt before the top foam cleared: Classic hot-spot problem from a thin-bottomed pan. Switch to a heavier saucepan or use a heat diffuser.
How to Use Each Product
For another homemade pantry staple that rewards patience and the right equipment, check out How to Make Homemade Nut Butter: From Whole Nuts To Creamy Spread.
If precise temperature control appeals to you here, you’ll find similar techniques useful in How to Temper Chocolate for Truffles and Coating at Home.
Clarified Butter
- Sautéing fish and seafood at moderate-high heat without the browning a whole butter would cause
- Emulsified sauces: hollandaise, béarnaise, beurre blanc
- Basting steaks and chicken mid-roast
- Making crepes or pan-frying eggs where you want butter flavour without burning
Ghee
- High-heat stir-fries and tarka (the Indian technique of blooming whole spices in fat)
- Finishing dal, rice dishes, and flatbreads
- Replacing oil in any high-heat sauté
- Stirring into warm oatmeal or roasted vegetables for a nutty richness
- Bulletproof-style coffees or blended teas

Storing and Shelf Life
The enemies of any fat are heat, light, water, and oxidation. Store your clarified butter or ghee in:
- A glass jar with a tight lid (glass doesn’t absorb odours)
- A cool, dark cupboard if using within two weeks (ghee only)
- The refrigerator for longer storage — both products firm up like cold coconut oil but reliquify quickly at room temperature
Always use a dry spoon. Even a small amount of water introduced into the jar promotes bacterial growth and shortens shelf life dramatically.
Frequently Asked Questions
Can you make ghee from salted butter?
Yes, but the salt concentrates as water evaporates, making the finished ghee noticeably salty. It’s not harmful, but for most cooking purposes — especially sauces and baking — unsalted ghee gives you more control. Reserve salted-butter ghee for spreading on bread or toast where a little salt is welcome.
Is ghee suitable for people who are lactose intolerant?
Typically yes. The milk solids — which contain both lactose and casein — are removed during straining. Most people with lactose intolerance or mild dairy sensitivities tolerate well-made ghee without issue. Those with a diagnosed milk protein (casein) allergy should be more cautious and consult a healthcare professional, as trace amounts can remain if straining is imperfect.
What’s the actual smoke point of ghee vs. clarified butter?
Both are high. Clarified butter has a smoke point of roughly 250°C (480°F). Ghee, because all water is eliminated and the milk solids are removed more completely, can reach a similar or slightly higher point. Compare this to extra-virgin olive oil at around 190–210°C (375–410°F) and whole butter at 150–175°C (300–350°F). The exact number varies by butter quality and how thoroughly the solids were removed.
Why does my homemade ghee smell different from the store-bought version?
Store-bought ghee is often made from large-batch industrial processing that can produce a more uniform but blander product. Homemade ghee made from high-fat or grass-fed butter often has a more pronounced, toasty aroma — that’s not a flaw. Conversely, if homemade ghee smells rancid or sour, check your starting butter (it may have been old) or whether water contaminated the jar.
Can you clarify butter in the oven?
Yes. Place butter in an oven-safe dish at 120°C (250°F) for 60–90 minutes. The slow, even heat separates the layers without any risk of scorching. Skim the foam, pour off the clarified layer, and discard the solids. It’s hands-off but takes longer — useful for large batches.
Conclusion
Clarified butter and ghee are genuinely useful kitchen fats, not specialty items. Once you understand what the process is doing — removing water and milk solids from butterfat — the technique stops being mysterious. Clarified butter is the milder, quicker result; ghee takes an extra 10–15 minutes for a richer, longer-lasting product.
The most important variables are low heat, a heavy pan, and staying attentive during the final browning stage if you’re making ghee. Get those right and you’ll have a product that outperforms anything on most supermarket shelves.