How to Make a Perfect Grilled Cheese Sandwich: Why Low Heat Wins

A grilled cheese sandwich should be simple. Butter, bread, cheese — done. But anyone who has pulled a pale, soggy, or scorched version out of the pan knows the gap between simple and easy is real. The tips below close that gap, whether you’re making a quick weekday lunch or a properly indulgent version with aged cheddar and sourdough.
The Bread Matters More Than You Think

Most people default to whatever sliced bread is in the pantry, and that works — but the bread choice shapes the final sandwich more than any other ingredient.
White sandwich bread (the classic Pullman loaf) delivers a thin, uniform crust that toasts quickly and evenly. It’s forgiving and ideal when you want that diner-style result.
Sourdough adds tang and a chewier crumb, but its irregular thickness and open holes can create hot spots. Slice it to a consistent ½-inch thickness and expect to use slightly lower heat.
Brioche or milk bread browns fast because of the extra sugar and fat. Watch it closely — what looks barely golden at one moment can tip to burnt in under 30 seconds.
Whatever you pick, slightly stale bread is actually better than very fresh. A day-old slice has lost some surface moisture, which means less steam in the pan and a crispier exterior.
Choosing and Layering Your Cheese

The cheese is obviously central, but the common mistake isn’t picking the wrong variety — it’s using cheese that’s too cold or sliced too thick.
If this makes you want to explore cheese beyond the sandwich, Cheese & Charcuterie Boards That Wow Every Guest shows how to build an impressive spread for guests.
Best cheeses for melting
- American cheese (or processed slices): Melts flawlessly due to added emulsifying salts. It’s the standard in diner grilled cheese for a reason.
- Gruyère: Nutty and creamy when melted; pairs exceptionally well with sourdough or rye.
- Fontina: Buttery with a mild earthiness; melts smoothly at relatively low heat.
- Sharp cheddar: Excellent flavor but lower moisture means it needs more time to fully melt — slice it thin or grate it.
- Mozzarella: Pulls and stretches beautifully but has a mild flavor; works best blended with something sharper.
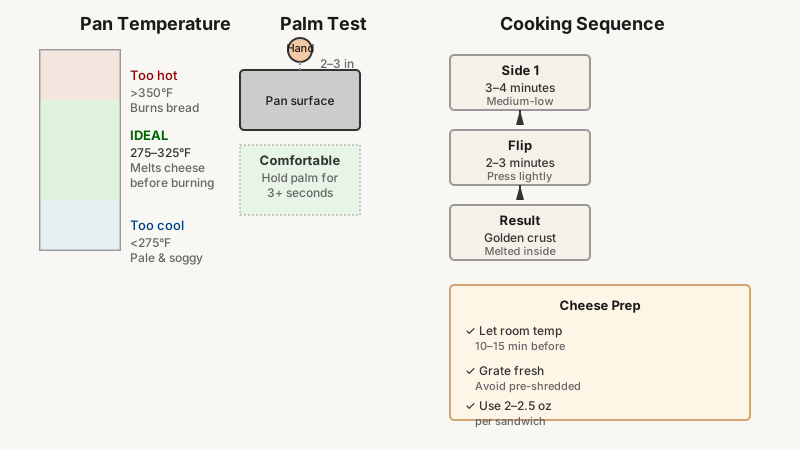
For a single-cheese sandwich, aim for roughly 2–2.5 oz (55–70 g) of cheese per sandwich. For blends, keep the total in that same range — more cheese doesn’t necessarily mean better melt; it often means the bread finishes cooking before the center gets gooey.
Grating your own cheese is worth the extra minute. Pre-shredded bags typically contain anti-caking agents (like cellulose) that interfere with smooth melting. A freshly grated handful melts noticeably more evenly.
Always let your cheese come to room temperature for 10–15 minutes before you build the sandwich. Cold cheese from the fridge requires more pan time, which risks burning the bread.
The Fat: Butter vs. Mayo vs. Both

This is where opinions get strong. Here’s what actually happens with each option:
Butter gives you a rich, classic flavor and a warm golden color. Use unsalted if you can control the seasoning; salted works fine but can taste sharp if you’re already using a salty cheese. Softened butter — not melted — is easier to spread without tearing the bread.
Mayonnaise has a higher smoke point than butter (roughly 400°F / 200°C vs. butter’s 300°F / 150°C) and spreads effortlessly straight from the fridge. It produces an even, consistent golden crust with slightly less risk of burning. The taste difference is subtle once the sandwich is cooked.
The hybrid approach: spread a thin layer of mayo on the bread’s outer surfaces, then add a small knob of butter directly to the pan. You get the browning consistency of mayo plus the flavor hit of butter. Many short-order cooks use this method.
Regardless of your fat choice, coat the outside of both bread slices — not just the pan — so you get coverage into the corners.
Heat Control: The Most Overlooked Variable

High heat is the enemy of great grilled cheese. The goal is to melt the cheese completely before the bread surface burns — and that requires patience.
The right temperature
Medium-low to medium heat (roughly 275–325°F / 135–165°C on the pan surface) is the sweet spot for most stovetop burners. If you’re using a cast iron skillet, preheat it on low for 2–3 minutes before adding the sandwich — cast iron holds heat aggressively, and a cold pan placed on high heat will overshoot quickly.
A common test: hold your palm 2–3 inches above the pan surface. You should feel warmth but be able to hold it there comfortably for 3 seconds. If you can’t, the pan is too hot.
The flip and the press
Cook the first side for 3–4 minutes, then flip. After flipping, a gentle press with a flat spatula increases contact between the bread and pan, improving browning. Don’t press so hard you compress the sandwich flat — just enough to ensure even contact.
If the cheese still hasn’t fully melted after both sides are golden, cover the pan with a lid for 30–60 seconds. The trapped steam and heat will finish the melt without darkening the crust further.
Total cook time
Expect 6–9 minutes total for most sandwiches on medium-low heat. Thicker bread or denser cheeses push toward the longer end.
Variations Worth Making

Once you have the base technique down, the formula is flexible.
The Dijon upgrade: Spread a thin layer of Dijon mustard on the inside of one slice before adding the cheese. It adds heat and acid that cut through the richness without tasting like mustard per se.
Caramelized onion grilled cheese: Cook sliced onions slowly in butter over low heat for 25–30 minutes until deep golden. Add them inside the sandwich with Gruyère. The sweetness against the cheese is genuinely exceptional.
Tomato and cheddar: Use fresh tomato slices, but pat them dry thoroughly with a paper towel first. Wet tomato = steam = soggy bread. This matters.
Herb butter: Mix softened butter with finely chopped fresh thyme, rosemary, or chives, then use it as your exterior fat. The herbs crisp slightly and perfume the crust.
Hot honey finish: Drizzle a small amount of hot honey on the sandwich immediately after it comes off the pan. Sweet, spicy, and savory in one bite.
For a next-level addition, How to Caramelize Onions Properly: A No-Shortcut Guide walks you through building deep, sweet flavor that pairs beautifully with melted cheese.
Common Mistakes and How to Fix Them

Bread is browned but cheese isn’t melted: Your heat was too high and/or cheese was too cold. Next time, start with room-temperature cheese and lower the heat. In the moment, tent the sandwich loosely with foil and let residual pan heat finish the job.
Sandwich is greasy: Too much fat on the bread. A thin, even coat is all you need — about ½ teaspoon of butter or mayo per side.
Uneven browning: The pan wasn’t fully preheated or has hot spots. Rotate the sandwich 180° halfway through each side’s cook time.
Cheese oozes out into the pan: The cheese layer was too close to the edges. Leave a ¼-inch border around the cheese when you build the sandwich.
Bread tears when spreading cold butter: Use softened butter, or switch to mayo — it spreads without resistance at any temperature.
Serving and the Small Details

Rest the sandwich for 60–90 seconds after it comes off the heat. The cheese continues to set slightly, making it less likely to flood out when you cut it.
Cut diagonally. This isn’t just aesthetic — a diagonal cut creates a longer exposed edge, which makes the first bite easier and shows off the melt. A sharp knife matters here; sawing with a dull blade compresses the bread.
Serve with tomato soup, a simple green salad, or pickles. The acidity in all three cuts the richness of the cheese and fat in exactly the way the sandwich needs.
Pan choice: nonstick is the most forgiving. Cast iron gives superior browning once you’ve dialed in your heat. Stainless steel works but requires more fat and attention. A well-seasoned carbon steel pan is the professional’s favorite and a reasonable middle ground.
A Note on Ratios

If you take one thing from this article, let it be this: a great grilled cheese is about balance. The ratio of bread thickness to cheese to fat determines whether every component finishes cooking at the same moment. Thin bread + too much cheese = raw center. Thick bread + too little fat = dry, pale crust. Aim for ½-inch bread, 2–2.5 oz of cheese, and a thin uniform coat of fat, and the timing almost takes care of itself.
The perfect grilled cheese isn’t about expensive ingredients. It’s about understanding what’s actually happening in the pan — and adjusting the three variables (heat, fat, and cheese temperature) until they all work together.