How to Cook Fish Without It Sticking to the Pan: Heat, Fat, Patience

Fish has a reputation for being tricky. One moment it’s glistening in the pan, the next it’s torn in half because the skin welded itself to the surface. The frustrating part is that fish doesn’t have to stick — the problem is almost always about heat, fat, and timing, not some mysterious property of the fish itself. Get those three things right and you’ll slide a perfect fillet onto the plate every time.
This guide covers the real mechanics of why fish sticks, the right setup before the fish ever touches the pan, and how to handle a fillet during cooking so it releases cleanly.

Why Fish Sticks to the Pan in the First Place
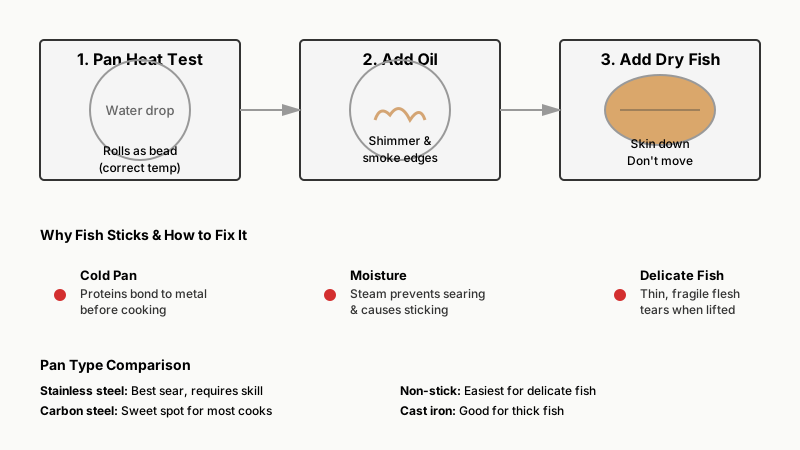
Before fixing the problem, it helps to understand it. Proteins in fish muscle — myosin and actin, primarily — are very delicate compared to those in beef or chicken. When a cold piece of fish hits a pan, those surface proteins bond directly to the metal before they have a chance to cook through and release naturally. The result is the protein essentially gluing itself to the surface.
There’s also the moisture problem. Fish releases water as it cooks. If the pan isn’t hot enough, that water pools between the fish and the metal, creating steam. Steam lowers the surface temperature further, the proteins stay soft and sticky, and the fillet tears when you try to move it.
Finally, texture matters. Delicate white fish like sole or flounder are much more prone to sticking than thicker, firmer fish like salmon or swordfish, because thin flesh has less structural integrity to hold itself together when you try to lift it.
The 7 Proven Tips for Stick-Free Fish
1. Dry the Fish Thoroughly Before It Hits the Pan
This is the single most impactful step most home cooks skip. Pat every surface of the fillet dry with paper towels — top, bottom, and sides. Moisture on the surface is your enemy: it causes the fish to steam rather than sear, which both promotes sticking and ruins the crust.
If you have time, place the dried fillets on a wire rack in the refrigerator uncovered for 20–30 minutes. The refrigerator air pulls even more surface moisture away, leaving the flesh almost tacky to the touch, which is exactly what you want.
2. Use the Right Pan
Not all pans behave the same with fish. Here’s how the main options stack up:
- Stainless steel: Excellent heat retention and the best sear, but requires the most technique (the heat and oil have to be exactly right). This is the pan professionals favor.
- Cast iron: Holds heat beautifully but can be slow to come up to temperature evenly. Great for thicker fish like salmon steaks.
- Carbon steel: The sweet spot for many cooks — lighter than cast iron, better seasoned non-stick properties than stainless, and excellent sear capability.
- Non-stick (PTFE-coated): The easiest option for delicate fish like sole or tilapia. The tradeoff is that you can’t get as high a heat, so your crust won’t be as deeply golden.
Avoid ceramic non-stick pans for fish if you want serious color — they work at low heat but lose their coating’s effectiveness if pushed.
3. Preheat the Pan Properly — the “Mercury Ball” Test
A cold pan is the root cause of most sticking. Heat your pan over medium-high heat for at least 2 minutes before adding any oil. To test whether stainless or cast iron is ready, add a single drop of water. If it sizzles and evaporates instantly, the pan is warm but not hot enough. If it forms a single rolling bead that skitters around the surface (the Leidenfrost effect), you’re at the right temperature.
At that point, add your oil and let it shimmer and just begin to smoke at the edges before adding the fish. This thin layer of hot oil fills the microscopic pores in the metal surface, creating a physical barrier between the fish protein and the pan.
4. Choose an Oil with a High Smoke Point
Butter is delicious on fish, but it burns at the temperatures needed to sear properly. Use a neutral oil with a high smoke point to cook the fish — refined avocado oil, refined sunflower oil, grapeseed oil, or refined coconut oil all work well. Once the fish is cooked, you can finish with butter for flavor in the last 30 seconds.
The oil should coat the pan thinly and evenly. Too much oil and you’re shallow-frying; too little and you have dry spots where the fish will bond to the metal.

5. Score the Skin (and Season at the Right Time)
If you’re cooking skin-on fish, score the skin with 2–3 shallow cuts across the fillet before cooking. Fish skin contracts when it hits the heat and can cause the fillet to curl, lifting parts of the flesh away from the surface and creating uneven contact — which leads to sticking in spots. Scoring relieves that tension.
Season with salt right before the fish goes into the pan, not 10 minutes ahead. Salt draws moisture out through osmosis. Even a few extra minutes can wet the surface you just worked to dry.
6. Don’t Move the Fish — Let It Release on Its Own
Once the fish is in the pan, leave it alone. This is where most cooks go wrong: they poke, prod, and try to lift the fillet before it’s ready, tearing the flesh in the process.
Here’s the rule: a properly seared fillet will release naturally when the crust has formed. You’ll know it’s ready to flip when you can slide a thin spatula under it without resistance — usually 3–4 minutes for a 1-inch-thick fillet over medium-high heat. If it resists, give it another 30–60 seconds. The pan is telling you it’s not done yet.
Use a thin, flexible fish spatula rather than a regular turner. The thin edge can slip under the crust without destroying it.
7. Cook Skin-Side Down First, and Cook It Longer on That Side
For skin-on fillets, always start skin-side down. The skin acts as a buffer, protecting the more delicate flesh side. Cook roughly 70% of the total time on the skin side — this renders the fat in the skin, crisps it up, and by the time you flip, the flesh is already mostly cooked through from the bottom up. You only need a brief 1–2 minutes on the flesh side to finish.
If the skin is puffing up and not making full contact with the pan, press it down gently with the spatula for the first 30 seconds to ensure even contact.
Handling Specific Types of Fish
Different fish need slightly different approaches:
Salmon: Forgiving and thick. Works beautifully in stainless steel or cast iron. Start skin-side down over medium-high heat and don’t rush the flip.
Cod or halibut: These flake easily, so be gentle with the flip. A well-dried, well-heated stainless or non-stick pan is ideal. Consider using a fish spatula and your other hand (held flat, not grasping) to support the fillet as you flip.
Sole or flounder: Very delicate. Use non-stick and lower-medium heat. These cook in 2–3 minutes total. Dredging lightly in flour creates a thin barrier that both browns better and resists sticking.
Tuna steaks: Firm enough to behave almost like beef. A screaming-hot cast iron or stainless pan works best for a rare-center sear. Minimal oil is fine; just make sure the pan is very hot.
Skin-off fillets: Without the skin buffer, sticking risk is higher. The flour dredge technique mentioned for sole works here too — a very thin coating of all-purpose flour, seasoned and shaken off completely, gives the surface something to bond to other than the metal.

If salmon is your go-to fillet, our detailed walkthrough Pan-Seared Salmon: How to Cook It Perfectly Every Time shows exactly how these techniques come together for that particular fish.
When to Use Other Cooking Methods Entirely
Sometimes the best fix for sticking isn’t technique — it’s switching the method. If you find yourself struggling repeatedly with a particular fish, consider:
- Baking on parchment: Zero sticking risk, hands-off, and ideal for white fish. You sacrifice the crust, but a brief broil at the end recovers some color.
- Foil packets: Especially good for delicate whole fish or thin fillets with aromatics and a splash of wine. Steaming in the packet keeps everything moist and removes sticking from the equation entirely.
- A well-oiled grill grate: Grilling fish works well for sturdy fish like salmon, swordfish, or mahi-mahi. Preheat the grill thoroughly, clean the grates, oil them heavily with a cloth, and don’t try to move the fish until it releases naturally — same principle as the pan.
Putting It All Together
The technique boils down to this: dry fish, hot pan, right oil, patience. Every tip on this list reinforces one of those four pillars. Skip the pre-drying and you’re steaming, not searing. Underheat the pan and the proteins bond before they cook. Use the wrong fat and you’ve lowered your heat threshold. Move the fish too soon and you break the crust before it can protect itself.
Once you’ve cooked fish this way a few times — seeing the golden crust form, feeling the resistance disappear right before the flip, sliding the spatula under cleanly — the process becomes intuitive. The fish tells you when it’s ready. You just have to listen.
Once your fish is out of the pan with a perfect crust intact, don’t waste those flavorful browned bits — How to Make a Quick Pan Sauce in 5 Simple Steps explains how to turn them into a quick, delicious finishing sauce.