How to Clean and Maintain Kitchen Knives for Longevity

Why Knife Maintenance Is Worth Your Time
A sharp, well-kept knife is safer than a dull one. This sounds counterintuitive — but a dull blade requires more force, which means more slipping and more trips to the emergency room. Beyond safety, proper maintenance protects what is often a significant investment. A quality chef’s knife, properly cared for, can last decades. Neglect it for a few years and you’ll be resharpening past the point of recovery or replacing it entirely.
This guide walks through everything: cleaning methods, drying, storage, sharpening, and the habits that quietly destroy good knives. No fluff — just what actually works.

The Right Way to Clean Kitchen Knives
Hand-Washing vs. Dishwashers
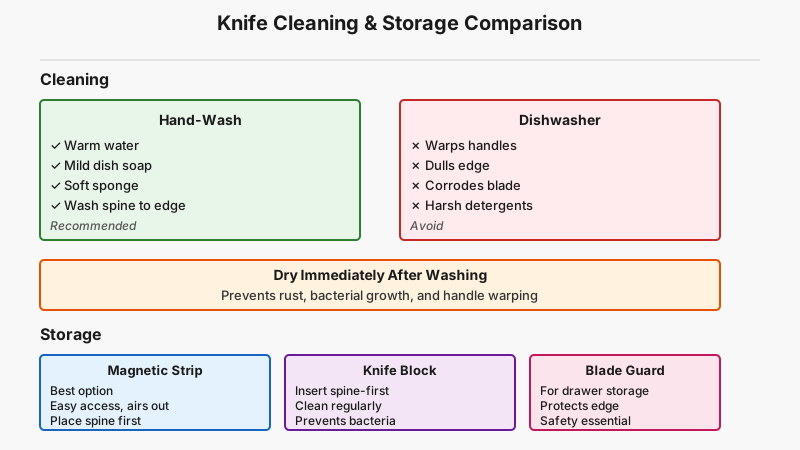
The dishwasher is the single biggest enemy of a good kitchen knife. The combination of high heat, harsh detergents, and jostling against other utensils does three damaging things:
- It warps and dries out wooden handles, causing cracking and loosening at the bolster.
- It dulls the edge rapidly through contact with other metal objects and the abrasive action of water jets.
- It corrodes the blade — even stainless steel knives can develop micro-pitting over time from prolonged exposure to dishwasher detergents, which are significantly more aggressive than dish soap.
Hand-washing is the only correct approach. Use warm water, a mild dish soap, and a soft sponge or cloth. Wash from the spine (the dull top edge) toward the cutting edge, never across it — dragging a cloth along the edge sideways degrades the blade and risks cutting yourself.
Rinse thoroughly. Soap residue, especially on carbon steel knives, accelerates oxidation.
Dealing with Stains and Rust Spots
If you’re working with carbon steel knives (many Japanese knives fall in this category), surface oxidation is normal and even desirable — a patina that develops over time actually provides some protection. But if you get actual rust spots, address them quickly.
- For light rust: rub with a raw potato cut in half dipped in baking soda. The oxalic acid in the potato reacts with the rust, and the baking soda acts as a mild abrasive.
- For more stubborn spots: a paste of baking soda and water applied with a cork or a rust eraser (available from knife specialty shops) works well.
- Avoid steel wool — it leaves micro-scratches that give rust new footholds.
Stainless steel is far more forgiving, but still not immune. Hard water stains respond to a wipe-down with a cloth dampened lightly with white vinegar, followed by immediate rinsing and drying.
Drying: The Step Most People Skip
This one is brief, but non-negotiable: dry your knife immediately after washing. Do not let it air-dry on a rack, and never leave it sitting in a puddle of water or soaking in the sink.
Water left on the blade — particularly around the bolster and handle junction — creates the ideal environment for rust and bacterial growth. Even high-grade stainless steel can develop discoloration with prolonged moisture exposure. On wooden handles, moisture causes swelling, warping, and eventually the wood separates from the tang.
Use a clean dish towel, wipe from the spine down toward the edge (not across it), and store immediately.

Storage: Protecting the Edge Between Uses
How you store knives matters as much as how you clean them. Three storage approaches are worth knowing:
Magnetic Knife Strips
Wall-mounted magnetic strips are arguably the best option for most kitchens. They keep blades off surfaces, allow easy access, and let the knife air out fully after washing. The key is to mount the knife carefully — place the spine against the magnet first, then rotate the blade down gently. Dropping a knife edge-first onto the magnet will chip it.
Choose a strip with enough magnetic strength to hold heavier blades securely, and check that it’s well-anchored to wall studs. A falling knife is a serious hazard.
Knife Blocks
Traditional wooden knife blocks work, but come with a catch: the slots can harbor bacteria and food particles, and inserting a knife into a tight slot edge-first repeatedly creates microdamage. To reduce this, always insert and remove blades spine-first or at an angle so the edge doesn’t contact the wood on the way in.
Clean the block periodically — turn it upside down and shake out debris, then let it air out fully.
Knife Guards and Blade Covers
For knives stored in a drawer, blade guards (also called sheaths) are essential. Loose knives rattling in a drawer against other utensils chip edges and create a hazard every time you reach in. Plastic or wood blade guards are inexpensive and widely available. If you’re storing a knife you use infrequently, a blade guard also protects against accidental contact during deep drawer searches.
What to avoid: never toss knives loose into a utensil drawer, and never store them flat on a cutting board or counter for extended periods.
Sharpening and Honing: Understanding the Difference
These two terms get conflated constantly, and the confusion leads to poorly maintained knives.
Honing Is Not Sharpening
A honing rod (also called a sharpening steel) does not remove metal. It realigns the microscopic edge of the blade, which folds and rolls slightly with regular use. This is why a quick pass on a honing rod before each use can restore a blade’s cutting efficiency — you’re straightening the edge, not grinding it.
For honing to work, the knife must still have a reasonably sharp edge. If a knife can’t slice a piece of printer paper cleanly, honing alone won’t fix it — it’s time to sharpen.
To hone correctly: hold the rod vertically with the tip resting on a folded towel on the countertop. Draw the blade down and across the rod at roughly 15–20 degrees (for Japanese knives, 10–15 degrees; for Western-style knives, 15–20 degrees). Alternate sides with each stroke. Five to six passes per side is usually sufficient.
Actual Sharpening: Whetstones vs. Pull-Through Sharpeners
Whetstones are the gold standard. They give you control over the angle and remove metal progressively, producing an edge that pull-through devices simply cannot match. A two-sided whetstone (one coarser grit for reshaping, one finer for polishing the edge) handles most home knife maintenance. Starting around 1000 grit for regular sharpening and finishing on a 3000–6000 grit stone is a good general approach.
Learning to use a whetstone takes practice, but the edge you get — and the money you save on professional sharpening — pays dividends quickly.
Pull-through sharpeners (the ones with crossed tungsten carbide blades or ceramic rods) are fast and accessible, but they are aggressive. They remove more metal than necessary, set an angle that may not suit your knife, and over time shorten the lifespan of the blade. They work as a stopgap on cheap knives or when a whetstone isn’t available, but they shouldn’t be your regular method on a knife you care about.
Electric sharpeners fall between these options. Quality electric sharpeners (from brands like Chef’sChoice) use abrasive discs at preset angles and can produce a good edge with minimal technique required. If a whetstone feels too daunting to start, a reputable electric sharpener is a reasonable compromise.
Professional sharpening: Once a year or once every 18 months, having knives professionally sharpened by someone using a whetstone or grinder is worth the cost — particularly for knives that have developed chips or need a full edge reset.

If you want a deeper dive into technique and equipment, How to Sharpen Kitchen Knives at Home: Why Honing Alone Won’t Cut It walks through the process in more detail.
Handle Care: Often Overlooked
Blades get all the attention, but handles determine whether a knife remains safe and comfortable to use.
Wooden handles need occasional conditioning. Mineral oil (food-grade) or a beeswax-based wood conditioner applied every few months keeps wood from drying out and cracking. A few drops rubbed in with a cloth and left to soak overnight does the job. Do not use cooking oils like olive or vegetable oil — they go rancid inside the wood grain.
Synthetic handles (G-10, Micarta, polymer) need very little care — just keep them clean. Check the rivets occasionally to ensure they haven’t loosened.
Bolsters and handles with gaps or looseness are a hygiene and safety issue. If a handle has worked loose from the tang, consult a knifemaker or cutler about re-handling before continuing to use the knife.
The Cutting Surface Matters Too
The board you cut on affects your edge nearly as much as how you clean and store the knife.
- Wood and bamboo: Gentle on edges and the best general choice. End-grain boards are especially forgiving. Keep them oiled and avoid soaking them.
- Plastic (polyethylene): Acceptable, though harder plastic boards dull edges faster than softer ones. Plastic boards also develop knife grooves that harbor bacteria — replace them when the surface becomes deeply scored.
- Glass, ceramic, marble, and stone: Avoid these for everyday cutting. They look attractive on a countertop, but they are extremely hard and will rapidly blunt and chip any blade.
- Bamboo note: Bamboo is often marketed as eco-friendly and gentle, but it is harder than most wood cutting boards and slightly harder on edges. It’s not the gentlest option, despite its reputation.
A Practical Maintenance Routine
Put it all together into a simple repeatable routine:
After every use:
- Hand-wash with mild soap and warm water.
- Dry immediately with a clean cloth.
- Store on a magnetic strip, in a knife block (spine-first), or in a blade guard.
Before each use:
- Quick hone with a honing rod (5–6 passes per side).
Monthly:
- Inspect for rust spots, chips, and handle condition.
- Condition wooden handles if they look dry.
Every 6–12 months (or as needed):
- Sharpen with a whetstone or electric sharpener.
- Consider professional sharpening for any knives with chips or significant edge damage.
For a broader look at keeping your whole kitchen toolkit in order, check out Capsule Kitchen: How to Organize and Maintain Essential Tools.
Conclusion
Good knife care is mostly about avoiding bad habits — the dishwasher, the wet counter, the loose drawer, the glass cutting board. The positive actions (honing, occasional sharpening, oil on the handle) take very little time but pay off in a blade that stays safe, sharp, and reliable for years. A quality knife maintained this way will outlast several rounds of cheaper knives that were never properly looked after. Start with whatever knife you use most, build the habits around it, and the rest follows naturally.