Capsule Kitchen: How to Organize and Maintain Essential Tools

What a Capsule Kitchen Actually Is
The term gets borrowed from fashion, but the principle translates cleanly: a deliberate, small set of tools that covers virtually every cooking task you’ll actually do — nothing more, nothing less. A capsule kitchen isn’t about minimalism as an aesthetic. It’s about friction. Every redundant peeler, every half-broken pan, every gadget you own but avoid adds decision cost and cleaning burden every single day.
The goal is a kitchen where you reach for a tool and it’s there, it works, and putting it away is effortless. That’s a harder target than it sounds, because most households accumulate slowly — a gift here, a sale impulse there — until the utensil drawer requires archaeology.
This guide covers how to audit what you have, which tools genuinely earn their shelf space, how to organize them so the system maintains itself, and what to do when the collection starts creeping again.
The Audit: What to Keep, Ditch, or Demote
Before organizing anything, pull everything out. All of it. Counters, drawers, cabinets, that basket above the fridge. Lay it on the floor or a table so you can see the full inventory.
Then sort into three groups:
Keep — Tools you used in the last 30 days and that perform a job nothing else can cover adequately.
Ditch — Duplicates, broken items, things for a life stage you’ve left (the pasta machine you used twice in the nineties). Donate, sell, or discard.
Demote — Seasonal or occasional tools (turkey baster, springform pan, ice cream maker) that belong in long-term storage, not prime cabinet real estate.
The 30-day rule is stricter than most people expect. A ricer, a mandoline, a cake-decorating set — many people keep these out of guilt or optimism rather than genuine use. If you haven’t touched it in a month and it doesn’t cover a genuine gap, it probably belongs in the demote pile, at minimum.
Handling Emotional Attachments
Some tools are family heirlooms or gifts. Keeping one cast-iron skillet from your grandmother makes sense. Keeping five mediocre pots because you feel bad discarding them does not. Acknowledge the attachment, keep the item if it earns its keep in use, and donate the rest without ceremony.
The Core Toolkit: What Actually Earns Its Keep
The following list isn’t prescriptive by brand, but it is prescriptive by function. These are the categories where a capable cook can realistically cover the vast majority of cooking tasks.

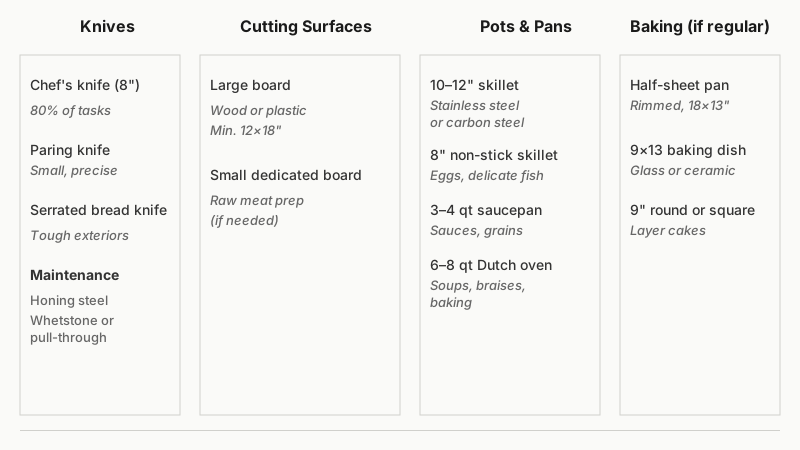
Knives (fewer than you think)
- Chef’s knife (8-inch is the most versatile) — handles probably 80% of all cutting tasks
- Paring knife — for small, precise work
- Serrated bread knife — also useful for tomatoes and anything with a tough exterior
That’s three. A fourth knife is a genuine edge case. A block full of ten is almost always excess.
Maintaining sharpness matters far more than quantity. A sharp 8-inch chef’s knife outperforms a drawer of dull specialty knives every time. A honing steel (used often) and a whetstone or pull-through sharpener (used a few times a year) should live with the knives.
Once you’ve pared down to a handful of blades, keeping them sharp and rust-free matters even more, so see How to Clean and Maintain Kitchen Knives for Longevity for the care routine that keeps them earning their spot.
Cutting Surfaces
Two boards: one large (wood or plastic, for most tasks) and one smaller, dedicated to raw meat if you cook it. A board large enough to feel comfortable — at least 12x18 inches — makes prep faster and safer. Boards too small for the task create mess and risk.
Pots and Pans
- 10- or 12-inch skillet — stainless steel handles higher heat and searing without the coating concerns of non-stick; a well-seasoned carbon steel pan serves the same role and lasts indefinitely
- 8-inch non-stick skillet — for eggs and delicate fish; replace when the coating degrades
- 3–4 quart saucepan — sauces, grains, reheating
- 6–8 quart stockpot or Dutch oven — soups, braises, boiling pasta; a good Dutch oven doubles as a baking vessel
Four cooking vessels cover almost everything. Some cooks drop the non-stick in favor of a well-seasoned carbon steel or cast iron and get by on three.
Baking Essentials
If you bake regularly:
- One half-sheet pan (rimmed, 18x13 inches) — arguably the most useful baking surface in existence
- A 9x13 baking dish (glass or ceramic)
- A 9-inch round or square cake pan if you bake layered cakes
If you bake only occasionally, the half-sheet pan alone will cover most tasks.
Hand Tools and Utensils
- Wooden spoon or silicone spatula — for stirring, folding
- Fish spatula (thin, slotted) — surprisingly versatile beyond fish
- Ladle
- Tongs (12-inch, locking) — one pair
- Whisk
- Peeler
- Box grater (handles cheese, ginger, citrus zest, vegetables)
- Can opener
- Instant-read thermometer — removes the guesswork from meat, bread, and candy
That’s about ten items. A utensil holder on the counter or a single drawer insert should hold all of them comfortably. If it doesn’t fit, there’s too much.
Small Appliances: Ruthless Selectivity
Small appliances are the biggest source of capsule kitchen drift. The rule: each appliance must replace significant time or effort that matters to you, and must earn weekly or at least frequent monthly use.
- Blender (full-size or high-powered immersion, depending on your needs) — soups, sauces, smoothies
- Food processor — for cooks who do high-volume chopping, pastry, or batch prep; skippable if you don’t
- Electric kettle — instant return on investment if you drink tea or pour-over coffee
- Instant Pot or slow cooker — only if braising and batch cooking are a real part of how you cook
A stand mixer earns its counter space only if you bake yeast breads or cakes with real frequency. A toaster oven earns space if it replaces your main oven for small tasks in warm months. Decide on your actual cooking life, not an imagined one.
Organizing the Tools You’ve Kept
Organization works when it reduces the number of decisions you make. The best systems are ones you can maintain without thinking.

Zones, Not Just Drawers
Group tools by task, not by type. The knife block, cutting board, and peeler all belong together near the prep zone. Pots and pans belong near the stove. Baking sheets and the Dutch oven belong near the oven. If the cutting board lives across the kitchen from the knives, you’ll leave one of them in the wrong place after every use.
Three useful zones:
- Prep zone — knives, boards, peeler, grater, thermometer
- Cooking zone — pans, utensils (spatulas, tongs, spoons, ladle, whisk)
- Baking/storage zone — sheet pans, baking dishes, mixing bowls, measuring tools
The Counter Is Prime Real Estate
Only items used at least three or four times a week belong on the counter. Everything else should have a drawer or cabinet home. Counter clutter is the most common maintenance failure in otherwise-organized kitchens — it happens gradually, one item at a time.
If the counter is small, the electric kettle, a knife block or magnetic knife strip, and a single utensil holder may be the full allocation. A magnetic strip mounted to the wall moves knives off the counter entirely and doubles as a visual organizational anchor.
Cabinet and Drawer Layouts That Hold
- Pots and pans: Stack with the largest on the bottom; use a vertical rack or pull-out organizer if space is tight. Lids stored separately in a lid rack or upright in a slot prevent the avalanche effect.
- Sheet pans and baking dishes: Store vertically in a divider, not flat-stacked — flat stacks mean lifting everything to reach the bottom item.
- Utensil drawer: Use a drawer insert with compartments sized to the actual tools you kept. Inserting a too-large organizer and leaving empty slots is better than cramming a small organizer.
- Dry goods proximity: Measuring cups and spoons belong near wherever you measure — next to the baking station or the stovetop, not across the kitchen.
For a deeper dive into grouping items by how you actually cook, check out How to Organize Kitchen Cabinets: Assign Zones By Daily Habit to fine-tune the zones inside each cabinet.
Maintaining the System: Drift Prevention
A capsule kitchen organized once and then never revisited will revert to its previous state within a year. The audit isn’t a one-time event.
The One-In, One-Out Rule
Every new tool that enters the kitchen displaces one. This sounds extreme until you’ve watched a kitchen revert to chaos in eight months after a thorough declutter. If you genuinely need a new piece — a replacement or a real upgrade — something else leaves.
Quarterly Check-Ins
Once a season, open every drawer and cabinet and take ten minutes to return things to their zones, identify anything that’s migrated or been added without thought, and remove anything that’s broken or no longer used. Four times a year is not a significant time investment, and it catches drift before it compounds.
Maintenance Habits That Cost Nothing
- Return tools to their designated spot immediately after washing, not to a counter staging area
- Dry cast iron and carbon steel immediately to prevent rust
- Hone knives before or after each use — it takes fifteen seconds and extends the time between sharpenings substantially
- Replace worn non-stick pans before the coating begins flaking, not after

When to Break the Rules
A capsule kitchen is a framework, not a doctrine. A serious home bread baker may need a bench scraper, a lame, a banneton, and a Dutch oven dedicated to baking — that’s the cooking life, not excess. A wok is a legitimate category if you cook stir-fries several times a week; it’s a space-eating novelty if you don’t. The standard to apply is honest, not aspirational.
Frequently Asked Questions
How many tools does a capsule kitchen actually need?
There’s no universal number, but most skilled home cooks manage with roughly 30–40 items total when you count knives, pots, pans, baking vessels, and hand tools separately. Some manage on fewer. The number matters less than whether everything is used and everything has a home.
Is a Dutch oven worth the cost and the space?
For most cooks, yes — a good enameled Dutch oven is one of the few items that genuinely replaces several others. It handles stovetop searing, oven braises, soups, stews, and no-knead bread. It’s arguably the single most versatile piece of cookware for a space-constrained kitchen.
Can I get by with no non-stick pan at all?
Many cooks do, using a well-seasoned cast iron or carbon steel pan for most tasks. The honest answer is that eggs and delicate fish are genuinely easier on non-stick, particularly for cooks still building technique. If you’re confident with heat management and fat timing, you can skip it. If not, one small non-stick pan earns its place.
What should go into long-term storage versus donation?
If you use an item at least once a year for a specific seasonal purpose (a turkey roaster at Thanksgiving, a springform pan for cheesecake at the holidays) and it works well, store it out of the main kitchen — in a pantry, garage, or high shelf. If you haven’t used it in two years and can’t name a specific occasion when you will, donate it.
How do I handle a very small kitchen with almost no storage?
Prioritize vertical space: magnetic knife strips, wall-mounted hooks, over-door organizers, and stackable pot racks. A smaller set of nesting tools — graduated bowls that fit inside each other, stackable pans — makes a meaningful difference. The capsule kitchen principle actually becomes more valuable in a small kitchen, not less, because every square inch has a real cost.
Putting It Together
A capsule kitchen earns its keep not through any single declutter session but through the habits that follow. Start with the audit — get everything out and be honest about what you actually cook. Build the core toolkit around real tasks, not imagined ones. Create zones that map to how you move while cooking, then maintain the system with a few consistent habits and a light quarterly review.
The payoff isn’t Instagram-worthy minimalism. It’s a kitchen that’s faster to cook in, faster to clean, and less mentally taxing every time you step into it — which, if you cook regularly, is one of the more useful things you can do for your daily quality of life.