How to Clean a Mattress at Home: Beyond Just Changing Sheets

Why Your Mattress Needs More Than a Sheet Change
A mattress collects a surprising amount of material over time — dead skin cells, sweat, dust mites, body oils, and the occasional spilled coffee. Most people change their sheets regularly but never think about what’s happening underneath. Dust mites alone can number in the millions inside a single mattress, and their waste particles are a well-documented trigger for allergies and asthma.
The good news: you don’t need professional cleaning equipment or expensive products to get a mattress genuinely clean. With a few hours and some common household items, you can freshen it up, tackle stains, and extend its usable life by years.

What You’ll Need Before You Start
Gather everything before stripping the bed. Stopping mid-process to hunt for supplies means the mattress sits damp or exposed longer than necessary.
- Vacuum cleaner with an upholstery or crevice attachment
- Baking soda (a standard box or two)
- White distilled vinegar in a spray bottle
- Hydrogen peroxide (3% solution, available at pharmacies)
- Dish soap or enzyme-based laundry detergent
- Clean white cloths or microfiber towels
- Cold water in a separate spray bottle
- Essential oil (optional — a few drops of lavender in the baking soda adds a pleasant scent)
Avoid hot water on stains; heat sets protein-based stains like blood or sweat into the fabric permanently.
The 7-Step Cleaning Process
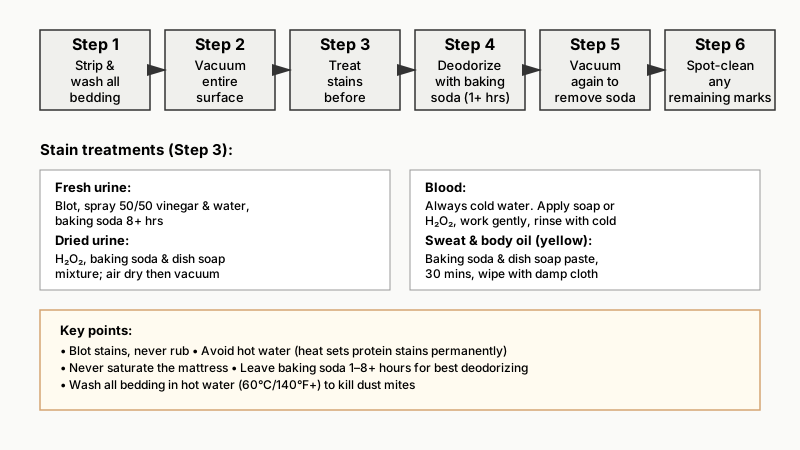
Step 1: Strip and Wash All Bedding
Remove everything — sheets, pillowcases, mattress protector, and duvet cover — and wash them immediately. Running bedding through a hot wash (60°C / 140°F or higher) kills dust mites effectively. While the laundry runs, you have time to work through the remaining steps.
If you have a mattress topper, treat it separately using the same method you’ll use on the mattress itself, depending on its material.
Step 2: Vacuum the Entire Surface
This step gets skipped far too often, and it makes a real difference. Use the upholstery attachment and work in slow, overlapping strokes across the top surface. Then do the sides. Pay particular attention to seams and piping, where dead skin and dust accumulate most densely — switch to the crevice tool here.
Vacuuming first removes loose debris so it doesn’t turn into a paste when you apply any liquid later.
While you have the vacuum out, it’s a good time to check out How to Deep Clean Baseboards and Trim: A Room-by-Room Guide so dust doesn’t just resettle from nearby surfaces.
Step 3: Treat Stains Before Deodorizing
Don’t apply baking soda until stains are addressed. Different stains need different approaches:
Urine stains (fresh): Blot — never rub — with a dry cloth to absorb as much liquid as possible. Spray with a 50/50 mix of white vinegar and water, blot again, then sprinkle baking soda over the damp area and let it sit for at least 8 hours before vacuuming.
Urine stains (dried or set): Mix 8 oz (240ml) of hydrogen peroxide, 3 tablespoons of baking soda, and a few drops of dish soap. Apply with a cloth — do not saturate the mattress. Let it dry completely, then vacuum. This enzyme-mimicking combination breaks down uric acid crystals.
Blood stains: Always use cold water. Apply a small amount of dish soap or hydrogen peroxide directly to the stain and work it in gently with a cloth. Rinse by blotting with cold water. Repeat as needed. Blood responds poorly to heat, so never use warm water.
Sweat and body oil stains (yellow discoloration): A paste of baking soda and a small amount of dish soap, left on for 30 minutes then wiped away with a damp cloth, works for mild yellowing. For stubborn patches, the hydrogen peroxide mixture above is more effective.
General food or drink stains: Blot first. Then apply a small amount of dish soap diluted in cold water, work it gently into the stain, and blot clean. Avoid saturating the fabric.

Step 4: Deodorize with Baking Soda
Once any stains are treated and the area is as dry as possible, this is the step that makes the biggest overall difference. Sprinkle baking soda liberally — and genuinely liberally — across the entire sleeping surface. A light dusting does almost nothing; you want a visible, thin layer.
If you’ve added a few drops of lavender or tea tree essential oil to the baking soda beforehand and mixed it well, this is when you’ll notice the scent.
Leave it for a minimum of one hour. For a thorough deodorize, leave it for 8 hours or more — overnight works well if you have somewhere else to sleep. Baking soda draws moisture and odor molecules out of the fabric as it sits.
Step 5: Vacuum Again Thoroughly
Vacuum up all the baking soda with the upholstery attachment using the same slow, methodical strokes as before. Go over each area more than once. Baking soda particles are fine and can settle into the fabric, so this step deserves more time than it seems to need.
Step 6: Air It Out
If at all possible, let the mattress air out before remaking the bed. Open windows to improve airflow through the room. If you can move the mattress to a sunny outdoor spot — propped against a wall or a fence — UV light has a natural sanitizing effect on surface bacteria and helps dissipate residual odors. Even 30 minutes of direct sunlight does noticeable work.
If moving the mattress outside isn’t practical, running a fan across the surface for an hour achieves reasonable ventilation.
Step 7: Protect It Going Forward
A waterproof mattress protector is the single most effective thing you can do to keep a mattress clean long-term. A good protector blocks liquids, creates a barrier against dust mites, and can be removed and machine-washed. It’s a simple purchase that dramatically reduces how often you need to deep-clean.
If you already have a mattress protector but haven’t been washing it regularly, aim for once every two months — more often if anyone in the household has allergies or if the mattress sees heavier use.
Special Situations: Memory Foam, Pillow-Top, and Latex Mattresses
The steps above work well for standard innerspring and hybrid mattresses, but a few materials need adapted care.
Memory foam: Avoid saturating the foam with liquid at any point — it doesn’t dry evenly and can grow mold internally. Use the minimum amount of cleaning solution needed, apply it with a cloth rather than spraying directly, and prioritize airflow during drying. Never put a memory foam mattress in direct contact with a heat source to speed drying.
Latex mattresses: Natural latex is sensitive to certain cleaning agents. Stick to mild dish soap and water. Avoid hydrogen peroxide, which can degrade latex over time.
Pillow-top mattresses: The pillow-top layer is usually not removable and can hold moisture stubbornly. Use minimal liquid and allow extra drying time — ideally with a fan running directly on the surface for several hours.

How Often Should You Clean a Mattress?
A full deep-clean twice a year is a reasonable baseline for most households. Spot-clean stains as they happen — waiting allows them to set. If someone in the home has dust mite allergies or asthma, quarterly cleaning and a dust-mite-proof mattress encasement (different from a standard protector — it fully encloses the mattress and zips shut) will make a measurable difference to symptoms.
Turning or rotating the mattress every three to six months also helps it wear evenly, though some mattresses (particularly those with a defined top layer) are designed for single-sided use — check the manufacturer’s guidance.
A Note on When Cleaning Isn’t Enough
Cleaning restores a mattress, but it has limits. If a mattress has visible mold growth inside the fabric (not just surface discoloration), a persistent smell that survives repeated cleaning, or a support structure that’s genuinely deteriorated, replacement is the practical call. Mold inside foam or coil layers cannot be safely remediated at home.
Most quality mattresses have a lifespan of 7–10 years with proper care, though some higher-end latex mattresses last considerably longer.
If your mattress cleaning routine reveals bigger clutter or organization issues in your bedroom, How to Declutter Your Home Step by Step (That Actually Works) can help you tackle the rest of the space.
Conclusion
Cleaning a mattress at home is straightforward when you work through it methodically. The key principles are simple: vacuum before applying anything wet, use the right solution for each stain type, let baking soda do its work with real contact time, and always prioritize thorough drying. A mattress protector handles the ongoing maintenance between deep cleans.
Done properly, this process leaves a mattress noticeably fresher, reduces allergen load, and can add years to its life — which is a better return on a couple of hours’ effort than most household chores offer.