How to Clean a Keyboard Properly: The No-Disassembly Five-Minute Fix

Why Your Keyboard Needs More Attention Than You Think
The average keyboard harbors more bacteria per square inch than a toilet seat — a claim backed by microbiologist research published in various consumer health studies. Beyond the hygiene angle, accumulated crumbs, dust, and skin oils actively degrade performance: sticky keys, unreliable switches, and faded keycap legends are almost always preventable with routine cleaning.
This guide covers everything from a fast daily wipe-down to a full deep clean for mechanical and membrane keyboards alike. No vague advice — just a clear process you can follow start to finish.

What You Need Before You Start
Gather your supplies first. Stopping mid-clean to hunt for a cotton swab wastes time and risks leaving your keyboard partially disassembled.
Essential tools
- Isopropyl alcohol (70–90%) — the gold standard for electronics. It evaporates quickly and disinfects without leaving residue. Avoid ethanol-based hand sanitizers; they often contain skin moisturizers that leave a film.
- Microfiber cloth — lint-free and won’t scratch keycap surfaces.
- Compressed air canister or electric air duster — for blasting debris from between keys. An electric duster (sometimes called a DataVac) is a more sustainable long-term investment than disposable canisters.
- Cotton swabs — for tight corners and the edges of individual switches.
- Soft-bristle brush — a clean, dry paintbrush or dedicated keyboard brush works well for sweeping loose particles.
- Keycap puller (for deep cleans) — plastic ring-style pullers are safer than wire ones for PBT and ABS keycaps.
- Small bowl of warm soapy water — for washing removed keycaps only, never for the PCB or plate.
- Masking tape or sticky notes — optionally, to document keycap positions before removal.
What to avoid
- Paper towels — too abrasive; they leave fibers and can micro-scratch legends.
- Bleach or ammonia-based cleaners — will strip keycap coatings and damage plastics.
- Excess moisture near the PCB — even a small amount of liquid inside a membrane keyboard can short circuits.
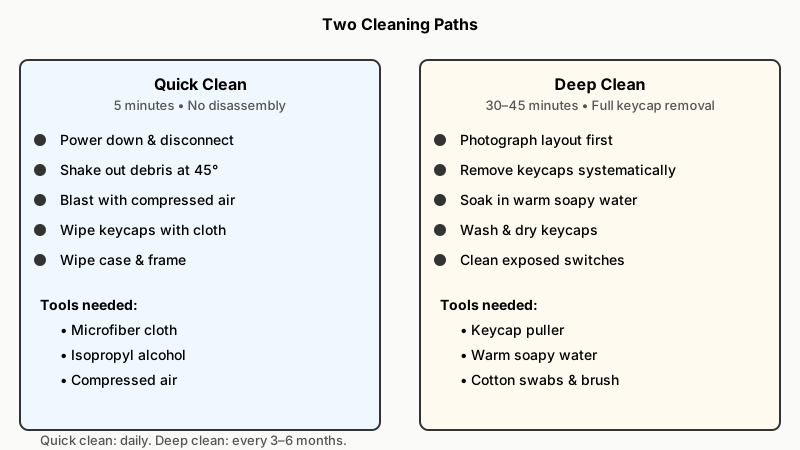
The Quick Clean: 5 Minutes, No Disassembly
For everyday maintenance, this process takes under five minutes and keeps buildup from becoming a bigger problem later.
Step 1: Power down and disconnect
Always unplug a wired keyboard before cleaning. For wireless keyboards, power them off. This protects both you and the hardware — pressing keys while cleaning can trigger unintended inputs, and moisture near live circuits is a genuine risk.
Step 2: Shake it out
Hold the keyboard upside down over a trash can and give it a gentle shake. You’ll be mildly horrified by what falls out. Tilt it at a 45-degree angle and repeat — different angles dislodge debris from different gaps.
Step 3: Blast with compressed air
Hold the nozzle a few centimeters from the surface and work in short bursts at an angle, not straight down (which pushes debris further into the switches). Move systematically from left to right, row by row.
Step 4: Wipe keycap surfaces
Dampen a microfiber cloth with isopropyl alcohol — damp, not soaking — and wipe each keycap surface. Use a cotton swab for the spaces along keycap edges where oils accumulate. Don’t press liquid into the gaps.
Step 5: Wipe the case
Wipe down the keyboard frame and underside with the same cloth. Pay attention to the space bar area, which tends to collect the most skin oil.
Reconnect and you’re done.

The Deep Clean: Full Keycap Removal
Do this every three to six months, or whenever your keyboard starts looking genuinely grimy. This approach works for most mechanical keyboards and many higher-end membrane boards with removable caps.
Step 1: Photograph the layout first
Before pulling a single key, take a photo of the full keyboard. If you have a non-standard layout (split space bars, ortholinear layouts, 75% or 65% boards with repositioned modifier keys), this photo saves significant frustration during reassembly.
Step 2: Remove keycaps systematically
Use a keycap puller, hooking it under the keycap at opposing corners. Pull straight up with even pressure — never at an angle, which can snap the stem. Start from the top-right corner and work left and down in rows to stay organized.
For stabilized keys (space bar, shift, enter, backspace), pull slowly. These keycaps are connected to stabilizer wires; forcing them can bend the wire or crack the keycap stem.
Step 3: Soak and wash keycaps
Place keycaps in a bowl of warm (not hot) water with a small drop of dish soap. Let them soak for 30–45 minutes. Hot water can warp PBT keycaps and loosen pad-printed legends on cheaper ABS sets, so keep the temperature moderate.
After soaking, rinse thoroughly under running water and spread them on a clean towel or paper-lined tray to air dry completely. This is critical — reassembling with damp keycaps traps moisture against the switches. Give them at least an hour; two is safer.
Step 4: Clean the board itself
With keycaps removed, you have direct access to the switch tops and PCB plate. Use compressed air to clear any debris sitting in switch housings. Then use cotton swabs lightly moistened with isopropyl alcohol to clean around each switch stem and the plate surface. Work carefully — you’re not trying to flood the switches with alcohol.
For mechanical keyboards with north-facing or south-facing PCB-mounted switches, a bit of isopropyl alcohol on a swab can also clean gummy residue off the top housing of the switch without disassembling the switch itself.
Step 5: Clean stabilizers (if accessible)
If your stabilizers are rattling or feel sticky, and they’re PCB-mounted (not plate-mounted), this is a good time to remove, clean, and re-lube them. Dry stabilizers are one of the most common causes of a poor typing feel. A small amount of dielectric grease or a dedicated stabilizer lube applied to the wire ends and slider channels makes a noticeable difference.
Step 6: Reassemble
Once keycaps are fully dry, use your photo as reference to place each cap back. Press straight down until you feel or hear a click — that’s the cap seating onto the stem. For stabilized keys, align the stabilizer wire with the keycap’s mounting points before pressing down.
Cleaning Different Keyboard Types
Not all keyboards are built the same, and the approach shifts depending on what you own.
If your desk setup includes a touchscreen device that collects similar smudges and grime, How to Clean a Smartphone Screen Properly: 7 Safe Steps walks through the safe way to handle those delicate surfaces.
Membrane keyboards
Most office and budget keyboards use a membrane layer beneath a rubber dome. These boards usually don’t have removable keycaps (though many do). If yours doesn’t, stick to the quick-clean method. If a liquid spill occurs, unplug immediately and let it dry inverted for 24–48 hours before attempting to power it back on — many membrane boards survive minor spills if they’re dried before reconnection.
Laptop keyboards
Laptop keyboards are notoriously difficult to deep clean because the keycaps use butterfly or scissor mechanisms that break easily if you pry them off without knowing the specific latch design. For laptops, stick to compressed air and isopropyl swabs. If you want to remove keycaps, look up the exact procedure for your laptop model before you attempt it.
Wireless and Bluetooth keyboards
The cleaning process is identical to wired keyboards, but make sure the keyboard is powered off and any charging cables are disconnected. Avoid moisture near charging ports.

Preventing Buildup Between Cleans
A little ongoing habit makes deep cleans much less frequent.
- Eat away from your keyboard. This sounds obvious but it’s the single most effective preventive step. Crumbs are the main source of stubborn grime.
- Wash your hands before typing. Skin oil is the primary cause of keycap shine and legend wear.
- Dust weekly. A quick 60-second pass with a soft brush or compressed air once a week keeps particles from compacting into the switches.
- Use a keyboard cover when the keyboard isn’t in use, especially in dusty environments or if you have pets. Silicone covers are inexpensive and widely available for standard layouts.
For another quick maintenance task that pays off with minimal effort, How to Change a Furnace Air Filter: A Five Minute Fix shows how a similar five-minute habit keeps a different household system running smoothly.
Conclusion
Cleaning a keyboard properly isn’t complicated, but it does require a methodical approach. The quick clean — disconnect, shake, air-blast, wipe — takes five minutes and handles most day-to-day grime. The deep clean, done a few times a year, keeps your switches responsive, your keycaps looking sharp, and your typing experience consistent.
The tools involved cost very little: isopropyl alcohol, compressed air, and a microfiber cloth cover 90% of situations. If you have a mechanical keyboard worth caring about, adding a keycap puller to that kit is worth the small investment.
The longer you wait, the harder everything is to clean — that’s really the only urgent thing here. Start with the quick method today, schedule the deep clean for whenever it’s next convenient, and you’re set.