Braised Meat That Falls Apart: Why Tough Cuts Turn Tender

Why Braising Produces Melt-In-Your-Mouth Meat
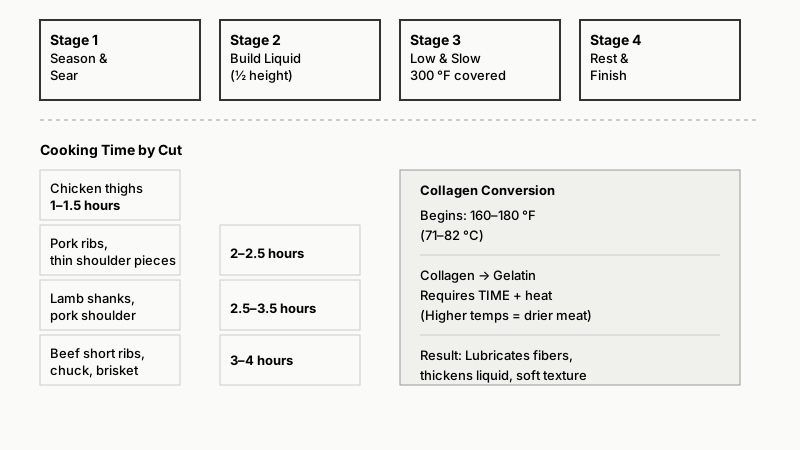
Braising is, at its core, a long wet-heat method that turns the toughest, most collagen-dense cuts into something you can pull apart with a spoon. The science behind it is straightforward: collagen — the connective tissue threaded through working muscles — begins converting to gelatin at around 160–180 °F (71–82 °C) and continues doing so over time. That gelatin thickens your braising liquid and simultaneously lubricates each muscle fiber, producing the soft, almost custardy texture that makes braised short ribs or pork shoulder so compelling.
What braising is not is a dump-it-and-forget-it method. Every decision you make — cut selection, searing, liquid ratio, temperature, timing — directly determines whether the meat genuinely falls apart or simply becomes dry and stringy. This guide covers each of those decisions in sequence.

Start with the Right Cut
This is the single most decisive step. Lean cuts — tenderloin, loin chops, chicken breast — become dry and chalky when braised for hours because they have almost no collagen to convert. For fall-apart texture, you need cuts with abundant connective tissue and often a fair amount of intramuscular fat.
Beef: Short ribs (bone-in preferred), chuck roast, brisket, oxtail, beef cheeks. Beef cheeks and oxtail are particularly collagen-rich and reward patience.
Pork: Shoulder (Boston butt), pork belly, spare ribs, ham hocks. Pork shoulder is forgiving for beginners because it has both fat and collagen in generous supply.
Lamb: Shoulder (bone-in), shanks, neck. Lamb shanks are a classic for a reason — one shank per person, braised until the meat slides off the bone with zero resistance.
Chicken: Thighs and drumsticks hold up far better than breast meat. Whole legs braised in wine or tomato sauce stay juicy where a breast would seize.
A useful rule of thumb: the harder a muscle works during the animal’s life, the more collagen it contains, and the better it suits braising. Cheeks, shanks, and shoulders work hard. Loins do not.
The Four Stages of a Proper Braise
Stage 1 — Season and Sear
Season the meat generously with salt at least 30 minutes before cooking, or overnight in the refrigerator if time allows. Salt draws moisture to the surface initially, then it’s reabsorbed, seasoning the interior more deeply.
Pat the surface completely dry before searing. Wet meat steams instead of browning. Heat a heavy pot — a cast-iron Dutch oven is ideal — over medium-high heat with a neutral oil until the oil shimmers. Sear the meat in uncrowded batches, leaving it undisturbed for 3–4 minutes per side until a deep mahogany crust forms. Do not rush this step: the Maillard reaction products created during searing add complexity to the final braise that cannot be achieved any other way.
Remove the seared meat and reduce the heat. Sauté your aromatics — diced onion, carrot, celery, whole garlic cloves — in the same fat until softened and lightly colored.
Stage 2 — Build the Braising Liquid
The liquid should never drown the meat. A classic guideline is to come no more than halfway up the sides of the meat, though denser cuts like oxtail can handle being nearly submerged. Too much liquid dilutes flavor and prevents the top of the meat from developing any caramelization during the cook.
What to use:
- Stock: Homemade beef, chicken, or lamb stock gives the richest result because it contributes its own gelatin. Store-bought low-sodium stock works; full-sodium can become aggressively salty as the liquid reduces.
- Wine: Red wine with beef and lamb; white wine with pork and chicken. Deglaze the pan with about a cup of wine after the aromatics, scraping up every brown bit, and reduce it by half before adding stock. Reducing cooks off harsher alcohol notes.
- Tomato: Crushed tomatoes or tomato paste add acidity and depth. A tablespoon of tomato paste cooked briefly in the pot before deglazing concentrates its flavor significantly.
- Beer or cider: Dark stout with beef, hard cider with pork — both work beautifully.
Add herbs (thyme, bay leaf, rosemary), return the meat to the pot, and make sure everything is half-submerged.
Stage 3 — The Low and Slow Cook
This is where patience earns its reward.
Oven braising (recommended): Preheat your oven to 300 °F (150 °C). Cook the covered pot in the oven rather than on the stovetop. Oven heat surrounds the pot from all sides, producing more even cooking and fewer hot spots than a burner. Resist the temptation to raise the temperature to shorten the time — collagen conversion requires time as much as heat, and higher temperatures will cook out moisture before the collagen fully softens.
Timing by cut:
- Chicken thighs: 1 to 1.5 hours
- Pork ribs, thin pork shoulder pieces: 2 to 2.5 hours
- Lamb shanks, pork shoulder roast: 2.5 to 3.5 hours
- Beef chuck, brisket: 3 to 4 hours
- Beef short ribs, oxtail, beef cheeks: 3.5 to 5 hours
These are realistic starting ranges — actual time depends on the thickness of the cut, your oven’s accuracy, and the size of your pot. Check with a fork rather than a timer: when the tines slide in and the meat yields without resistance, it’s done.
Slow cooker: A valid alternative. Use the low setting (approximately 200 °F / 93 °C) for 8–10 hours for large cuts. The tradeoff is that you miss some evaporation-driven concentration; consider reducing the strained braising liquid on the stovetop before serving.

Stage 4 — Rest and Finish the Sauce
Once the meat is tender, remove it carefully (it will be fragile) and tent loosely with foil. Strain the braising liquid through a fine-mesh sieve into a saucepan. Skim the fat — or chill it overnight; the solidified fat lifts off in a single layer, the cleanest method. Then reduce the liquid over medium heat until it reaches a glossy, sauce-like consistency. This usually takes 10–20 minutes depending on volume.
Taste and adjust: a small splash of good vinegar or a squeeze of lemon brightens the sauce and balances the richness. A pat of cold butter whisked in off the heat (a monte au beurre) adds gloss and body without making it taste overtly buttery.
Return the meat to the sauce briefly to warm through and absorb flavor, then serve.
If you want to understand why resting matters so much for texture and juiciness, check out How to Rest Meat After Cooking: Texture & Juiciness Guide.
Common Mistakes and How to Avoid Them
Wrong cut: No amount of technique rescues a braised chicken breast. Commit to collagen-rich cuts.
Too high a temperature: Braising at 350 °F+ pushes meat past tender and into dry and grainy. If you’re short on time, a slightly larger cut braised at 300 °F for longer beats a smaller piece rushed at higher heat.
Too much liquid: Braising, not boiling. Keep the liquid at or below the midpoint of the meat.
Skipping the sear: Some cooks skip searing for convenience. The braise will be edible, but the flavor difference is real and noticeable — the fond (the browned bits) carries a disproportionate amount of the final depth.
Underseasoning: Braising liquid dilutes surface seasoning. Be generous with salt at every stage — on the meat before searing, in the liquid itself, and again when finishing the sauce.
Opening the lid repeatedly: Each time the lid comes off, the pot loses heat and moisture. One check per hour is plenty.
Make-Ahead Is Not Just Allowed — It’s Better
Braised meat is almost always better the next day. The meat re-absorbs the sauce as it cools, and resting overnight allows flavors to harmonize in a way that a two-hour rest never quite matches. This makes braising ideal for entertaining: braise the day before, refrigerate the meat in its reduced sauce, and gently reheat (covered, low oven around 275 °F / 135 °C) for 30–45 minutes before serving.

Frequently Asked Questions
Why is my braised meat tough even after hours of cooking?
Either the temperature was too high and the meat dried out, or the cut had too little collagen to begin with. Check your oven temperature with an independent thermometer — many household ovens run 25–50 °F hotter than their dial indicates. If you used the right cut and the meat is still tough after the expected time, it simply needs more time; return it to the oven covered for another 30–60 minutes.
Can I braise without wine or alcohol?
Yes. Replace wine with an equal volume of unsalted stock plus a tablespoon of apple cider vinegar or a splash of grape juice for acidity and body. The flavor profile will differ but the technique works the same way.
How do I know when the braise is truly done?
Insert a fork or skewer into the thickest part and twist gently. The meat should yield and start to pull apart with minimal force. A knife should slide through with almost no resistance. Don’t judge by internal temperature alone — temperature tells you food safety, not tenderness.
Do I need to brown the vegetables too?
Browning the aromatics (onions, carrots, celery) adds depth, but it matters less than searing the meat. If time is short, a light 5-minute soften is sufficient.
Can I braise frozen meat?
Technically possible, but not recommended. Frozen meat releases a large amount of water as it thaws in the pot, which dilutes the liquid and interferes with proper braising. Thaw completely in the refrigerator beforehand — for food safety, always thaw in the refrigerator rather than at room temperature.
Putting It Together
Fall-apart braised meat comes down to a simple logic: the right cut, patient low heat, enough time for collagen to do its work, and attention to the sauce at the end. Nothing about the method is difficult — the main discipline is resisting shortcuts. A beef cheek braised at 300 °F for four and a half hours will reward you in a way that no amount of technique applied to a sirloin ever can. Choose your cut carefully, trust the low temperature, and let time be the main ingredient.
Once you’ve mastered the technique here, you might enjoy expanding your repertoire with 12 Slow Cooker Comfort Food Recipes Worth Making.