Beginner Guide to Bullet Journaling: Start Strong

Bullet journaling sits at a strange intersection — it’s a productivity system rigorous enough to replace a planner, flexible enough to double as a sketchbook, and personal enough that no two people’s journals look the same. If you’ve been circling the idea without knowing where to jump in, this guide cuts through the noise and gets you actually started.
What Is Bullet Journaling, and Why Does It Work?
The bullet journal method was created by designer Ryder Carroll, who developed it as a way to manage his own ADHD and scattered task lists. He published the system online in 2013 and later expanded it into a book, The Bullet Journal Method (2018). At its core, the system is an analog organizational tool that uses rapid logging — short, symbol-coded entries — to track tasks, events, and notes in a single notebook.
Why it sticks when apps don’t for many people comes down to friction and intentionality. Writing by hand creates a mild cognitive speed bump that forces you to decide whether something is actually worth recording. Research published in Psychological Science has shown that longhand note-taking improves comprehension and retention compared to typing, largely because you’re forced to paraphrase rather than transcribe. That same principle applies to planning.
Bullet journaling also doesn’t lock you into a pre-printed structure. A planner bought in January forces weekly spreads whether you need them or not. A bullet journal expands and contracts with your actual life.

The Four Core Concepts You Need First
Before you touch a notebook, understand the four building blocks Carroll laid out. Everything else in the community — the elaborate layouts, the color-coded themes — is optional decoration on top of these.
1. Rapid Logging
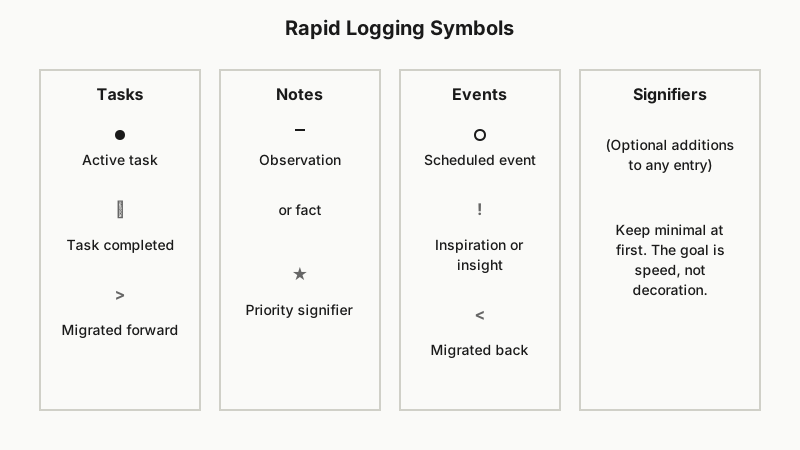
Rapid logging is the language of the system. Each entry is a short line (a bullet) prefixed by a symbol that signals its type:
- • (dot) — a task, something you need to do
- – (dash) — a note, an observation, a fact
- ○ (circle) — an event, something that happened or is scheduled
- × (X through a dot) — a task completed
- > (migration arrow) — a task moved forward to the next period
- < (back-migration arrow) — a task moved to the future log
You can add signifiers on top — a star for priority, an exclamation for inspiration. Keep it minimal at first. The goal is speed, not decoration.
2. The Index
Your index lives at the front of the notebook. Every time you start a new collection or spread, you record its title and page numbers there. Think of it as a table of contents you build as you go. This is what prevents the notebook from becoming a disorganized dump.
Number your pages before you start — or buy a notebook that comes pre-numbered (Leuchtturm1917 is the most commonly recommended for this reason, though any dotted or grid notebook works).
3. The Collections
Collections are the organizational units. Carroll defines four standard ones:
Daily Log — the workhorse. Each day gets a header with the date, and you rapid-log tasks, notes, and events as they arise. You don’t plan the entire day in advance here; you capture throughout the day.
Monthly Log — a two-page spread at the start of each month. One page acts as a calendar (dates listed vertically, events noted beside them); the other is a task list of things you want to accomplish that month.
Future Log — a grid divided into future months, placed near the front of the journal. When something comes up that belongs three months from now — a dentist appointment, a deadline — it goes here, away from your active pages.
Weekly Log — Carroll didn’t originally include this, but most beginners find it useful. A simple grid or list showing the week ahead, pulled from the monthly log, with space to plan daily tasks.
Beyond these, you can add any collection you need: a reading list, a habit tracker, a grocery rotation, a project breakdown. Collections are just named, indexed pages.
4. Migration
Migration is what separates this system from a to-do list you forget about. At the end of each day, you scan your daily log. Completed tasks get an ×. Irrelevant ones get a line through them. Remaining tasks get evaluated: does this actually matter? If yes, migrate it — forward with a > to tomorrow’s log, or back with a < to the future log if it’s non-urgent. If you find yourself migrating the same task repeatedly, that’s a signal. Either do it, delete it, or admit it belongs somewhere else.
The same process happens monthly: scan the month’s task list, migrate forward what’s real, cross out what isn’t.

Setting Up Your First Bullet Journal: Step by Step
Here’s a practical sequence that avoids the paralysis most beginners hit when they try to make everything perfect before they’ve started.
Step 1: Choose a notebook you won’t treat as precious. A cheap dotted Muji notebook works as well as an expensive one. Save the beautiful notebook for your second journal, once you know what you actually need. Dotted or grid paper is preferable to ruled — the dots give you structure without overpowering hand-drawn layouts.
Step 2: Number your pages. If your notebook isn’t pre-numbered, write page numbers in the bottom corners of the first 50 pages. Do more as you go. Don’t try to number every page at once — it kills momentum.
Step 3: Set up your Index (pages 1–4). Leave four pages blank at the front. Write at the top of page 1. You’ll fill this in as you go.
Step 4: Create your Future Log (pages 5–8). Divide four pages into sections, one per month. Label them. Write in any known appointments or deadlines.
Step 5: Set up your first Monthly Log. Two pages. Left side: list the dates of the month vertically (1–30/31), write the day abbreviation beside each, and note any events. Right side: task list for the month.
Step 6: Start a Daily Log. Write today’s date as a header. Start logging. That’s it.
Don’t set up a yearly overview, a habit tracker, a mood wheel, a book log, and a gratitude page on day one. Build those in when you discover you actually need them.
Common Mistakes Beginners Make
Trying to make it Instagram-worthy immediately. The elaborate layouts you see online took people months or years to develop. They’re also often made by people whose hobby is the journal itself — decorating is their purpose, not the productivity. Your first journal will be ugly. That’s correct.
Skipping migration. Without migration, the bullet journal is just a notebook. The daily review is what makes the system self-correcting.
Adding too many collections. Every collection you add is a commitment to maintain. Start with the four core ones. Add a new collection only when you notice you need it.
Using the wrong pen. This sounds trivial but isn’t. If you hate writing in your journal because the ink bleeds through or the pen skips, you’ll stop using it. A 0.5mm pigment liner (Staedtler, Sakura Pigma Micron, or Uni Pin are solid choices) or a smooth ballpoint keeps entries clean without bleed-through on most notebook papers.
Treating missed days as failure. Skip a week? Open the journal and start a new daily log for today. The system has no memory of your absence.
How to Make the System Your Own
Once you’ve run through one full month with the basics, you’ll know what’s missing. Common additions that genuinely add value:
Habit tracker: A simple grid where rows are habits (sleep, exercise, reading) and columns are days. Filling in a cell takes two seconds and makes patterns visible over time.
Weekly review: A short Sunday ritual where you look at next week’s monthly log, set up a weekly spread if you use one, and check your future log for anything upcoming.
Project pages: Any multi-step task deserves its own collection — a home renovation, a job search, a writing project. Break it into sub-tasks, index it, and reference it from your daily log.
Brain dump: When your head is full, give yourself a page and write everything down without order. Then migrate actionable items into the proper places. This isn’t an official collection, but it’s one of the most useful practices in the system.

If you want to pair your bullet journal with a dedicated daily writing practice, How to Start a Daily Journaling Habit That Actually Sticks offers practical tips for making the habit last.
Choosing the Right Tools (Without Overspending)
You need exactly two things: a notebook and a pen. Everything else is optional.
Notebooks worth considering:
- Leuchtturm1917 A5 — pre-numbered pages, quality paper, a proper index section, and an elastic closure. The community standard for a reason.
- Muji A5 dotted — cheaper, thinner paper, but perfectly functional for a first journal.
- Scribbles That Matter — good bleed resistance, hardcover, pre-numbered. A solid mid-range choice.
Pens that work well:
- For everyday writing: Staedtler Triplus Fineliner, Uniball Jetstream ballpoint
- For headers: a slightly broader brush pen like the Tombow Fudenosuke (soft tip)
- For color accents: Zebra Mildliners or similar pastel highlighters that don’t bleed through
You don’t need all of these. One good pen is enough.
For readers who want their journaling setup to reflect a broader lifestyle shift, Minimalism for Beginners: Start Small, Change Everything explores how to keep possessions and routines simple.
Conclusion
The bullet journal is not a creative project you need to be ready for — it’s a practical tool you figure out by using. Start ugly, start small, and run the system as designed for at least one full month before you customize. The core loop — log, reflect, migrate — is more powerful than any layout you could design.
If you miss days, come back. If a collection stops working, stop using it. The only wrong way to bullet journal is to keep your notebook closed.
Open it today. Write tomorrow’s date. You’re already started.