How to Start a Sourdough Starter: Setup & Maintenance Guide

Sourdough is one of the oldest forms of leavened bread, and the living culture at its heart — the starter — is both simpler and more forgiving than most beginners expect. You don’t need a kitchen scale made in Switzerland or heritage grain from a small-batch mill. You need flour, water, time, and a consistent hand. This guide walks you through exactly how to build a starter from scratch and keep it healthy for years.
What Is a Sourdough Starter, Really?
A sourdough starter is a fermented mixture of flour and water that captures wild yeast and lactic acid bacteria (LAB) from your flour and environment. Those two microbial communities work together: the wild yeast (primarily Saccharomyces cerevisiae and related species) produces carbon dioxide that makes dough rise, while LAB — mostly Lactobacillus strains — generate lactic and acetic acids that give sourdough its characteristic tang.
Unlike commercial yeast, which is a single concentrated strain, a mature starter is a dynamic ecosystem. That’s why starters from San Francisco, rural Vermont, or a kitchen in Oslo taste noticeably different from one another. Flour variety, local water chemistry, ambient temperature, and even the baker’s hands all shape the microbial community over time.

Starting a Sourdough Starter From Scratch
Building a new starter takes roughly 7–14 days. The exact timeline depends on your kitchen temperature and flour type. Don’t rush it.
What You’ll Need
- Flour: Whole wheat or rye flour for the first few days — both carry more wild yeast and bacteria than white flour because the grain’s outer bran is left intact. You can transition to bread flour later.
- Water: Filtered or left-out tap water is fine. Heavily chlorinated tap water can slow fermentation, so if your starter seems sluggish, try filtered water.
- A clean jar: A tall, wide-mouthed jar (1-quart / 1-litre capacity) gives you room to watch the starter rise and fall without overflow.
- A kitchen scale: Weight measurements are more reliable than volume. A modest digital scale is worth every penny here.
- A rubber band or tape: Mark the jar at the starter’s current level after each feeding so you can track how much it rises.
- A loose lid or cloth: The starter needs airflow, not an airtight seal.
Days 1–2: The First Mixture
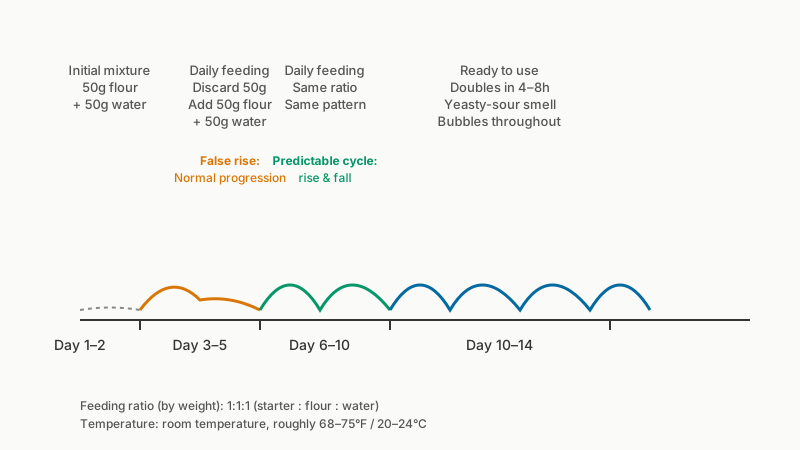
Combine 50 g whole wheat or rye flour with 50 g water (room temperature, roughly 68–75°F / 20–24°C). Stir vigorously — this aerates the mixture and kick-starts fermentation. Cover loosely and leave at room temperature.
In the first 24–48 hours you may see small bubbles or a bit of expansion. You might also notice a sharp, almost unpleasant smell — that’s normal. Early fermentation is dominated by less desirable bacteria that will be displaced as the culture acidifies.
Days 3–5: Early Activity and the First Discard
Begin feeding once per day. The process is the same each time:
- Discard most of the starter — keep only 50 g.
- Add 50 g of flour (you can now mix whole wheat with all-purpose or bread flour if you like).
- Add 50 g of water.
- Stir well, cover loosely, and mark the jar.
The discard step feels wasteful, but it’s essential. Removing excess starter prevents acid buildup from overwhelming the yeast, and it keeps the quantity manageable. The discarded portion can go straight into pancakes, crackers, or flatbreads — nothing is truly wasted.
Around day 3 or 4, you’ll likely see a surge of activity followed by a crash. This is the “false rise,” driven by leuconostoc bacteria that eventually die off as acidity rises. It’s a sign the culture is progressing normally, not a sign of success — keep feeding.
Days 6–10: Building Consistency
By now the starter should smell pleasantly sour — like yogurt, or lightly vinegary. You’re looking for a predictable pattern: it rises after feeding, peaks with a domed top and bubbles throughout, then falls. That peak-to-fall cycle is the rhythm you’ll work with forever.
If activity is slow, try these adjustments:
- Move the jar somewhere warmer (top of the refrigerator, near a sunny window, or inside an oven with just the light on).
- Switch to 100% whole rye flour temporarily — rye accelerates fermentation noticeably.
- Feed twice daily instead of once.
Days 10–14: The Float Test (and Why to Use It Carefully)
The classic “float test” — dropping a small spoonful of starter into water to see if it floats — indicates the presence of gas bubbles and some level of activity. However, it’s an imprecise measure of readiness. A more reliable check: your starter should reliably double (or more) in size within 4–8 hours of feeding at room temperature, smell yeasty-sour rather than just sour, and show a network of bubbles throughout when you look at it from the side.
Once you hit that benchmark consistently for two or three days in a row, your starter is ready to leaven bread.

How to Maintain a Sourdough Starter Long-Term
A mature starter is low-maintenance — you don’t need to baby it daily unless you’re baking frequently. The two main maintenance modes are room temperature feeding (for active bakers) and refrigerator storage (for everyone else).
Room Temperature Feeding
If you bake several times a week, keep the starter on the counter and feed it once or twice daily using the same 1:1:1 ratio (1 part starter : 1 part flour : 1 part water by weight). Feed it at roughly the same time each day so you understand its rhythm. Use it when it hits peak rise — that’s when yeast activity and gas production are highest.
A warmer kitchen (above 78°F / 26°C) means the starter will peak faster, sometimes within 3–4 hours. A cooler kitchen extends the cycle to 8–12 hours. Neither is wrong; adjust your schedule accordingly.
Refrigerator Storage
For bakers who make one or two loaves a week — or less — the refrigerator is your friend. After feeding, let the starter sit at room temperature for 1–2 hours (so fermentation gets a head start), then transfer it to the fridge. The cold slows microbial activity dramatically; a well-fed starter can sit in the refrigerator for 1–2 weeks without feeding, though weekly feeding is ideal to keep the culture vigorous.
To bake from a refrigerated starter:
- Take it out the night before or morning of baking.
- Discard down to 50 g and feed it (50 g flour, 50 g water).
- Wait until it doubles — usually 4–8 hours at room temperature — then use it.
Some bakers do a second feeding to ensure peak activity; this is worth it if the starter has been dormant for more than a week.
Hydration Ratios: What They Mean
The ratio of water to flour in a starter is called its hydration. The 1:1 ratio described above produces a 100% hydration starter — a thick, pourable batter. Some bakers prefer a stiffer starter (60–75% hydration), which ferments more slowly, produces more acetic acid (sharper tang), and is easier to handle for scoring. Others use higher hydration (125%) for faster, milder fermentation.
Start at 100% and experiment once you’re comfortable. The starter’s character will shift within a few feedings when you change hydration.
What Those Liquid Layers Mean
If you open your jar and find a grayish or dark liquid sitting on top of the starter, don’t panic. That liquid — bakers call it “hooch” — is alcohol produced by yeast when the culture is hungry. It signals overdue feeding, not spoilage. Pour it off (or stir it back in for extra sourness), then feed as normal.
Actual spoilage is rare in a well-maintained starter. Signs to watch for: pink or orange streaks (discard the starter and start over), fuzzy mold growth that isn’t just a dry crust, or a genuinely foul smell that doesn’t resolve after two or three feedings.
Long-Term Storage: Freezing and Drying
If you’re traveling or taking a long break from baking, you have two solid options:
- Freeze it: Spoon a portion of mature starter into a zip-lock bag or freezer-safe container. It can keep for months. Thaw in the fridge, then bring to room temperature and feed several times to revive.
- Dry it: Spread a thin layer of starter on parchment paper and let it air-dry completely (12–24 hours). Break the dried flakes into small pieces and store in an airtight container. Dried starter can last years. To revive, rehydrate with a small amount of water, then feed as if starting fresh — it usually takes 3–5 days to become active again.

Common Mistakes and How to Fix Them
Feeding on a rigid schedule regardless of the starter’s state. The starter tells you when it’s hungry by rising and falling. Watch the cycle, not just the clock.
Using too much starter in the feed ratio. A 1:1:1 ratio (starter : flour : water) is a common starting point, but if your starter is very active and acidic, switch to 1:2:2 or even 1:5:5 to give the yeast more food and space.
Giving up after the false rise. That early surge around days 2–4 is not your mature starter; it’s leuconostoc bacteria that fizzle out on their own. Keep feeding.
Baking before the starter is truly established. A starter that doubles in size once isn’t necessarily consistent. Wait until it does so reliably, three days in a row, before depending on it for bread.
Keeping too large a quantity. More starter means more flour consumed per feeding and more waste. 50–100 g is plenty for most home bakers.
Making the Most of Your Discard
Discard isn’t garbage — it’s partially fermented flour with genuine flavor. Use it in:
- Sourdough pancakes and waffles (substitute discard for part of the flour and liquid)
- Cracker dough (mix with olive oil, herbs, and a pinch of salt, roll thin, bake until crisp)
- Flatbreads (discard mixed with a little oil makes a fast, tasty flatbread even without added leavening)
- Pizza dough (replace 20–30% of the flour with discard for added flavor depth)
Refrigerating discard in a separate jar extends its life for up to a week, giving you time to decide how to use it.
Conclusion
A sourdough starter rewards patience more than precision. The first week can feel uncertain — odd smells, inconsistent bubbles, that dramatic false rise — but the culture is almost always progressing exactly as it should. Once established, a starter is remarkably resilient: it survives neglect, travels across time zones in a freezer bag, and can be revived from dried flakes years later.
The practical advice: start with whole grain flour, watch the rise-and-fall cycle rather than the clock, keep quantities small, and use your discard rather than tossing it. Bake a loaf when your starter doubles reliably, smell it with curiosity rather than anxiety, and adjust based on what you observe. The skill builds fast once you start paying attention.
When it doubles on schedule and floats in water, it’s ready for its first loaf — How to Bake Sourdough Bread from Scratch picks up from there with mixing, shaping, proofing and the bake itself.