How to Make Homemade Whipped Cream: The Cold Bowl Secret

Making whipped cream at home takes about five minutes and produces something that bears almost no resemblance to the shelf-stable foam in a pressurized can. The texture is lighter, the flavor is richer, and you control every ingredient. If you’ve ever wondered why restaurant desserts taste so much better, this is often the answer.
This guide walks through the full process — from choosing the right cream to fixing a batch that’s gone too far — so you get perfect results every time.
The One Ingredient That Actually Matters
Heavy whipping cream is non-negotiable. Look for a fat content of at least 36% — in most grocery stores, cartons labeled “heavy cream” or “heavy whipping cream” sit right at 36–40% fat. That fat is what traps air as you whip, forming the stable foam we’re after.
“Whipping cream” (sometimes called “light whipping cream”) typically contains 30–36% fat. It will whip, but the result is softer and collapses faster. Half-and-half and whole milk don’t have enough fat to whip at all.
A note on ultra-pasteurized cream
Most supermarket cream is ultra-pasteurized (UHT), meaning it’s been heated to around 280°F (138°C) for a short time to extend shelf life. It whips fine — just start with it very cold, since the process takes slightly longer than with pasteurized cream.
If you can find pasteurized (not ultra-pasteurized) cream from a local dairy, the flavor is noticeably fresher and it tends to whip a little faster.

Equipment and the Cold Factor
You don’t need a stand mixer. A hand mixer, a whisk, or even a jar with a tight lid all work. What every method shares is one requirement: everything should be cold.
- Bowl and beaters: Put your metal mixing bowl and the beater attachments in the freezer for 10–15 minutes before you start. A cold bowl keeps the cream from warming up as friction builds during mixing.
- The cream itself: Pour cream straight from the refrigerator. If it’s been sitting on the counter for 20 minutes, return it to the fridge for another 15.
- Room temperature: A hot kitchen is the enemy. If your kitchen is above 75°F (24°C), work quickly and consider placing your mixing bowl over a larger bowl of ice water.
Methods compared
| Method | Time to soft peaks | Best for |
|---|---|---|
| Stand mixer (whisk attachment) | 1–2 minutes | Large batches |
| Hand mixer | 2–3 minutes | Everyday use |
| Balloon whisk by hand | 4–6 minutes | Small amounts, no electricity |
| Mason jar (shake method) | 3–5 minutes | Kids, camping, novelty |
The mason jar method genuinely works: pour cream halfway into the jar, seal it, and shake vigorously. It’s a workout, but it produces soft whipped cream and makes a good kitchen project with children.
The Step-by-Step Process
Once your equipment is cold and your cream is ready, the actual technique is straightforward.
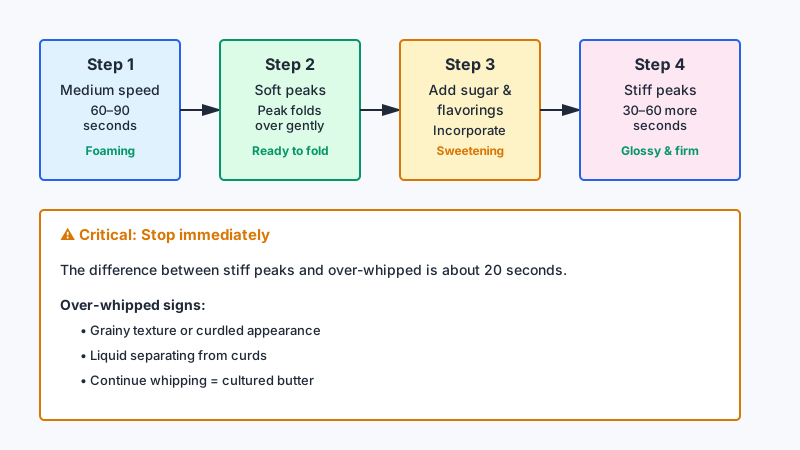
1. Start on medium speed. Beginning at high speed causes large, unstable bubbles and can lead to grainy cream. Medium speed (setting 4–6 on most hand mixers) builds a finer, more stable foam.
2. Watch for soft peaks. After 60–90 seconds with a hand mixer, stop and lift the beaters. If the cream forms a peak that gently folds over at the tip, you’re at soft peaks — ideal for folding into mousses or serving alongside fruit.
3. Add sugar and flavorings. Once soft peaks form, add your powdered sugar and vanilla. Adding them too early can inhibit whipping; too late and they don’t fully incorporate.
4. Continue to stiff peaks. Beat another 30–60 seconds. The cream should hold a firm peak that stands straight up when the beaters are lifted. It should look smooth and glossy, not grainy.
5. Stop immediately. This is where most batches go wrong. The difference between stiff peaks and over-whipped cream is about 20 seconds at high speed. Set a timer or check every few seconds.

Sweetener options
- Powdered (confectioners’) sugar: The standard choice. It dissolves instantly and contains a small amount of cornstarch, which actually helps stabilize the cream.
- Granulated sugar: Works, but use slightly less and make sure it fully dissolves before you stop mixing.
- Honey or maple syrup: Add a tablespoon per cup of cream. Both add flavor and a slight chewiness to the texture.
- No sugar: Unsweetened whipped cream is excellent with savory dishes, spiced pies, and strong coffee drinks.
A standard ratio: 1 cup heavy cream → 2 tablespoons powdered sugar → ½ teaspoon vanilla extract. This yields about 2 cups of whipped cream.
For more ideas on balancing sweetness and acidity in homemade condiments, check out 12 Homemade Salad Dressing Recipes Worth Making.
Flavoring Variations Worth Trying
Once you have the base technique down, whipped cream becomes a canvas. A few combinations that work particularly well:
- Brown butter whipped cream: Whisk a tablespoon of cooled brown butter into the cream before whipping. Works beautifully on apple pie.
- Espresso whipped cream: Add a teaspoon of instant espresso powder with the sugar. Excellent on chocolate desserts.
- Citrus zest: A teaspoon of lemon or orange zest brightens the cream noticeably — good with berry desserts and cheesecake.
- Bourbon or rum: A tablespoon of spirit adds depth without making the cream boozy. It also slightly extends holding time.
- Spiced cream: A quarter teaspoon of cinnamon or cardamom changes the whole character of the cream.
Keep extras mild. Liquid additions beyond about two tablespoons per cup of cream start to interfere with stability.
If you enjoy playing with textures and add-ins, How to Make a Smoothie Bowl at Home: The Thick Base Secret offers another cold, creamy canvas for similar flavor experiments.
How to Stabilize Whipped Cream So It Holds Longer
Freshly whipped cream is best used within an hour or two. Left in the refrigerator, it gradually weeps and deflates. If you need it to hold for several hours — say, on a layered cake or a dessert you’re transporting — there are a few reliable stabilizers.
Gelatin method (most reliable for long holds): Sprinkle ¼ teaspoon of unflavored gelatin over 1½ teaspoons of cold water. Let it bloom for 5 minutes, then gently heat it until dissolved (a few seconds in the microwave). Let it cool until it’s no longer warm to the touch, then drizzle it into the cream as you whip. This can hold whipped cream for 24 hours in the refrigerator.
Cream cheese method (easy, slightly tangy): Beat 2 tablespoons of softened cream cheese until smooth, then add the cream and whip together. The tang is barely noticeable under flavorings.
Instant pudding powder: A tablespoon of vanilla instant pudding mixed with the powdered sugar works well and is popular in home baking. The starch and gums in the mix act as stabilizers.
Powdered milk: A tablespoon of nonfat dry milk powder per cup of cream is a neutral-tasting option that adds protein to help structure.

Troubleshooting: When Things Go Wrong
The cream isn’t thickening
Nine times out of ten, this means the cream or bowl wasn’t cold enough. Return everything to the fridge for 15 minutes and try again. If you’ve been whipping for more than 5 minutes and nothing is happening, the cream may be at too low a fat content — check the carton.
The cream looks grainy or curdled
You’ve over-whipped it. The fat globules have clumped together and begun separating the butterfat from the liquid. At this point, you have two choices: carefully fold in a tablespoon or two of fresh cold cream to bring it back (works if you catch it early), or keep whipping all the way to butter. Over-whipped cream makes perfectly good cultured-style butter — add a pinch of salt, drain the buttermilk, and use it.
It collapses quickly after serving
Usually a temperature issue. Serve cold and onto cold plates if possible, or use one of the stabilizers above.
It tastes flat
A small pinch of fine sea salt — even a quarter teaspoon per two cups — amplifies sweetness and flavor noticeably. Don’t skip it.
Storing Whipped Cream
Transfer leftovers to an airtight container and refrigerate. Expect to re-whisk briefly before using, as some separation is normal. Unstabilized cream keeps for up to 24 hours; gelatin-stabilized cream keeps for 2–3 days.
For longer storage, dollop whipped cream onto a parchment-lined baking sheet and freeze until solid (about an hour), then transfer the frozen mounds to a zip-lock bag. These frozen dollops keep for up to two months and can be placed directly on warm desserts — they thaw in minutes.
Conclusion
Homemade whipped cream is one of those techniques that pays disproportionate dividends. The ingredients cost almost nothing, the time investment is minimal, and the upgrade over the canned version is immediate and obvious. Cold equipment, the right fat content, and knowing when to stop — those three things cover most of what separates a good batch from a bad one. Everything else is refinement.