How to Clean a Dishwasher Properly: Where Grease And Odor Hide
Most people run a dishwasher dozens of times a month and never clean the machine itself. That’s a problem. Grease, food debris, limescale, and soap scum build up quietly inside the filter, spray arms, door gasket, and interior walls — and once that layer sets in, your dishes come out spotty, cloudy, or carrying a faint smell you can’t quite place. The fix is straightforward and takes less than an hour if you do it properly.
This guide walks through every part of the dishwasher that needs attention, in the right order, using methods that actually work.
Why Your Dishwasher Gets Dirty in the First Place
The dishwasher self-cleans in a loose sense — hot water and detergent circulate through it with every cycle. But several things prevent it from staying truly clean:
- Hard water deposits: Calcium and magnesium in tap water leave white, chalky residue on interior surfaces and heating elements. Hard water affects roughly 85% of homes in the United States, according to the U.S. Geological Survey.
- Grease accumulation: Oils and fats from plates don’t always fully emulsify, especially at lower wash temperatures. They coat the filter and spray arm holes over time.
- Food particle buildup: Small bits of food — pasta, rice, seeds — get trapped in the filter or settle at the bottom of the tub.
- Soap scum: Detergent residue, particularly from powder or pod formats, can deposit on the interior walls and the door seal.
- Mold and mildew: The warm, enclosed environment is ideal for mold growth, especially around the rubber door gasket.
Cleaning frequency depends on use. For a household that runs the dishwasher once a day, a full deep clean every four to six weeks is a reasonable target. The filter alone benefits from a quick rinse every one to two weeks.
What You’ll Need Before You Start
You don’t need specialized products. Most of what works best is already in your kitchen or easily available:
- White distilled vinegar
- Baking soda
- A soft-bristled toothbrush (dedicated to cleaning)
- Dish soap
- A small bowl or cup
- Microfiber cloth or old sponge
- Toothpick or skewer (for clearing spray arm holes)
- Commercial dishwasher cleaner (optional, but useful for heavy limescale)
If you have very hard water, a citric acid–based dishwasher cleaner — products like Affresh or similar — can shift mineral scale more aggressively than vinegar alone. That’s worth knowing upfront, because some people run vinegar cycles repeatedly on heavy buildup and wonder why it’s not working.

Step-by-Step: How to Clean Every Part of Your Dishwasher
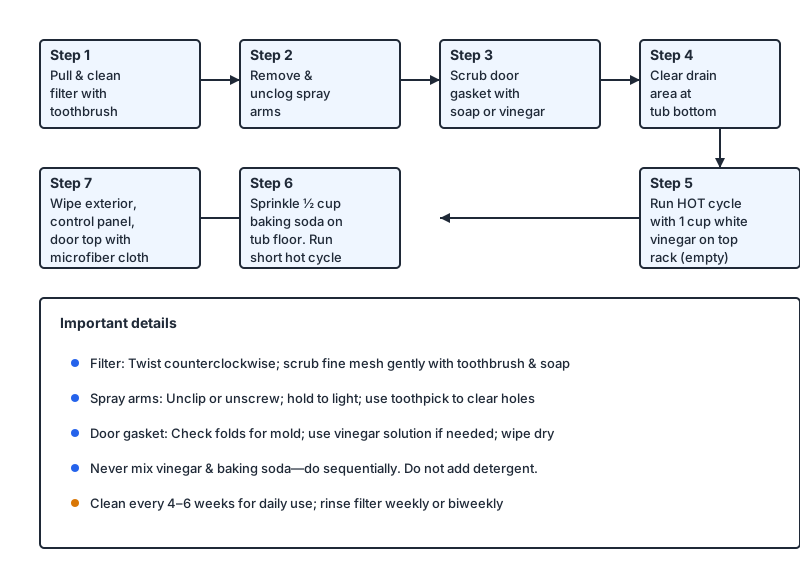
Step 1: Pull Out the Filter and Clean It
This is the most neglected part of dishwasher maintenance — and the most important.
The filter sits at the bottom of the tub, usually beneath the lower spray arm. Most modern dishwashers have a cylindrical filter that twists out counterclockwise. Check your manual if you’re unsure, but it’s almost always a quarter-turn and lift.
Once removed, rinse it under warm running water. For anything stuck — and there will usually be something stuck — use a toothbrush with a drop of dish soap. Scrub the fine mesh screen gently; it’s more delicate than it looks. Rinse thoroughly until water runs clean through the mesh, then twist it back into place.
If you’ve never cleaned the filter and your machine is a few years old, you may find a grey, greasy mat of debris in there. That’s normal and fixable; it just takes a bit more scrubbing.
Step 2: Clean the Spray Arms
Dishwashers typically have two spray arms — one beneath the bottom rack and one below the upper rack, sometimes a third at the very top. These rotate during the wash cycle and jet water through small holes to clean your dishes. When those holes get clogged, cleaning performance drops noticeably.
Remove the spray arms by unclipping or unscrewing them (most simply lift off or unscrew counterclockwise). Hold each arm up to the light and look through the holes. Use a toothpick, skewer, or thin wire to clear any blockages. Then rinse the arms under running water, shaking them to flush debris through.
Reattach them securely. A loose spray arm rattles during the cycle and sprays water unevenly.
Step 3: Wipe Down the Door Gasket
The rubber seal around the inside of the door is a prime location for mold, mildew, and trapped food. It folds over on itself, so debris hides in the folds.
Dip a toothbrush in a mixture of warm water and dish soap and scrub along the entire length of the gasket, paying attention to the folds. For mold spots, a solution of one part white vinegar to one part water applied with a cloth will usually shift them. Work around the full perimeter — top, bottom, and sides.
After scrubbing, wipe the gasket dry. Leaving it wet encourages mold to return faster.
Step 4: Clear the Drain Area
Once the filter is out, look at the drain area at the bottom of the tub. You may find standing debris, small broken glass, a lost bottle cap, or general sludge. Wipe this area with a damp cloth and remove any visible objects. A blocked drain causes poor drainage and can eventually trigger error codes on the dishwasher’s control panel.
Step 5: Run a Hot Vinegar Cycle
Place a dishwasher-safe cup or bowl filled with about 240 ml (one cup) of white distilled vinegar on the top rack. Run the hottest cycle your machine offers — typically labeled “sanitize” or “heavy wash.” Do not add detergent. Run the machine empty.
The vinegar circulates through the entire interior, loosening grease residue, dissolving light mineral deposits, and neutralizing odors. It won’t damage the interior or gaskets in this concentration, despite what some manufacturers claim in their fine print (those warnings usually refer to undiluted vinegar applied directly over long periods).

Step 6: Follow Up with Baking Soda
After the vinegar cycle finishes, sprinkle about 120 g (half a cup) of baking soda across the bottom of the tub. Run a short hot cycle. Baking soda is a mild abrasive and deodorizer — it lifts residual staining on the tub floor and leaves the interior smelling clean rather than faintly of vinegar.
Don’t mix the vinegar and baking soda steps into a single cycle. They neutralize each other when combined, producing a fizzing reaction that’s visually satisfying but chemically counterproductive. Do them sequentially.
Step 7: Wipe the Exterior and Control Panel
The outside of the dishwasher often gets overlooked. For stainless steel exteriors, a microfiber cloth dampened with a little dish soap does the job — wipe in the direction of the grain to avoid streaking. For the control panel, use a barely damp cloth; avoid spraying water directly at it, since moisture can work into the electronics over time.
Wipe the top of the door (the hidden surface that faces up when the door is open) — this area collects greasy dust and is easy to miss.
Dealing with Stubborn Problems
For a broader approach that covers your oven, microwave, and fridge alongside your dishwasher, check out How to Deep Clean Kitchen Appliances Step by Step.
Heavy Limescale Buildup
If the interior walls look white and chalky despite regular cleaning, you’re dealing with significant limescale. Citric acid is more effective than vinegar at dissolving calcium carbonate deposits. You can either use a commercial citric acid–based dishwasher cleaner (following package directions) or dissolve 60 g of food-grade citric acid powder in the detergent compartment and run a hot cycle.
For very severe buildup on the heating element specifically, a professional appliance technician can descale it — not a common necessity, but worth knowing if efficiency has noticeably dropped.
Persistent Bad Odor
If a musty or rotten smell returns quickly after cleaning, the source is almost always one of three things: a clogged drain hose, a partially blocked garbage disposal (if your dishwasher drains through it), or mold inside the door seal that wasn’t fully removed. Check the garbage disposal connection first — it’s the most common cause and the easiest fix.
White Residue on Dishes
This is usually either hard water mineral deposits or excess rinse aid. Check your rinse aid dispenser setting — most machines allow you to adjust the dosage. A setting that’s too high leaves a slick or streaky film; a setting that’s too low can leave water spots. Adjust and run a test load.

Keeping It Clean Between Deep Cleans
A few habits significantly extend the time between full cleans:
- Rinse the filter every week or two. It takes two minutes. This single habit prevents most odor and performance issues.
- Leave the door ajar after a cycle. Letting moisture escape prevents mold from taking hold. Many modern dishwashers do this automatically with an auto-open door feature, but if yours doesn’t, prop it open a few inches.
- Use a rinse aid. It’s not just for shine — rinse aid reduces water droplets clinging to interior surfaces, which slows limescale accumulation.
- Scrape plates, but don’t pre-rinse. Modern detergents need something to bind to; fully rinsed dishes can actually leave more residue because the detergent has nothing to work on. Scrape food solids off and load.
- Run hot cycles periodically. If you typically use eco or cool cycles to save energy, run a hot cycle at least once every couple of weeks. Heat kills bacteria and keeps the drain clear.
If musty smells are a recurring problem in your laundry room too, our guide How to Clean a Washing Machine: Fixing That Musty Odor tackles that specific issue.
Conclusion
Cleaning a dishwasher properly isn’t complicated — it’s mostly a matter of knowing which parts to target and doing them in a logical sequence. The filter and spray arms do most of the mechanical work; the gasket is where biology tends to set up shop; and the interior walls need chemistry (acid and base, sequentially) to stay mineral-free and odor-free.
Building in a quick filter rinse every week or two, and a full clean every month or so, keeps the machine running efficiently and your dishes genuinely clean — rather than just hot and dry.