Homemade Pizza Dough: A Step-by-Step Guide That Works

Making pizza dough from scratch is one of those kitchen skills that feels intimidating the first time and completely intuitive by the third. Once you understand what the dough is actually doing — why it rests, why it stretches, why it sometimes fights back — you can troubleshoot on the fly and turn out a solid crust every time.
This guide covers everything: ingredients, technique, timing, and the variables that make the difference between a limp base and one with real chew and char.
The Ingredients (and Why Each One Matters)
Homemade pizza dough needs only five things: flour, water, yeast, salt, and olive oil. That simplicity is exactly why ingredient quality and proportion matter more than most people expect.
Flour
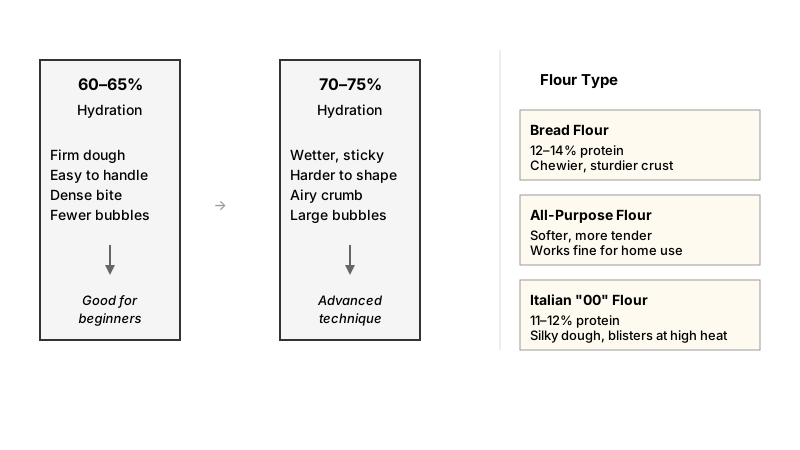
Bread flour gives you a chewier, sturdier crust because of its higher protein content — typically around 12–14% — which builds more gluten. All-purpose flour works fine and produces a slightly softer, more tender result. Italian “00” flour (finely milled, around 11–12% protein) is the classic choice for Neapolitan-style pizza; it creates a silky dough that blisters beautifully at high heat.
For most home bakers, bread flour or a blend of bread flour and all-purpose is the most reliable starting point.
Yeast
Active dry yeast and instant yeast are both widely available. Instant yeast (also called rapid-rise or fast-acting) doesn’t need to be dissolved in water first — you can add it directly to the flour. Active dry yeast benefits from a 5–10 minute bloom in warm water before mixing.
Fresh yeast, if you can find it, gives a slightly more complex flavor but has a very short shelf life.
Water
Hydration level — the ratio of water to flour by weight — shapes the texture of your finished crust. A dough at 60–65% hydration is firm, easy to handle, and yields a dense, satisfying bite. Push it to 70–75% and you get a wetter, stickier dough that’s harder to shape but produces a more open, airy crumb and those desirable large bubbles.
Start at 63% if you’re new to pizza dough. You can experiment upward as your handling technique improves.
Salt and Olive Oil
Salt strengthens gluten and controls yeast activity — it also makes the dough taste like something. Don’t skip it, and don’t add it directly on top of the yeast before mixing; high salt concentrations can inhibit yeast. Mix them separately into the dough.
Olive oil tenderizes the crumb and adds a subtle richness. Some traditional Neapolitan recipes omit it entirely, arguing it interferes with the char. For a home oven — which rarely exceeds 260°C (500°F) — a tablespoon or two actually helps the crust color and flavor.

The Basic Recipe
This makes enough dough for two 10–12 inch pizzas. Scale freely.
Ingredients:
- 500g (about 4 cups) bread flour
- 325ml (1⅓ cups) warm water (around 38°C / 100°F)
- 7g (1 standard packet) instant yeast
- 10g (1¾ tsp) fine sea salt
- 2 tbsp olive oil
Method:
-
Mix the dough. Combine flour and yeast in a large bowl. Add water and olive oil, then mix with a fork or your hands until a shaggy dough forms. Add the salt and keep mixing until no dry flour remains.
-
Knead. Turn the dough out onto a lightly floured surface and knead for 8–10 minutes until it’s smooth, elastic, and springs back when you poke it. You can also use a stand mixer with a dough hook on medium speed for 6–7 minutes. The dough should clear the sides of the bowl but remain slightly tacky at the base — don’t add too much extra flour.
-
First rise. Shape the dough into a ball, place it in a lightly oiled bowl, cover with plastic wrap or a damp cloth, and let it rise at room temperature until doubled — roughly 1–1.5 hours, depending on the temperature of your kitchen.
-
Divide and shape into balls. Punch the dough down gently, divide it into two equal pieces (about 400g each), and shape each into a tight ball. Place them on a floured tray or plate, cover again, and let them rest for at least 15–30 minutes before shaping.
-
Shape the pizza. Use your hands, not a rolling pin if you can help it. Press the dough from the center outward, then gently stretch it over your knuckles or by rotating and pulling it in the air. Rolling crushes the gas bubbles and produces a denser, cracker-like base.
If you enjoy working dough by hand, you might also like Easy Homemade Pasta Recipes for Beginners: 7 Doughs to Try, which walks through several other homemade doughs worth mastering.
The Cold Fermentation Method (Worth the Wait)
If you have 24–72 hours to plan ahead, cold-ferment the dough in the refrigerator after the first rise. This slow fermentation is the single biggest upgrade you can make to flavor.
During cold fermentation, yeast works slowly and produces a wider range of organic compounds. The result is a crust with genuine depth — slightly tangy, more complex, with better aroma. Pizzerias that you remember often cold-ferment for 48–72 hours.
How to do it: after the first rise, divide and ball the dough, place each ball in a lightly oiled container with a lid, and refrigerate. Pull them out 1–2 hours before baking to come to room temperature, which makes the gluten relax and the dough easier to stretch.

Baking: Heat Is Everything
Your oven’s maximum temperature matters more than almost any other baking variable. A wood-fired pizza oven hits 400–500°C (750–900°F) and bakes a pizza in 60–90 seconds. A home oven tops out at roughly 250–260°C (480–500°F), so you need to compensate with the right equipment and technique.
Use a Pizza Stone or Steel
A baking stone or, better yet, a pizza steel preheated for at least 45–60 minutes at your oven’s maximum temperature is the closest approximation to a deck oven. Steel conducts heat more aggressively than stone, which means faster browning on the underside. Either is vastly better than a cold baking sheet.
Slide the pizza onto the preheated surface using a lightly floured pizza peel or the back of a sheet pan. If the dough is sticking, use a mix of flour and fine semolina — semolina acts like tiny ball bearings and helps the dough slide freely.
Broiler Trick
For the last 2–3 minutes of baking, switch on your oven’s broiler (grill) element. This scorches the top of the pizza — cheese bubbles and browns, crust blisters at the edges — and gets you closer to that leopard-spotted, wood-fired look. Watch it carefully; it can go from “perfectly charred” to “burnt” in under a minute.
Baking Time
At 260°C (500°F) on a preheated steel, a 10-inch pizza typically bakes in 6–9 minutes. Thicker crusts and more toppings need longer; thin Neapolitan-style bases can be done in 5–6.
Once your pizza is baked to perfection, keep Best Way to Reheat Leftover Pizza: 6 Methods Ranked handy for the inevitable leftovers.
Common Problems and How to Fix Them
Dough springs back when you try to stretch it. This is tight gluten. Let the dough rest for another 10–15 minutes, then try again. Don’t fight it.
Crust is too dense and bread-like. You may have added too much flour during kneading, or didn’t let it ferment long enough. Try a longer rest and a slightly wetter dough next time.
Bottom is pale and soft, top is done. The baking surface wasn’t hot enough. Preheat the stone or steel longer — 45–60 minutes minimum.
Dough is sticky and impossible to handle. This is normal at higher hydration. Work quickly, use a light dusting of flour, and resist the urge to dump in more — excess flour toughens the crust and throws off your hydration ratio.
Yeast didn’t activate (dough didn’t rise). Check the water temperature — too hot (above 49°C / 120°F) kills yeast, too cold slows it dramatically. Also check the expiration date on the yeast.

Storing and Freezing Dough
Refrigerated dough balls keep for up to 3 days before they start to over-ferment and develop an unpleasantly sour, almost alcoholic smell. If you want to keep them longer, freeze them.
To freeze: ball up the dough after the first rise, coat lightly in olive oil, and seal each ball in a zip-lock bag with the air pressed out. They keep well for up to 3 months. Thaw overnight in the refrigerator, then bring to room temperature before shaping.
Topping Ratios Worth Knowing
Homemade dough deserves restraint on the toppings. For a 12-inch pizza:
- Sauce: 3–4 tablespoons (about 60–80g). More than this and the crust goes soggy.
- Cheese: 80–100g of fresh mozzarella (or about ¾ cup of low-moisture shredded). Pile on too much and it pools into a greasy puddle.
- Toppings: Keep it to 2–3 items. Each additional ingredient adds moisture and weight, both enemies of a crispy crust.
If you’re using fresh mozzarella, tear it by hand and pat the pieces dry with paper towels before topping. The excess moisture is the main culprit behind watery, disappointing pizza.
A Practical Conclusion
The gap between good homemade pizza and great homemade pizza usually comes down to two things: time and heat. Give the dough at least 24 hours in the fridge if you can — even if that’s all you change — and get your baking surface properly hot before the pizza goes in.
Everything else is practice. The dough will feel strange the first time you stretch it, and the shaping will be imperfect. That’s fine. Even a misshapen pizza made from properly fermented dough, baked on a hot steel, will taste better than most takeout. After a few rounds, your hands learn what the dough is telling them, and the whole process becomes second nature.