How to Unclog a Showerhead: Dissolving Mineral Buildup With Vinegar

A showerhead that sprays in random directions — or barely sprays at all — is almost always a mineral buildup problem. Hard water deposits calcium and magnesium inside the nozzles over time, blocking or redirecting the flow until what used to feel like a proper shower feels like a garden hose with a kink in it. The fix is straightforward, requires no special plumbing skills, and costs almost nothing.
This guide walks through every practical method, from a 30-minute vinegar soak to a full disassembly clean, so you can match the approach to how bad the buildup actually is.
Why Showerheads Clog in the First Place
The culprit is almost always limescale — the white or yellow-ish crust that forms when hard water evaporates and leaves its mineral content behind. Water hardness is measured in grains per gallon (gpg) or milligrams per liter; anything above 7 gpg is considered hard, and a large portion of households in regions like the American Midwest, southern England, and the Middle East deal with water in the 10–25 gpg range.
Limescale accumulates fastest in the small rubber nozzles (called spray jets or spray holes) at the face of the showerhead. Modern showerheads often have flexible silicone nozzles specifically because they’re easier to clean — you can literally rub the deposits off with a finger. Older or cheaper models use rigid plastic or metal holes, which require soaking to dissolve the buildup.

A secondary cause is sediment — fine sand or rust particles that travel through older pipes and physically plug the nozzles. If your water supply comes from a well or you live in a building with aging iron pipes, sediment may be as much of a problem as mineral scale.
Hard water isn’t just hard on showerheads—it affects your whole home’s systems, which is one of many reasons covered in How to Make Your Home More Energy Efficient: Seal, Insulate, Save.
Before You Start: What You’ll Need
For most methods, you only need a few things:
- White distilled vinegar (the cheap gallon jugs work perfectly — acetic acid dissolves calcium carbonate)
- A plastic bag large enough to fit over the showerhead
- Rubber bands or zip ties to secure the bag
- An old toothbrush or small scrub brush
- Needle-nose pliers or an adjustable wrench (only if you’re removing the head)
- Plumber’s tape (PTFE tape) — useful when reattaching the head
- CLR or a similar calcium/lime remover for heavy buildup
For most clogs, you won’t need to spend a dollar. If you have vinegar in the kitchen, you’re already equipped.
Method 1: The Bag Soak (No Removal Required)
This is the best starting point if the clog is mild to moderate and you’d rather not unscrew anything.
- Fill a plastic bag with enough white vinegar to fully submerge the showerhead face when the bag is tied over it.
- Slip the bag over the showerhead so the face is completely submerged in the vinegar.
- Secure it tightly with a rubber band or zip tie around the neck of the showerhead arm.
- Leave it for at least one hour — overnight is better for heavy deposits.
- Remove the bag, run the shower on hot for 30–60 seconds to flush loosened deposits through the nozzles, then scrub the face with an old toothbrush.
For chrome or nickel finishes, don’t leave vinegar on longer than 8 hours — prolonged exposure can dull the finish. Brushed brass is more sensitive; limit to 30 minutes and rinse thoroughly.
Method 2: Rub the Nozzles by Hand
If your showerhead has soft silicone spray jets (they look like small rubber bumps), this takes about two minutes.
Turn off the water, then simply massage each nozzle with your thumb in a circular motion. The flexible material breaks limescale loose without any chemicals. Follow up with a warm-water rinse. Many people who do this monthly never need to do a deep clean at all.
Method 3: Remove and Soak the Showerhead
For stubborn blockages, taking the head off and soaking it in a bowl of vinegar gives you better results than the bag method because every internal passage gets exposure to the acid.
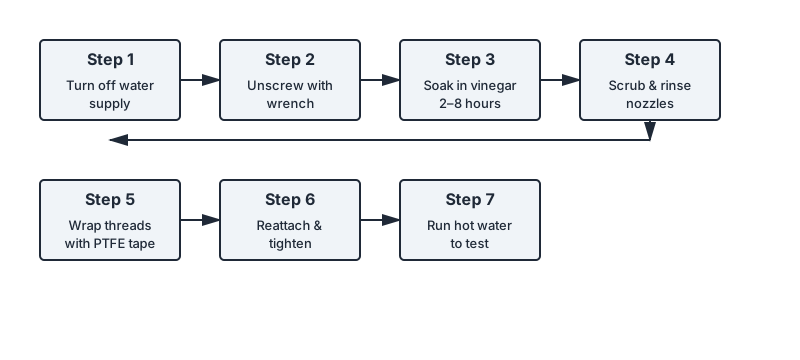
- Turn off the water supply or just make sure no one uses the shower.
- Wrap the connection nut with a cloth to protect the finish, then use an adjustable wrench to loosen it (turn counter-clockwise). Most showerheads unscrew by hand once started.
- Place the head in a bowl or bucket filled with white vinegar. The whole face should be submerged.
- Soak for 2–8 hours, or overnight for severe buildup.
- Remove and rinse under warm running water. Use a toothbrush to scrub the nozzle face and a toothpick or straightened paper clip to clear any individual holes that are still blocked.
- Wrap the shower arm threads with two or three winds of PTFE tape before reattaching — this prevents leaks and makes future removal easier.
- Hand-tighten, then give it a quarter-turn with the wrench. Don’t over-tighten; you can crack plastic components.

Method 4: Use CLR or a Commercial Descaler
White vinegar is acetic acid at roughly 5% concentration. CLR (Calcium, Lime and Rust remover) is a stronger blend of acids and works faster on heavy, long-standing deposits.
Use it the same way — either in a bag or a soaking bowl — but follow the manufacturer’s dilution instructions. CLR typically needs only 2 minutes of contact time for light scale and up to 5 minutes for heavy buildup. Rinse thoroughly, because any residue left in the nozzles will reach you in the next shower.
Important: CLR is not safe for all finishes. Avoid it on brushed nickel, oil-rubbed bronze, and natural stone surrounds unless the manufacturer explicitly says it’s compatible. Vinegar is gentler and safer for most finished surfaces.
Method 5: Clean the Filter Screen
Many showerheads have a small mesh filter screen — sometimes called a flow restrictor or inlet screen — just inside the connection point where the head meets the arm. This screen catches sediment before it reaches the nozzles, and it clogs silently without affecting spray pattern the same way nozzle blockages do. The symptom is reduced overall flow pressure even after you’ve cleaned the nozzles.
- Remove the showerhead as described above.
- Look inside the inlet (the end that connects to the pipe). You’ll usually see a small circular screen, sometimes held in by a plastic ring.
- Use needle-nose pliers or a flathead screwdriver to carefully remove the screen.
- Rinse it under running water and use a toothbrush to remove any sediment. If it’s damaged, replacement screens are available at most hardware stores for under a dollar.
- Reinstall and reattach the showerhead.
This step is frequently overlooked and often explains why pressure doesn’t improve after a vinegar soak.
Method 6: Use Baking Soda for Extra Scrubbing Power
For surface deposits on the showerhead face that vinegar has loosened but not fully cleared, a paste of baking soda and a small amount of water makes an effective mild abrasive.
Apply the paste to the nozzle face, let it sit for 10–15 minutes, then scrub with a toothbrush. The slight abrasiveness of the baking soda physically dislodges residue that acid alone left behind. Rinse thoroughly.
Note: mixing baking soda directly with vinegar in a bowl creates a lot of fizzing that neutralizes both — use them separately. Soak in vinegar first, then scrub with baking soda paste.
Method 7: Full Disassembly for Severe Clogs
If flow is still poor after soaking and screen cleaning, some showerheads can be fully disassembled. This varies by model, but many mid-range and premium heads (brands like Moen, Delta, and Kohler) have removable spray plates or face plates that snap or screw off.
Check your model’s manual or the manufacturer’s website for disassembly instructions. Once open, you can soak individual components and use a straightened paper clip or a thin pick to clear each nozzle hole individually. Reassemble in reverse, replacing any worn O-rings with hardware-store equivalents of the same diameter.
If the showerhead is very old, severely corroded, or constantly clogs despite cleaning, replacing it is often cheaper and faster than trying to restore it. A decent showerhead runs from $20–$60 and will perform better from day one.

Preventing Buildup: Long-Term Habits
Cleaning a showerhead every few months beats doing a major unclog once a year.
- Monthly wipe-down: After showering, wipe the nozzle face with a cloth to remove water droplets before they evaporate and leave deposits.
- Quick weekly scrub: If you have hard water, run your thumb over the nozzles weekly to break off any early-stage buildup.
- Vinegar soak every 3–4 months: A 30-minute soak as routine maintenance prevents the deep calcification that takes hours to fix.
- Shower filter: A showerhead filter or a whole-house water softener reduces mineral load significantly. Filters designed for showers typically use KDF media or activated carbon and need replacement every 6–12 months depending on water hardness.
- Leave ventilation on: A drier bathroom slows mineral deposition slightly, though the main driver is your water’s mineral content, not humidity.
If mineral and grime buildup is a recurring theme in your bathroom, our guide How to Unclog a Drain Naturally: Baking Soda Beats Harsh Chemicals tackles the same issue in a completely different fixture.
Conclusion
Unclogging a showerhead is one of the more satisfying home maintenance tasks — it costs almost nothing, takes an hour or less in most cases, and delivers an immediately noticeable improvement. Start with the bag soak method; it handles the majority of clogs without any tools or disassembly. For anything more stubborn, remove the head, soak it overnight, and don’t forget to check the inlet screen. If you’re in a hard-water area, put a quarterly soak on your calendar and you’ll likely never deal with a fully blocked showerhead again.