How to Make a Perfect Omelette: Technique, Tips & Fillings

Making a perfect omelette is one of those skills that separates cooks who understand heat from cooks who just follow recipes. The technique is simple in concept — eggs, fat, heat — but the details matter enormously. Get them right and you produce something silky, tender, and deeply satisfying in under three minutes. Get them wrong and you have rubbery, browned scrambled eggs wrapped in a skin.
This guide breaks down exactly what to do, why it works, and how to adapt the approach for different styles.
The Egg Mixture: Start Here, Not With the Pan
Before the pan even touches the burner, the egg prep deserves attention.
How Many Eggs?
Three eggs is the standard for a single-serving French omelette. Two eggs produces something too thin to fold cleanly; four eggs starts to feel like a frittata project. For a diner-style omelette, three eggs still holds.
Seasoning and Beating
Season the eggs before beating, not after. Salt draws out moisture over time, so if you salt the beaten eggs and let them sit for 15 minutes, they’ll weep liquid into the pan. Season immediately before cooking — or beat and cook right away.
For the French style, beat with a fork rather than a whisk. A fork breaks the yolks and blends the whites without incorporating a lot of air. The goal is a homogeneous mixture, not a foam. You’ll see the eggs turn uniformly yellow with no streaks of white.
For an American diner-style omelette, a small splash of water (about a teaspoon per egg) adds a little steam during cooking, making the eggs slightly puffier. Some cooks use milk or cream — both work, but they slow the set and can make the egg taste richer than the filling warrants. Water is neutral and effective.

The Fat
Butter is the classic choice and the best for most omelettes. It tells you when the pan is ready (it should foam, then the foam should subside slightly before the eggs go in) and it contributes flavor. Use unsalted butter so you control the salt level. About one tablespoon per three eggs is right — enough to coat the pan generously.
For a higher-heat approach or if you’re watching dairy, a neutral oil works. Olive oil adds a Mediterranean note that pairs well with feta or sun-dried tomato fillings but can feel off with classic French herbs.
The Pan: Size and Material Matter More Than Most Recipes Admit
An 8-inch nonstick pan is the right tool for a three-egg omelette. Too large, and the eggs spread too thin and cook unevenly. Too small, and you can’t maneuver the spatula.
Nonstick makes the fold and slide dramatically easier. Even professional cooks who use carbon steel or stainless for everything else often keep a dedicated nonstick pan for omelettes — one they never use for searing or metal utensils, preserving the coating.
If you’re using stainless, the technique is the same but the margin for error is smaller. The pan must be properly preheated and the butter must be hot enough before the eggs go in, or sticking is almost guaranteed.
The same principles of pan choice and heat control apply beyond eggs, as explained in Pan-Seared Salmon: How to Cook It Perfectly Every Time.
Heat Level
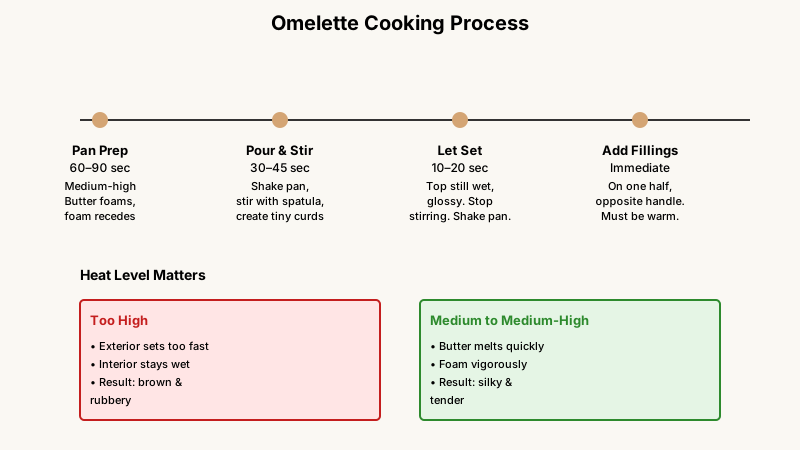
This is where most omelettes go wrong. Medium to medium-high heat is correct — not screaming high, not timid low.
- Too high: the exterior sets before the interior cooks, and you get a brown, rubbery result.
- Too low: the eggs cook slowly, lose moisture, and become tough and dry.
You want the butter to melt quickly, foam vigorously, and the foam to just begin to recede before the eggs go in. That takes roughly 60–90 seconds on a medium-high burner. If the butter browns immediately, the pan is too hot — let it cool briefly.
The Cooking Process, Step by Step
Once the pan is hot and the butter is at the right stage:
- Pour in the eggs all at once. Don’t trickle them in.
- Shake and stir simultaneously. With a heatproof silicone spatula, stir the eggs in small circles while shaking the pan with your other hand. This creates tiny curds across the entire surface and keeps the eggs moving so nothing sets hard on the bottom. Keep doing this for about 30–45 seconds.
- Stop stirring and let it set. When the eggs are mostly cooked but the top still looks wet and slightly glossy, stop stirring. Give the pan a shake to make sure the omelette moves freely.
- Add fillings now. Place them across one half of the omelette — the half opposite the pan handle. Fillings should already be cooked and warm. Raw vegetables will steam and make the egg soggy; cold cheese won’t melt properly.
- Fold and plate. Tilt the pan away from you at about a 45-degree angle over your plate. The omelette will slide toward the far edge. Use the spatula to fold the near half over the filling, then let the pan’s tilt do the final flip onto the plate. The finished omelette should be oval, lightly golden on the outside if you prefer French style, or sealed and pale if you want it very soft.

The French vs. American Style
The French omelette is pale, rolled or folded, and cooked entirely on medium heat with constant movement. The exterior should be smooth and barely colored — almost custard-like at the center. It takes about 90 seconds total.
The American diner omelette is cooked a little longer, often browned slightly on the outside, folded in half rather than rolled, and filled more generously. It’s heartier and more forgiving. Neither style is superior — they serve different moods and menus.
Fillings: What Works, What Doesn’t
The best omelette fillings share one quality: they’re already cooked, or they need no cooking at all.
Classic Combinations
- Fines herbes: chives, parsley, tarragon, and chervil folded in just before the omelette is plated. This is the canonical French version and needs nothing else.
- Cheese: Gruyère, sharp cheddar, or goat cheese all melt well. Add it when the eggs are nearly set so it has time to soften without overcooking the eggs.
- Ham and cheese: diced cooked ham with Swiss is a reliable standard that works at breakfast, lunch, or dinner.
- Mushroom: sauté sliced mushrooms in butter with a little thyme until all the moisture has evaporated. Wet mushrooms will make the omelette soggy.
- Spinach and feta: wilt the spinach first, squeeze out moisture aggressively, then combine with crumbled feta.
- Smoked salmon and crème fraîche: cold smoked salmon placed on the hot egg with a small spoonful of crème fraîche — the residual heat is all you need.
What to Avoid
Avoid fillings with high water content unless you’ve pre-cooked them down: fresh tomatoes, raw bell peppers, and zucchini all release water that turns a good omelette into a soggy mess. Roast or sauté them first.
Avoid overfilling. A three-egg omelette can hold about a quarter-cup of filling comfortably. More than that and the fold becomes difficult and the omelette tears.

Common Mistakes (And How to Fix Them)
The omelette sticks. Either the pan wasn’t hot enough when the eggs went in, or the butter burned off before the eggs set. Solution: preheat longer and don’t let butter sit over heat before adding eggs.
The omelette is rubbery. Cooked too long or at too high a heat. Solution: pull it off the heat slightly underdone — residual heat finishes the job. The center should still look glossy when you fold.
The omelette tears when folding. The eggs were either too thin (too few eggs for the pan size), overcooked before folding, or the filling was too heavy or placed in the center. Solution: keep fillings on one half, fold sooner rather than later.
The eggs are watery. Salt was added and the eggs sat too long before cooking. Solution: salt right before cooking, not before.
Brown on the outside. Heat too high. This is a style choice in American omelettes, but if you want the French pale finish, reduce heat and move the eggs constantly in the first 30 seconds.
A Few Things Worth Knowing About Egg Quality
Fresh eggs with bright orange yolks produce a richer, more flavorful omelette. Pasture-raised eggs tend to have deeper-colored yolks due to diet, though flavor differences are subtle. Room-temperature eggs beat more easily and spread more evenly in the pan — take them out of the refrigerator 15 minutes before cooking if you remember.
Beyond freshness and temperature, the technique will carry you further than egg provenance. Don’t let egg sourcing become a reason to delay cooking.
Good eggs matter for more than omelettes, so if your breakfast repertoire includes batter-based dishes, Fluffy Pancakes from Scratch: Why Batter Falls Flat explains another way ingredient quality can make or break the result.
Conclusion
A perfect omelette isn’t complicated — but it does require paying attention for about three minutes, which is longer than most people think they need to. The keys are simple: season just before cooking, use the right-sized pan with real butter, keep the heat at medium-high, move the eggs constantly at first, and take the omelette off heat while the center still looks slightly underdone.
Master those five things and you have a skill worth using every week. The fillings are just expression — the technique is the foundation.