Free Up Phone Storage: 12 Proven Ways That Actually Work

Running low on phone storage is one of those problems that sneaks up on you. One day your camera roll is fine; the next you’re getting a “Storage Almost Full” warning mid-photo. Before you panic-delete everything or buy a new phone, there’s a structured way to reclaim space — and keep it clear.
This guide covers both Android and iOS devices. The steps differ slightly between platforms, but the underlying logic is the same: find what’s eating your space, decide what stays, and set up habits so the problem doesn’t return.
1. Find Out What’s Actually Taking Up Space
Before deleting anything, look at the breakdown. Both major platforms give you a built-in storage map.
On iPhone: Go to Settings → General → iPhone Storage. You’ll see a color-coded bar and a ranked list of apps with their sizes. Scroll slowly — the sizes next to each app include cached data and documents, not just the app itself.
On Android: Go to Settings → Storage (the exact path varies by manufacturer, but it’s usually under Device Care or Battery and Device Care on Samsung, or directly in Settings on Pixel phones). You’ll see categories: apps, images, videos, audio, documents, and “other.”
The category labeled “Other” or “System” is often a surprise. On some Android devices it can balloon to several gigabytes from cached data and temporary files. Don’t be alarmed — much of it is clearable.

2. Clear App Caches (Without Deleting Your Apps)
Apps accumulate cached files to speed up loading. That’s fine in theory, but over time a single streaming app can cache several gigabytes of data you’ll never consciously use.
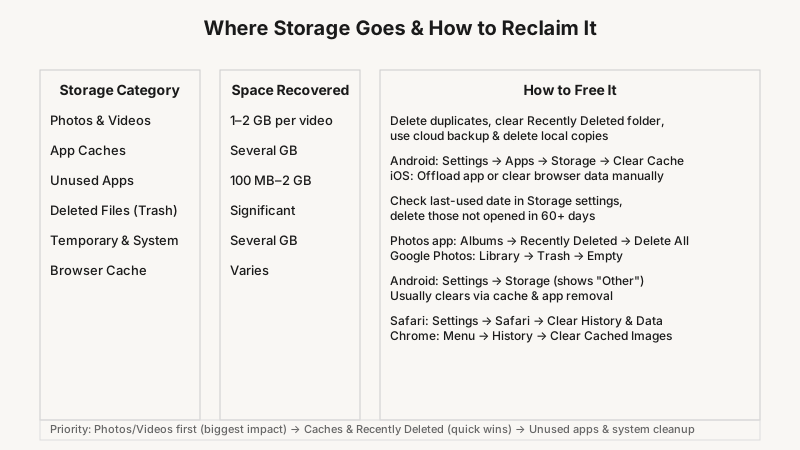
Android: Navigate to Settings → Apps, tap a specific app, then choose Storage → Clear Cache. You don’t need to clear data (which would log you out and erase local progress) — just the cache. Start with your most-used apps: browsers, streaming services, maps, and social media.
iPhone: iOS handles caching differently. You can’t clear just the cache for most apps through Settings. Instead, try offloading the app (Settings → General → iPhone Storage → [App Name] → Offload App). This removes the app binary but keeps your documents and settings. When you reinstall the app, your data comes back. It’s a middle path between keeping and deleting.
For browsers specifically: in Safari, go to Settings → Safari → Clear History and Website Data. In Chrome (on either platform), tap the three-dot menu → History → Clear Browsing Data, and select Cached Images and Files.
3. Audit Your Photo and Video Library
For most people, photos and videos are the single biggest storage consumer. A few minutes of 4K video can eat 1–2 GB on its own.
If you want a more thorough approach to sorting through years of camera roll clutter, How to Organize Digital Photos: A Step-by-Step System walks through a step-by-step system for tackling it.
Delete Duplicates and Near-Duplicates
Both iOS 16 and later and recent versions of Google Photos include built-in duplicate detection. On iPhone, open the Photos app, scroll to the bottom of your Albums list, and tap Duplicates. You can merge them with one tap.
For Android users without Google Photos’ duplicate feature, a third-party app like Remo Duplicate Photos Remover or Gemini Photos (iOS) can scan and group similar shots for review. Always preview before bulk-deleting.
Clear the “Recently Deleted” Folder
This is the most commonly overlooked spot. When you delete a photo, it sits in a “Recently Deleted” or “Trash” folder for 30 days before it’s permanently removed. You need to empty that folder manually to reclaim space immediately. In the Photos app on iPhone, go to Albums → Recently Deleted → Select All → Delete. Google Photos has the same setup under Library → Trash.
Use Cloud Backup — Then Delete Locally
If you use Google Photos or iCloud Photos, once your images are confirmed as backed up, you can free local copies. In Google Photos, look for the Free Up Space option (under your profile icon → Manage Storage). It removes locally stored photos that are safely backed up to the cloud. iCloud Photos does this automatically if you enable Optimize iPhone Storage in Settings → [Your Name] → iCloud → Photos.

4. Remove Apps You Haven’t Used in Months
Most people have a graveyard of apps they downloaded once and never opened again. On iPhone, go to Settings → General → iPhone Storage and look for apps with a “Last Used” date listed beneath them. Any app you haven’t touched in 60+ days is a candidate for deletion.
On Android, Google Play can surface rarely used apps too — but a manual scroll through your app drawer is often faster. Sort by size in Settings → Apps to see the heaviest hitters first.
Pay special attention to:
- Games — even simple ones often cache hundreds of megabytes of assets.
- Old social media apps you no longer use.
- Duplicate tools — a second photo editor or a third messaging app you forgot you installed.
5. Manage Downloads and Offline Content
Streaming services let you download content for offline viewing, which is genuinely useful — but those downloads accumulate fast and rarely get cleaned up.
Check these locations specifically:
- Spotify / Apple Music / YouTube Music: Go to your app’s Downloads or Library section and remove albums or playlists you’ve already listened to.
- Netflix / Disney+: These apps have a Downloads tab. Remove shows you’ve finished.
- Podcasts: Podcast apps often auto-download new episodes without deleting old ones. Dig into the settings and enable auto-delete after listening.
- Google Maps / Apple Maps / offline navigation: If you downloaded region maps for a trip, delete them once you’re home. Each region can be several hundred MB to over 1 GB.
6. Move Files to External or Cloud Storage
If you need to keep large files — a locally saved video, a PDF library, work documents — consider moving them off the device entirely.
Cloud options: Google Drive, iCloud Drive, Dropbox, and OneDrive all offer free tiers (typically 5–15 GB) and paid expansions. Upload your files, confirm they’re accessible, then delete the local copy.
Physical external storage: Android users with a USB-C port can connect a flash drive using an OTG (On-The-Go) adapter and move files directly. Some Android phones still support microSD cards — check your model’s spec sheet. iPhone users can use Lightning or USB-C flash drives designed for iOS (brands like SanDisk and Western Digital make them), though this is more of a power-user option.
7. Check Messaging Apps for Hidden Bulk
Messaging apps quietly accumulate enormous amounts of media. WhatsApp is a common offender: every photo, video, voice note, and document sent or received is saved locally by default.
WhatsApp (Android & iOS): Go to Settings → Storage and Data → Manage Storage. You’ll see a breakdown by conversation, sorted by size. You can select and delete media from specific chats without deleting the conversation itself.
iMessage: On iPhone, go to Settings → General → iPhone Storage → Messages. Tap Review Large Attachments to see a ranked list of the largest files you’ve received. You can delete individual items without losing the message thread.
Telegram: Go to Settings → Data and Storage → Storage Usage → Clear Telegram Cache. Telegram caches aggressively and can eat gigabytes without you realizing it.

8. Reset and Restart to Clear Temporary Files
A simple phone restart clears some temporary files and RAM cache. It’s not a major space reclaimer, but it’s a useful baseline step before you audit storage numbers — because some inflated readings reflect in-use temporary data that disappears after a reboot.
For a deeper clean on Android, some devices offer a Device Care or Optimize Now function that flushes junk files with one tap. Use it, but don’t rely on it as your primary strategy.
9. Reduce the Size of Future Files
Freeing up space once is a good fix; not filling it back up is the real goal.
- Lower your camera resolution for everyday shots. If you’re not printing large-format photos, shooting at maximum resolution (50MP+ on flagship phones) generates files 3–5x larger than you need for social sharing or family albums. Most camera apps let you set a default resolution.
- Disable automatic media saving from apps. Instagram, WhatsApp, and TikTok can be set to not save every photo or video to your camera roll. Find the option in each app’s settings.
- Use streaming over downloading. Only download music or podcasts when you need offline access (flights, travel). Otherwise, stream.
10. Factory Reset as a Last Resort
If your phone is deeply cluttered and you’ve been using it for years, a factory reset wipes everything and returns it to a fresh state. This is nuclear — back up your contacts, photos, and app data before you do it.
On iPhone: Settings → General → Transfer or Reset iPhone → Erase All Content and Settings. On Android: Settings → General Management → Reset → Factory Data Reset.
This is rarely necessary just for storage, but if you’re also experiencing slowdowns and software glitches, a reset kills two birds with one stone.
Building a Storage Habit That Lasts
The best storage strategy isn’t a one-time cleanup — it’s light maintenance every few weeks. Try this:
- Set a monthly reminder to empty the Recently Deleted folder in Photos.
- Review app usage every two months and delete anything unused.
- Clear your browser cache once a month.
- After any trip, offload photos to a cloud backup and delete downloaded maps.
- Check messaging app storage quarterly — especially if you’re in active group chats.
With these habits, you’ll rarely hit the panic point again. Phone storage problems are almost always a maintenance issue, not a hardware one. A methodical approach — check what’s there, remove what you don’t need, prevent future buildup — keeps most phones running comfortably without spending a cent.
The same organizing mindset applies beyond your phone, and Best Storage Bins for Decluttering Closets: A Buyer’s Guide can help you keep the decluttering momentum going at home too.