Homemade Pizza Dough Recipe: Crispy, Chewy, Perfect
Disclosure: This post may contain affiliate links. We may earn a commission at no extra cost to you. See our Affiliate Disclosure.

Making pizza dough from scratch sounds like a weekend project, but once you’ve done it a couple of times, it takes about 10 minutes of hands-on work. The payoff — a crust that blisters beautifully in a hot oven, with a flavor no store-bought dough can touch — is absolutely worth it.
This recipe is built around a few principles: proper hydration, a slow cold ferment for depth of flavor, and a bake temperature that most home cooks don’t push high enough. Let’s break it all down.
The Ingredients (and Why They Matter)
You don’t need anything exotic. Here’s what goes into a classic Neapolitan-style dough, scaled for two 12-inch pizzas:
- 300g (2½ cups) bread flour — Higher protein content (around 12–13%) means more gluten development, which gives you that satisfying chew. All-purpose flour works, but the crust will be slightly softer.
- 195g (¾ cup + 2 tbsp) cold water — That’s a hydration of 65%, a good starting point for a workable, non-sticky dough. Beginners can drop to 60% if the dough feels unmanageable.
- 6g (1 tsp) fine sea salt — Don’t skimp. Salt controls fermentation, tightens gluten structure, and is the single biggest flavor lever you have.
- 3g (¾ tsp) instant dry yeast — This is enough for an overnight cold ferment. If you’re baking same-day, bump it to 7g (2¼ tsp) and use warm water instead.
- 5g (1 tsp) olive oil — Optional, but it adds a slight richness and keeps the crust from drying out. Traditionalist Neapolitan recipes leave it out entirely.
A Note on Flour Types
If you can find 00 flour (the ultra-fine Italian milling grade), use it. It absorbs water differently and produces a silkier dough that’s easier to stretch thin without tearing. King Arthur 00 Pizza Flour and Caputo Pizzeria are two widely available options. That said, standard bread flour produces excellent results and is far easier to source.
Step-by-Step Method
1. Mix the Dough
Combine the flour and yeast in a large bowl and stir briefly. Add the salt (keep it separate from the yeast initially — direct salt contact can inhibit yeast activity). Pour in the cold water and olive oil, then mix with a fork or your hand until no dry flour remains. The dough will look rough and shaggy. That’s fine.
Let it rest, uncovered, for 20 minutes. This is autolyse — a short rest that lets the flour hydrate fully and kick-starts gluten development without any kneading. After the rest, the dough will be noticeably smoother.
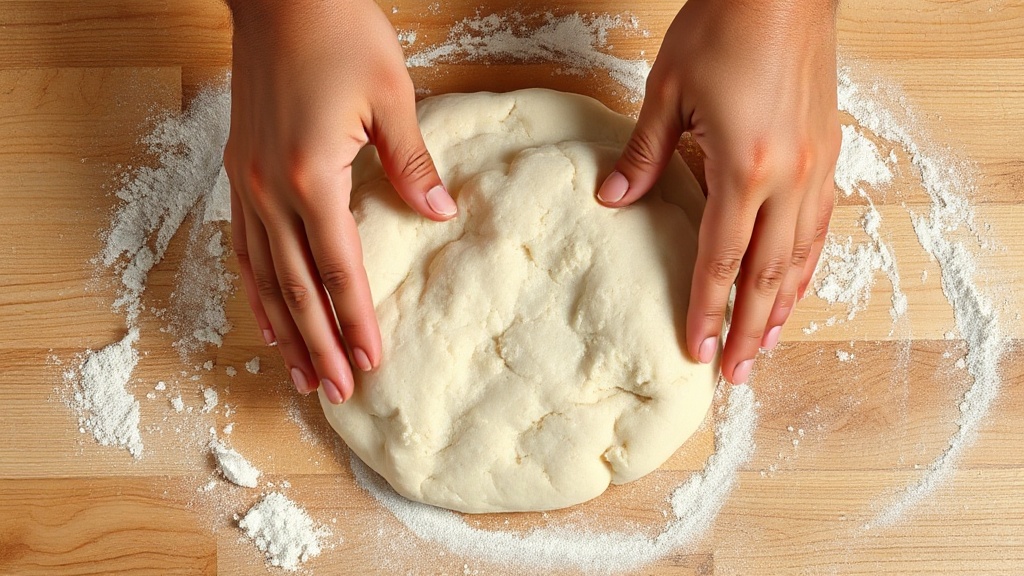
2. Knead
Turn the dough onto a clean surface (no extra flour yet) and knead for 8–10 minutes. You’re looking for a dough that passes the windowpane test: stretch a small piece between your fingers — if it stretches thin enough to see light through without tearing, the gluten network is developed. If it tears, knead another 2 minutes.
Alternatively, use a stand mixer with a dough hook on medium speed for 6–7 minutes. The result is identical.
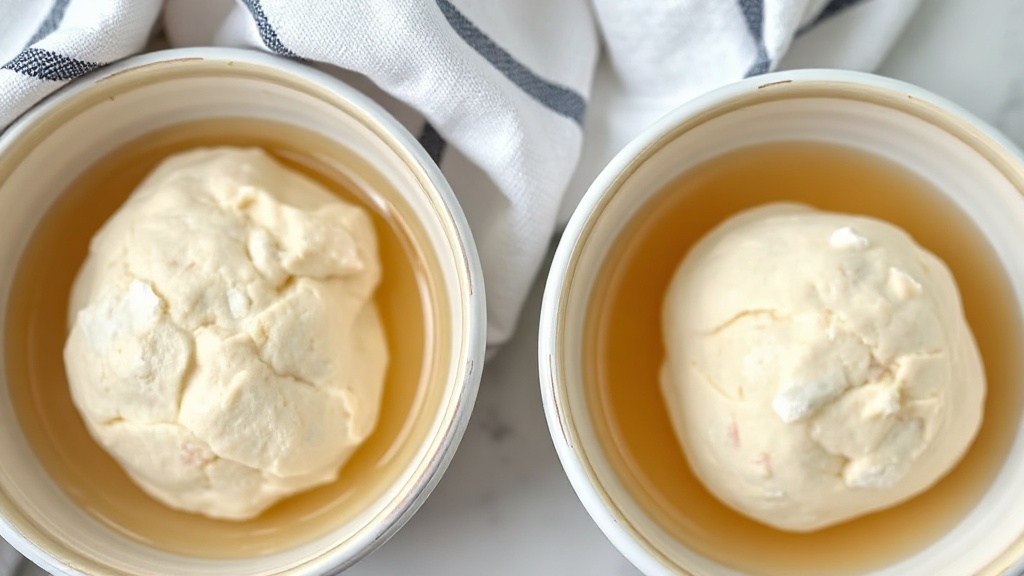
3. Cold Ferment Overnight (Highly Recommended)
Divide the dough into two equal balls (roughly 250g each), place each in a lightly oiled container or zip-lock bag, and refrigerate for 24–72 hours. Cold fermentation is where most of the flavor develops. Yeast metabolizes slowly at low temperatures, producing complex organic acids and CO2 that create bubbles in the crumb and a slightly tangy edge to the crust.
If you’re short on time, a same-day ferment works too: let the covered dough balls rise at room temperature for 1.5–2 hours until roughly doubled in size. The flavor won’t be as complex, but the texture will still be excellent.
4. Shape the Dough
About an hour before baking, pull the dough from the fridge and let it come to room temperature. Cold dough is tight and springy — it fights you. Room-temperature dough stretches willingly.
Flour your hands and work surface lightly. Flatten each ball into a disc using your fingertips, pressing from the center outward. Then lift the disc and use your knuckles underneath to stretch it gently, rotating as you go. Aim for 12 inches in diameter with a raised rim around the edge.
What to avoid: a rolling pin. It presses out all the gas bubbles you spent 24 hours building. The crust will be flat and dense. Use your hands.
5. Bake It Hot
This is where most home pizza fails. A standard home oven maxes out at 500–550°F (260–290°C). You want every single degree of that.
Option A: Pizza stone or baking steel. Place it on the top rack of your oven and preheat for at least 45 minutes. A baking steel (like the Baking Steel brand) retains and conducts heat far better than a stone, cutting bake time to roughly 6–8 minutes and producing a better char on the bottom. Transfer the topped pizza onto it using a floured pizza peel or the back of a baking sheet.
Option B: Cast-iron pan or sheet pan. Not quite as good, but perfectly workable. Heat the pan in the oven for 10 minutes, then carefully slide the shaped dough in before topping.
Bake until the crust is golden with dark-brown spots, and the cheese is bubbling and starting to color — typically 7–10 minutes depending on your oven.
Troubleshooting Common Problems
Dough keeps springing back when I stretch it. It’s too cold or too tight. Cover it and let it rest for 10–15 more minutes at room temperature. The gluten will relax.
Dough is sticky and impossible to handle. Slightly wet hands are your friend — don’t load up on flour, which will toughen the crust. A 60% hydration dough is also easier to handle than 65% if you’re new to this.
The crust is pale and soft, not crispy. Your oven or baking surface wasn’t hot enough, or the pizza spent too long in the oven at a lower temperature. Crank the heat and shorten the bake time.
There are big bubbles forming in the crust. That’s actually a good sign — it means your fermentation was active. If they’re too large, pop them gently with a fork before baking.
The bottom is burning before the top is done. Move the rack up. Conversely, if the top browns before the bottom crisps, move the rack down or switch to broil for the last 2 minutes.

Storing and Freezing Dough
Refrigerated dough keeps for up to 72 hours without flavor degrading. After that, the yeast starts to over-ferment and the dough develops an overly sour, alcohol-forward flavor.
For longer storage, freeze the dough balls after the initial cold ferment. Wrap each ball tightly in plastic wrap, then put them in a freezer bag. They keep for up to 3 months. To use, thaw overnight in the refrigerator, then follow the usual room-temperature rest before shaping.
Topping Ratios Worth Knowing
Homemade dough deserves restraint on the toppings. For a 12-inch pizza:
- Sauce: 3–4 tablespoons (about 60–80g). More than this and the crust goes soggy.
- Cheese: 80–100g of fresh mozzarella (or about ¾ cup of low-moisture shredded). Pile on too much and it pools into a greasy puddle.
- Toppings: Keep it to 2–3 items. Each additional ingredient adds moisture and weight, both enemies of a crispy crust.
If you’re using fresh mozzarella, tear it by hand and pat the pieces dry with paper towels before topping. The excess moisture is the main culprit behind watery, disappointing pizza.
Final Thoughts
The gap between homemade pizza dough made with care and the kind you’d buy from the store isn’t subtle. It’s the difference between a crust that has character — slight tang, irregular bubbles, a crisp underside that gives way to a chewy crumb — and one that’s just a vehicle for toppings.
The overnight cold ferment is the single most impactful thing you can do. It costs zero extra effort (just time) and transforms a decent crust into something you’d pay restaurant prices for. Try it once, and you probably won’t go back to same-day dough.
Start simple: bread flour, a long cold rise, a very hot oven. You can spend years refining ratios and techniques, but those three things will get you 80% of the way there on the first bake.